This is part 3 of a multi-part series that looks at some basic Android I/O using simple Hello World programs. At this point I’ll assume you know how to make a new Android Project in Eclipse as that was covered in Part 1. In this part we are going to look at two types of pop-up messages that allow you to communicate with the user outside of the normal program flow.
The first line of code we added to the default code generated by the project was this.
Toast helloToast = Toast.makeText(this, “Hello World”, Toast.LENGTH_LONG);
This line of code calls the Static method makeText of the Toast class. The makeText method returns a Toast object that will display the message you provide, in our case “Hello World”, for the duration you specify. The two available durations are Toast.LENGTH_LONG and Toast.LENGTH_SHORT. Once we have our Toast object we can just call the show method to display it on the screen. Before displaying our toast, however, I thought I would center it on the screen. The setGravity method lets you tell Android where the toast should be displayed by using one of the Gravity constants, and then specifying an x offset and y offset. Since I wanted it in the very center of the screen I used Gravity.Center and specified offsets of 0.
helloToast.setGravity(Gravity.CENTER, 0, 0);
You can see a list of available Gravity constants here. When you run this code you should see a small pop-up with the message “Hello World” appear, and then disappear automatically without any user interaction. On the next page we’ll look at a pop-up that requires user interaction.
The lines we’ve added are:
The AlertDialog Class makes use of the Builder Class AlertDialogBuilder. So in the first line when we call:
AlertDialog helloAlert = new AlertDialog.Builder(this).create();
We are using the Builder to return an AlertDialog object to us that is already partially setup for our use. The next two lines use setTitle and setMessage to set the text displayed to the user in the dialog’s title section and body respectively. Finally, we need to have a way for the user to actually interact with our alert. At minimum we should have a close button so the user can make the alert go away. We use setButton, passing it the text that should be displayed on the button, and an event that allows us to perform actions when the button is clicked. By default, the dialog will be closed on a click event so we don’t need to put any code into our event. Finally we call the show method, like we did with toast, to display our Hello World pop-up.
While that technically finishes both of our Hello World pop-up programs I want to take a moment to examine the buttons on the AlertDialog.
In SDK 1.1 there were three methods we used to make buttons in our AlertDialog: setButton, setButton2, and setButton3. In our example here we are only using setButton. That will give us a single button that is centered horizontally in the AlertDialog. If we also called setButton2 we would have two buttons side by side with our first button on the left and our second button on the right. If we include all three buttons like this:
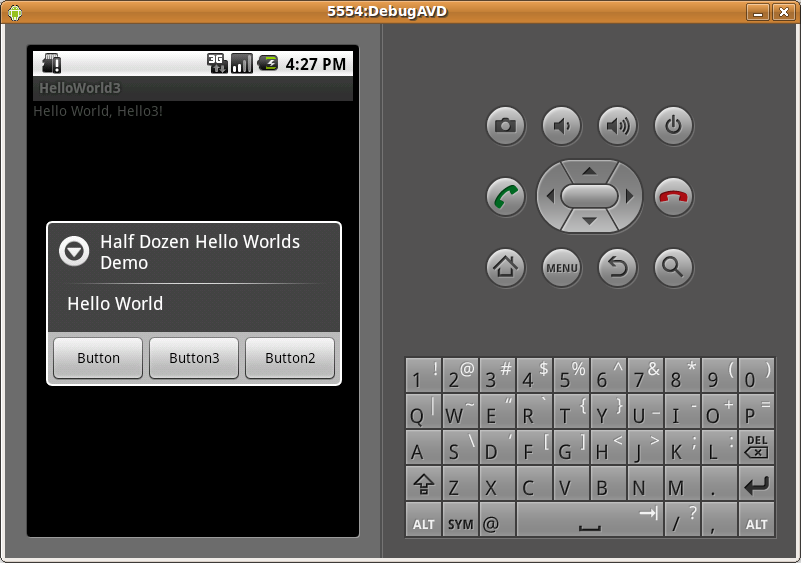
We would see our first button on the far left, the second on the far right, and the third in the middle like so.

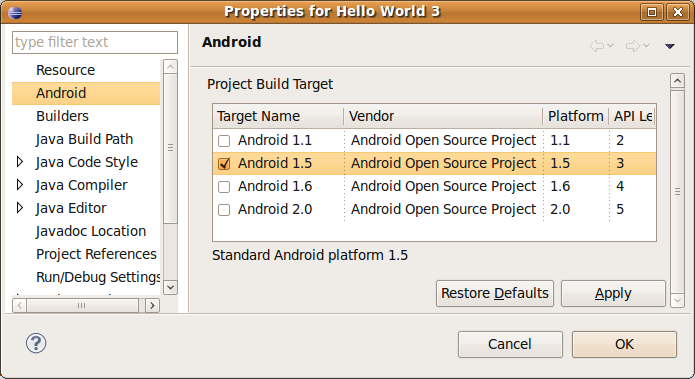
If the numbering seems a little arbitrary to you then you may not be alone since these methods were deprecated. Let’s build this code using a more recent Android SDK. Right click on your project, and click on Properties. Click on Android, and click on the check mark next to either Android 1.5, Android 1.6, or Android 2.0. Then click Apply, and then OK.

Go to your code and replace this code block
With this:
You can see that the new method for adding buttons is to call one single method (setButton) and pass a constant telling Android how to render it.
This is the end of our introduction to popup notifications, but come back for Part 4 where we will use Text to Speech to make your Android Device actually say “Hello World.”
Toasts
Imagine you are at a large dinner party. You want to make a toast to your host. You raise your glass a call out a toast. Half the people at the party don’t notice (none of the kids at the kids table notice at all), but you aren’t worried about that as you clink glasses with the dozen people who did notice. The first pop-up we are going to look at is Android’s Toast, which does exactly this. It allows you to present a message to the user without any confirmation that they noticed the message. Build a new project using Android SDK 1.1 and update your Activity Java to look like this.package com.learnandroid.helloworld; import android.app.Activity; import android.os.Bundle; import android.view.Gravity; import android.widget.Toast; public class Hello3 extends Activity { /** Called when the activity is first created. */ @Override public void onCreate(Bundle savedInstanceState) { super.onCreate(savedInstanceState); setContentView(R.layout.main); Toast helloToast = Toast.makeText(this, "Hello World", Toast.LENGTH_LONG); helloToast.setGravity(Gravity.CENTER, 0, 0); helloToast.show(); } }
Toast helloToast = Toast.makeText(this, “Hello World”, Toast.LENGTH_LONG);
This line of code calls the Static method makeText of the Toast class. The makeText method returns a Toast object that will display the message you provide, in our case “Hello World”, for the duration you specify. The two available durations are Toast.LENGTH_LONG and Toast.LENGTH_SHORT. Once we have our Toast object we can just call the show method to display it on the screen. Before displaying our toast, however, I thought I would center it on the screen. The setGravity method lets you tell Android where the toast should be displayed by using one of the Gravity constants, and then specifying an x offset and y offset. Since I wanted it in the very center of the screen I used Gravity.Center and specified offsets of 0.
helloToast.setGravity(Gravity.CENTER, 0, 0);
You can see a list of available Gravity constants here. When you run this code you should see a small pop-up with the message “Hello World” appear, and then disappear automatically without any user interaction. On the next page we’ll look at a pop-up that requires user interaction.
Alerts
When I was a kid I used to love The Great Muppet Caper. I vividly remember a scene where Gonzo shouts, “Stop the Presses!” The editor asks him what happened and he says, “I just always wanted to say that.” If you want a pop-up that makes sure it gets attention (whether something important happened or not) then an Alert might be just what you need. Let’s update our Java Activity to look like this:package com.learnandroid.helloworld; import android.app.Activity; import android.app.AlertDialog; import android.content.DialogInterface; import android.os.Bundle; public class Hello3 extends Activity { /** Called when the activity is first created. */ @Override public void onCreate(Bundle savedInstanceState) { super.onCreate(savedInstanceState); setContentView(R.layout.main); AlertDialog helloAlert = new AlertDialog.Builder(this).create(); helloAlert.setTitle("Half Dozen Hello Worlds Demo"); helloAlert.setMessage("Hello World"); helloAlert.setButton("Close", new DialogInterface.OnClickListener() { @Override public void onClick(DialogInterface arg0, int arg1) {} }); helloAlert.show(); } }
AlertDialog helloAlert = new AlertDialog.Builder(this).create();
        helloAlert.setTitle("Half Dozen Hello Worlds Demo");
        helloAlert.setMessage("Hello World");
        helloAlert.setButton("Close", new DialogInterface.OnClickListener() {
   @Override
   public void onClick(DialogInterface arg0, int arg1) {}
  });
        helloAlert.show();
AlertDialog helloAlert = new AlertDialog.Builder(this).create();
We are using the Builder to return an AlertDialog object to us that is already partially setup for our use. The next two lines use setTitle and setMessage to set the text displayed to the user in the dialog’s title section and body respectively. Finally, we need to have a way for the user to actually interact with our alert. At minimum we should have a close button so the user can make the alert go away. We use setButton, passing it the text that should be displayed on the button, and an event that allows us to perform actions when the button is clicked. By default, the dialog will be closed on a click event so we don’t need to put any code into our event. Finally we call the show method, like we did with toast, to display our Hello World pop-up.
While that technically finishes both of our Hello World pop-up programs I want to take a moment to examine the buttons on the AlertDialog.
In SDK 1.1 there were three methods we used to make buttons in our AlertDialog: setButton, setButton2, and setButton3. In our example here we are only using setButton. That will give us a single button that is centered horizontally in the AlertDialog. If we also called setButton2 we would have two buttons side by side with our first button on the left and our second button on the right. If we include all three buttons like this:
AlertDialog helloAlert = new AlertDialog.Builder(this).create();
        helloAlert.setTitle("Half Dozen Hello Worlds Demo");
        helloAlert.setMessage("Hello World");
        helloAlert.setButton("Button", new DialogInterface.OnClickListener() {
   @Override
   public void onClick(DialogInterface arg0, int arg1) {}
  });
        helloAlert.setButton2("Button2", new DialogInterface.OnClickListener() {
   @Override
   public void onClick(DialogInterface arg0, int arg1) {}
  });
        helloAlert.setButton3("Button3", new DialogInterface.OnClickListener() {
   @Override
   public void onClick(DialogInterface arg0, int arg1) {}
  });
        helloAlert.show();

If the numbering seems a little arbitrary to you then you may not be alone since these methods were deprecated. Let’s build this code using a more recent Android SDK. Right click on your project, and click on Properties. Click on Android, and click on the check mark next to either Android 1.5, Android 1.6, or Android 2.0. Then click Apply, and then OK.

Go to your code and replace this code block
helloAlert.setButton("Button", new DialogInterface.OnClickListener() {
   @Override
   public void onClick(DialogInterface arg0, int arg1) {}
  });
        helloAlert.setButton2("Button2", new DialogInterface.OnClickListener() {
   @Override
   public void onClick(DialogInterface arg0, int arg1) {}
  });
        helloAlert.setButton3("Button3", new DialogInterface.OnClickListener() {
   @Override
   public void onClick(DialogInterface arg0, int arg1) {}
  });
helloAlert.setButton(AlertDialog.BUTTON_POSITIVE, "Button", new DialogInterface.OnClickListener() {
   @Override
   public void onClick(DialogInterface arg0, int arg1) {}
  });
        helloAlert.setButton(AlertDialog.BUTTON_NEGATIVE,"Button2", new DialogInterface.OnClickListener() {
   @Override
   public void onClick(DialogInterface arg0, int arg1) {}
  });
        helloAlert.setButton(AlertDialog.BUTTON_NEUTRAL ,"Button3", new DialogInterface.OnClickListener() {
   @Override
   public void onClick(DialogInterface arg0, int arg1) {}
  });
This is the end of our introduction to popup notifications, but come back for Part 4 where we will use Text to Speech to make your Android Device actually say “Hello World.”


No comments:
Post a Comment