Pages

Friday, May 20, 2011

Create SD Card in Android Emulator and copy files into, in Eclipse, Emulator and DDMS.

In my previous articles, I described how to Create an SD Card to existing AVD, and Copying Files to a Disk Image in ubuntu host system using text commands in Terminal.

Now, I have another approach using in Eclipse, Emulator and DDMS. May be it's more easy, at least no need to remember the text commands.

Create a new AVD in Eclipse:

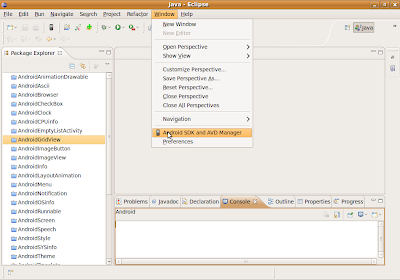
- Start Eclipse, click Window on the top menu, and click Android SDK and AVD Manager.
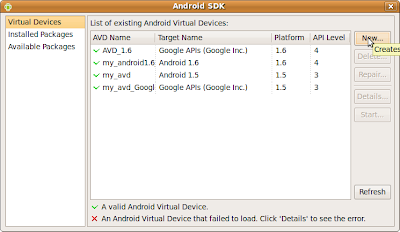
- New a AVD


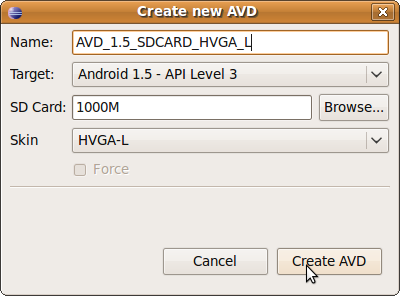
- Name your new AVD, select Target, type 1000M in SD Card and select skin. Click Create.
note: SD Card must be either a file path or a size such as 128K 0r 64M. type 1000M now to create a SD Card of 1G.

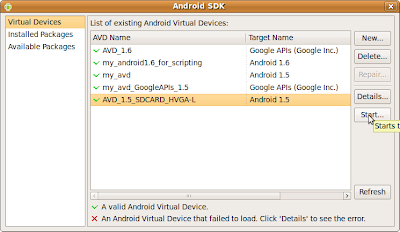
- Select and Start the new AVD.


After the Emulator started, you can close the AVD Manager.

Create folder in SDCard

I can't find any File Manager in Android Emulator. Fortunately, Android Emulator provide a DevTools with Terminal, so you can create a folder using Linux command inside Android Emulator.

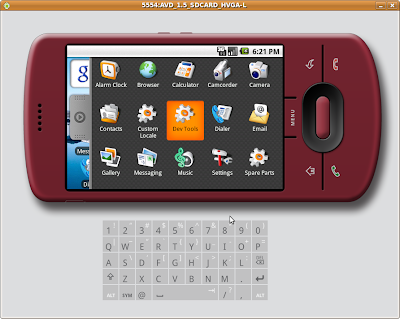
- Click the ARROW on the screen to display the available application.

- Click DevTools.


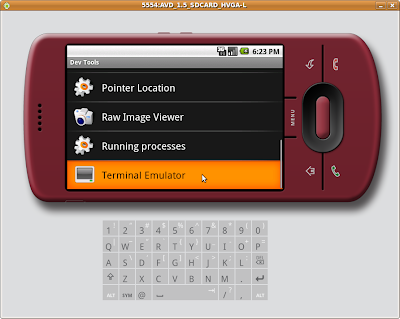
- Scroll down to start Terminal Emulator


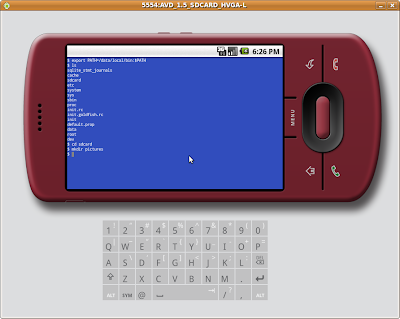
- It's the same a terminal in Linux, you can ls to view the current files and folders in your $home.


- Now change into sdcard and create a folder, say pictures.
$cd sdcard
$mkdir pictures

It's the only two line of command in this approach.


Copy files from your host system into Android SDCard

- With the Emulator is running. Now go back to Eclipse, switch to DDMS Perspective

Click the arrow on the menu bar and select DDMS

or

Click Window > Open Perspective > others > to select DDMS

- Select the device in the window on the left, eg. emulator-5554.
(Without select the device, you will fail in copying files into.)

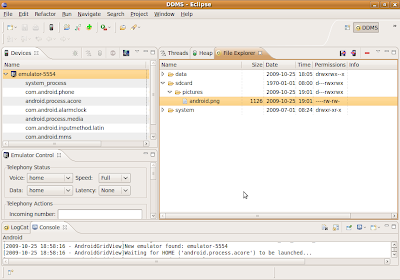
- In DDMS, select File Explorer tag in the window on the right. Expend sdcard folder. Now, you can see the pictures folder in the tree. And also, you can see the Permissions of the folder.


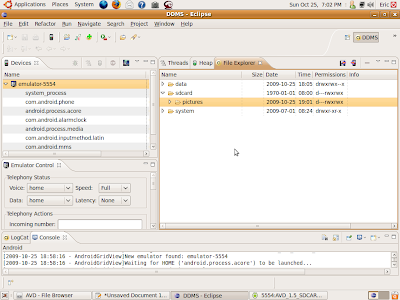
- Select the pictures folder, and click Push a file onto the device .

- Browse to and select the files from your host, to push onto the Android Emulator.

- Further expend the folder pictures, you can see the new file here.

HelloGallery, read picture files from SD, using File ArrayList

It extend from previous exercise, HelloGallery, using Gallery Widget, but read files from SD instead of R.drawable.


Firstly, you have to Create an SD Card to existing AVD and Copying Files to a Disk Image.

All the xml files are same as previous, just keep it no change.

Modify the HelloGallery.java:

package com.exercise.HelloGallery;

import java.io.File;
import java.util.ArrayList;
import java.util.List;

import android.app.Activity;
import android.content.Context;
import android.content.res.TypedArray;
import android.graphics.Bitmap;
import android.graphics.BitmapFactory;
import android.os.Bundle;
import android.view.View;
import android.view.ViewGroup;
import android.widget.AdapterView;
import android.widget.BaseAdapter;
import android.widget.Gallery;
import android.widget.ImageView;
import android.widget.AdapterView.OnItemClickListener;

public class HelloGallery extends Activity {
/** Called when the activity is first created. */
@Override
public void onCreate(Bundle savedInstanceState) {
    super.onCreate(savedInstanceState);
    setContentView(R.layout.main);

    Gallery g = (Gallery) findViewById(R.id.gallery);
    g.setAdapter(new ImageAdapter(this, ReadSDCard()));

    g.setOnItemClickListener(new OnItemClickListener() {
        public void onItemClick(AdapterView<?> parent,
          View v, int position, long id) {
        }
    });
}

private List<String> ReadSDCard()
{
 List<String> tFileList = new ArrayList<String>();

 //It have to be matched with the directory in SDCard
 File f = new File("/sdcard/pictures/");

 File[] files=f.listFiles();

 for(int i=0; i<files.length; i++)
 {
  File file = files[i];
  /*It's assumed that all file in the path
    are in supported type*/
  tFileList.add(file.getPath());
 }

 return tFileList;
}

public class ImageAdapter extends BaseAdapter {
    int mGalleryItemBackground;
    private Context mContext;
    private List<String> FileList;

    public ImageAdapter(Context c, List<String> fList) {
        mContext = c;
        FileList = fList;
        TypedArray a = obtainStyledAttributes(R.styleable.Theme);
        mGalleryItemBackground = a.getResourceId(
          R.styleable.Theme_android_galleryItemBackground,
          0);
        a.recycle();
    }

    public int getCount() {
        return FileList.size();
    }

    public Object getItem(int position) {
        return position;
    }

    public long getItemId(int position) {
        return position;
    }

    public View getView(int position, View convertView,
      ViewGroup parent) {
        ImageView i = new ImageView(mContext);

        Bitmap bm = BitmapFactory.decodeFile(
          FileList.get(position).toString());
        i.setImageBitmap(bm);
    
        i.setLayoutParams(new Gallery.LayoutParams(150, 100));
        i.setScaleType(ImageView.ScaleType.FIT_XY);
        i.setBackgroundResource(mGalleryItemBackground);
    
        return i;
    }
}
}

Copying Files to a Disk Image

Once you have created the disk image, you can copy files to it prior to loading it in the emulator. To copy files, you can mount the image as a loop device and then copy the files to it, or you can use a utility such as mtools to copy the files directly to the image. The mtools package is available for Linux, Mac, and Windows.

Here, I will mount and copy files to emulator SD Card as a loop device.

In Unix-like operating systems, a loop device, vnd (vnode disk), or lofi (loopback file interface) is a pseudo-device that makes a file accessible as a block device.

Create a directory, named SD in my home.

Type the command in Terminal:
$sudo mount -o loop /home/eric/.android/avd/my_avd_GoogleAPIs_1.5.avd/sdcard.img /home/eric/sd

Where /home/eric/sd is the directory mounted to be accessed.
/home/eric/.android/avd/my_avd_GoogleAPIs_1.5.avd/sdcard.img is the SDCard image created for Android Emulator.

Now, you can create directory, copy files to the emulator's SDCard by SD.

$cd sd
$sudo mkdir pictures
$cd pictures
$sudo cp /home/eric/SDCard_16M.png .
$...

To know more details of the command mount, type
$man mount

Create an SD Card to existing AVD

Here, I want to create an SD Card image to an AVD.

- Firstly, locate the path of your AVD, type the command in Terminal:
$android list avd

- Create a SDCard image, named "sdcard.img" (it's the default name for the emulator to load).
In my case, I want to add 16M SD Card to the /home/eric/.android/avd/my_avd_GoogleAPIs_1.5.avd.

$mksdcard 16M /home/eric/.android/avd/my_avd_GoogleAPIs_1.5.avd/sdcard.img

where /home/eric/.android/avd/my_avd_GoogleAPIs_1.5.avd/ is the path of my avd.


Restart the emulator, click Menu in Android Home screen, then click Settings > SD Card & phone storage. Now, you can see the SD Card here.

With 16M SD Card:


Without SD Card, before adding the SDCard image:

HelloGallery, using Gallery Widget.

Here is a exercise to implement a picture view using Gallery, a view that shows items in a center-locked, horizontally scrolling list.


Basically, this exercise follow the Android Tutorial, Hello Gallery. But in my practice, error is complained in building. I have to create a attrs.xml and modify some code to fix it.

Here is how I fix it to make it work.

Create a Android Application, HelloGallery. Copy some images, in .png format, into res/drawable/ directory. Named image_01..05.png in my case.

Android supports bitmap resource files in a few different formats: png (preferred), jpg (acceptable), gif (discouraged). The bitmap file itself is compiled and referenced by the file name without the extension (so res/drawable/my_picture.png would be referenced as R.drawable.my_picture).

Create res/values/attrs.xml to define Theme_android_galleryItemBackground.
<?xml version="1.0" encoding="utf-8"?>
<resources>
<declare-styleable name="Theme">
<attr name="android:galleryItemBackground" />
</declare-styleable>
</resources>


Modify main.xml to have a Gallery in the screen.
<?xml version="1.0" encoding="utf-8"?>
<Gallery xmlns:android="http://schemas.android.com/apk/res/android"
android:id="@+id/gallery"
android:layout_width="fill_parent"
android:layout_height="wrap_content"
/>


Finally, modify the HelloGallery.java
package com.exercise.HelloGallery;

import android.app.Activity;
import android.content.Context;
import android.content.res.TypedArray;
import android.os.Bundle;
import android.view.View;
import android.view.ViewGroup;
import android.widget.AdapterView;
import android.widget.BaseAdapter;
import android.widget.Gallery;
import android.widget.ImageView;
import android.widget.Toast;
import android.widget.AdapterView.OnItemClickListener;

public class HelloGallery extends Activity {
/** Called when the activity is first created. */
@Override
public void onCreate(Bundle savedInstanceState) {
   super.onCreate(savedInstanceState);
   setContentView(R.layout.main);

   Gallery g = (Gallery) findViewById(R.id.gallery);
   g.setAdapter(new ImageAdapter(this));

   g.setOnItemClickListener(new OnItemClickListener() {
       public void onItemClick(AdapterView<?> parent,
           View v, int position, long id) {
           Toast.makeText(HelloGallery.this, "" + position,
               Toast.LENGTH_SHORT).show();
       }
   });
}

public class ImageAdapter extends BaseAdapter {
   int mGalleryItemBackground;
   private Context mContext;

   private Integer[] mImageIds = {
           R.drawable.image_01,
           R.drawable.image_02,
           R.drawable.image_03,
           R.drawable.image_04,
           R.drawable.image_05
   };

   public ImageAdapter(Context c) {
       mContext = c;
       TypedArray a = obtainStyledAttributes(R.styleable.Theme);
       mGalleryItemBackground = a.getResourceId(
         R.styleable.Theme_android_galleryItemBackground,
                   0);
       a.recycle();
   }

   public int getCount() {
       return mImageIds.length;
   }

   public Object getItem(int position) {
       return position;
   }

   public long getItemId(int position) {
       return position;
   }

   public View getView(int position,
       View convertView, ViewGroup parent) {
       ImageView i = new ImageView(mContext);

       i.setImageResource(mImageIds[position]);
       i.setLayoutParams(new Gallery.LayoutParams(150, 100));
       i.setScaleType(ImageView.ScaleType.FIT_XY);
       i.setBackgroundResource(mGalleryItemBackground);

       return i;
   }
}
}

Exercise: Change background color, by SeekBar


In this exercise, the background color is changed, controlled by SeekBar.

A SeekBar is an extension of ProgressBar that adds a draggable thumb. The user can touch the thumb and drag left or right to set the current progress level or use the arrow keys.

When SeekBarChange, the onProgressChanged() of OnSeekBarChangeListener will be called, and the background of the screen(LinearLayout) will be updated according to the value (SeekBar.getProgress()).

Create a Android Application, SeekColor, with three SeekBar for Red, Green and Blue setting.

main.xml
<?xml version="1.0" encoding="utf-8"?>
<LinearLayout xmlns:android="http://schemas.android.com/apk/res/android"
android:orientation="vertical"
android:layout_width="fill_parent"
android:layout_height="fill_parent"
android:id="@+id/myScreen"
>
<TextView
android:layout_width="fill_parent"
android:layout_height="wrap_content"
android:text="@string/hello"
/>
<SeekBar
android:id="@+id/mySeekingBar_R"
    android:layout_width="fill_parent"
    android:layout_height="wrap_content"
    android:max="255"
    android:progress="0"/>
<SeekBar
android:id="@+id/mySeekingBar_G"
    android:layout_width="fill_parent"
    android:layout_height="wrap_content"
    android:max="255"
    android:progress="0"/>
<SeekBar
android:id="@+id/mySeekingBar_B"
    android:layout_width="fill_parent"
    android:layout_height="wrap_content"
    android:max="255"
    android:progress="0"/>
</LinearLayout>


SeekColorActivity.java
package com.exercise.seekcolor;

import android.app.Activity;
import android.os.Bundle;
import android.widget.LinearLayout;
import android.widget.SeekBar;

public class SeekColorActivity extends Activity {

private int seekR, seekG, seekB;
SeekBar redSeekBar, greenSeekBar, blueSeekBar;
LinearLayout mScreen;

/** Called when the activity is first created. */
@Override
public void onCreate(Bundle savedInstanceState) {
    super.onCreate(savedInstanceState);
    setContentView(R.layout.main);

    mScreen = (LinearLayout) findViewById(R.id.myScreen);
    redSeekBar = (SeekBar) findViewById(R.id.mySeekingBar_R);
    greenSeekBar = (SeekBar) findViewById(R.id.mySeekingBar_G);
    blueSeekBar = (SeekBar) findViewById(R.id.mySeekingBar_B);
    updateBackground();

    redSeekBar.setOnSeekBarChangeListener(seekBarChangeListener);
    greenSeekBar.setOnSeekBarChangeListener(seekBarChangeListener);
    blueSeekBar.setOnSeekBarChangeListener(seekBarChangeListener);

}

private SeekBar.OnSeekBarChangeListener seekBarChangeListener
= new SeekBar.OnSeekBarChangeListener()
{

@Override
public void onProgressChanged(SeekBar seekBar, int progress,
  boolean fromUser) {
// TODO Auto-generated method stub
 updateBackground();
}
@Override
public void onStartTrackingTouch(SeekBar seekBar) {
// TODO Auto-generated method stub
}

@Override
public void onStopTrackingTouch(SeekBar seekBar) {
// TODO Auto-generated method stub
}
};

private void updateBackground()
{
 seekR = redSeekBar.getProgress();
 seekG = greenSeekBar.getProgress();
 seekB = blueSeekBar.getProgress();
 mScreen.setBackgroundColor(
  0xff000000
  + seekR * 0x10000
  + seekG * 0x100
  + seekB
  );
}
}

Exercise: Load background to ImageButton, in programmatical approach

In addition to "Load background to ImageButton, using XML", Android support programmatic approach also, using setImageResource().

In this exercise, I implement ImageButton.setOnFocusChangeListener() and ImageButton.setOnClickListener() to handle the background image of the ImageButton. The outcome is same as the "Load background to ImageButton, using XML".


Download and save the three image above to res > drawable folder.

Add a ImageButton in main.xml
<?xml version="1.0" encoding="utf-8"?>
<LinearLayout xmlns:android="http://schemas.android.com/apk/res/android"
   android:orientation="vertical"
   android:layout_width="fill_parent"
   android:layout_height="fill_parent"
   >
<TextView 
   android:layout_width="fill_parent"
   android:layout_height="wrap_content"
   android:text="@string/hello"
   />
<ImageButton
    android:id="@+id/myImageButton"
    android:layout_width="wrap_content" 
    android:layout_height="wrap_content" 
    android:background="@drawable/android"
    />
</LinearLayout>


Modify the source code to implement setOnFocusChangeListener() and setOnClickListener()
package com.exercise.AndroidImageButton;

import android.app.Activity;
import android.os.Bundle;
import android.view.View;
import android.view.View.OnClickListener;
import android.view.View.OnFocusChangeListener;
import android.widget.ImageButton;

public class AndroidImageButtonActivity extends Activity {
 
  private ImageButton mImageButton;
 
  /** Called when the activity is first created. */
  @Override
  public void onCreate(Bundle savedInstanceState) {
    super.onCreate(savedInstanceState);
    setContentView(R.layout.main);
      
    mImageButton = (ImageButton) findViewById(R.id.myImageButton);
      
    mImageButton.setOnFocusChangeListener(
      new OnFocusChangeListener()
       {
   @Override
   public void onFocusChange(View v, boolean hasFocus) {
   // TODO Auto-generated method stub
   if (hasFocus==true)
   {
      mImageButton.setImageResource(R.drawable.androidonfocus);
   }
   else
   {
      mImageButton.setImageResource(R.drawable.android);
   }
 }
     });
      
     mImageButton.setOnClickListener(
       new OnClickListener() {
   @Override
   public void onClick(View v) {
   // TODO Auto-generated method stub
   mImageButton.setImageResource(R.drawable.androidonclick);
 }
     });     
   }
}

Exercise: Load background to ImageButton, using XML

Default of ImageButton:

Button On Focus:

Button On Click:


The backgound of ImageButton can be defined in main.xml, without any works on programming.


Download and save the three image above to res > drawable folder.

Create a loadimagebutton.xml in res > drawable folder.

<?xml version="1.0" encoding="utf-8"?>
<selector
xmlns:android="http://schemas.android.com/apk/res/android">
<item
 android:state_focused="true"
 android:state_pressed="false"
 android:drawable="@drawable/androidonfocus" />
<item
 android:state_focused="true"
 android:state_pressed="true"
 android:drawable="@drawable/androidonclick" />
<item
 android:state_focused="false"
 android:state_pressed="true"
 android:drawable="@drawable/androidonclick" />
<item  
 android:drawable="@drawable/android" />
</selector>


Modify main.xml to involve loadimagebutton

<?xml version="1.0" encoding="utf-8"?>
<LinearLayout xmlns:android="http://schemas.android.com/apk/res/android"
android:orientation="vertical"
android:layout_width="fill_parent"
android:layout_height="fill_parent"
>
<TextView
android:layout_width="fill_parent"
android:layout_height="wrap_content"
android:text="@string/hello"
/>
<ImageButton
    android:background="@drawable/loadimagebutton"  
    android:layout_width="wrap_content" 
    android:layout_height="wrap_content" 
    />
</LinearLayout>


(To achieve the same out-come using programmatical approach, refer to the next article, Exercise: Load background to ImageButton, in programmatical approach.)

Exercise: style

A style is a set of one or more formatting attributes that you can apply as a unit to single elements in your layout XML file(s). For example, you could define a style that specifies a certain text size and color, then apply it to instances of a certain type of View element.

details>>

Create a dummy Android Application, AndroidStyle. Create style.xml in the folder res > values


<?xml version="1.0" encoding="utf-8"?>
<resources>
 <style name="StyleText1">
     <item name="android:textSize">20sp</item>
     <item name="android:textColor">#EC9200</item>
     <item name="android:gravity">center_horizontal</item>
 
 </style>
 <style name="StyleText2">
     <item name="android:textSize">30sp</item>
     <item name="android:textColor">#990000</item>
     <item name="android:gravity">right</item>
 </style>
 <style name="StyleButton1">
     <item name="android:layout_width">wrap_content</item>
     <item name="android:layout_height">wrap_content</item>
 </style>
 <style name="StyleButton2">
     <item name="android:layout_width">fill_parent</item>
     <item name="android:layout_height">fill_parent</item>
 </style>    
</resources>


Modify main.xml to apply the styles.

<?xml version="1.0" encoding="utf-8"?>
<LinearLayout xmlns:android="http://schemas.android.com/apk/res/android"
 android:orientation="vertical"
 android:layout_width="fill_parent"
 android:layout_height="fill_parent"
 >
<TextView
 android:layout_width="fill_parent"
 android:layout_height="wrap_content"
 android:text="@string/hello"
 />
<TextView
 style="@style/StyleText1"
 android:layout_width="fill_parent"
 android:layout_height="wrap_content"
 android:text="It's StyleText1"
 />
<TextView
 style="@style/StyleText2"
 android:layout_width="fill_parent"
 android:layout_height="wrap_content"
 android:text="It's StyleText2"
 />
<Button
 style="@style/StyleButton1"
 android:text="It's StyleButton1"
 />
<Button
 style="@style/StyleButton2"
 android:text="It's StyleButton2"
 /> 
</LinearLayout>


Exercise: Get screen resolution using android.util.DisplayMetrics

android.util.DisplayMetrics is a structure describing general information about a display, such as its size, density, and font scaling.


To use android.util.DisplayMetrics to get resolution:

Create a dummy Android Application, add a TextView in main.xml to display the result.

<TextView
android:id="@+id/strScreenSize"
android:layout_width="fill_parent"
android:layout_height="wrap_content"
android:text=""
/>

Modify the .java file to read DisplayMetrics

package com.exercise.AndroidScreen;

import android.app.Activity;
import android.os.Bundle;
import android.util.DisplayMetrics;
import android.widget.TextView;

public class AndroidScreenActivity extends Activity {
  /** Called when the activity is first created. */
  @Override
  public void onCreate(Bundle savedInstanceState) {
      super.onCreate(savedInstanceState);
      setContentView(R.layout.main);
   
        DisplayMetrics dm = new DisplayMetrics();
        getWindowManager().getDefaultDisplay().getMetrics(dm);
        String str_ScreenSize = "The Android Screen is: "
                    + dm.widthPixels
                    + " x "
                    + dm.heightPixels;

        TextView mScreenSize = (TextView) findViewById(R.id.strScreenSize);
        mScreenSize.setText(str_ScreenSize);
  }
}


Exercise: Apply Theme in AndroidManifest.xml

Android provide some predefine themes in the base package, you can change the theme by adding a code in the file AndroidManifest.xml.

Inside Application tag to take effect on whole Application.

<?xml version="1.0" encoding="utf-8"?>
<manifest xmlns:android="http://schemas.android.com/apk/res/android"
 package="com.exercise.AndroidTheme"
 android:versionCode="1"
 android:versionName="1.0">
<application android:icon="@drawable/icon" android:label="@string/app_name"
 android:theme="@android:style/Theme.Black"
 >
   <activity android:name=".AndroidThemeActivity"
             android:label="@string/app_name">
       <intent-filter>
           <action android:name="android.intent.action.MAIN" />
           <category android:name="android.intent.category.LAUNCHER" />
       </intent-filter>
   </activity>
</application>
<uses-sdk android:minSdkVersion="2" />
</manifest>

Or,
Inside Activity tag to take effect on individual Activity.

<?xml version="1.0" encoding="utf-8"?>
<manifest xmlns:android="http://schemas.android.com/apk/res/android"
  package="com.exercise.AndroidTheme"
  android:versionCode="1"
  android:versionName="1.0">
<application android:icon="@drawable/icon" android:label="@string/app_name"
 >
    <activity android:name=".AndroidThemeActivity"
              android:label="@string/app_name"
              android:theme="@android:style/Theme.Light"
              >
        <intent-filter>
            <action android:name="android.intent.action.MAIN" />
            <category android:name="android.intent.category.LAUNCHER" />
        </intent-filter>
    </activity>
</application>
<uses-sdk android:minSdkVersion="2" />
</manifest>


@android:style/Theme.Black


@android:style/Theme.Light


@android:style/Theme.Translucent

Simple steps to change the drawable icon with Transparency background using GIMP

In the Exercise: Add a icon on Dialog, the background of android icon is in white. It can be removed to be transparency using GIMP.

Open the android.png in GIMP.

Select Fuzzy Select Tool.

Click on the background of the icon.

Click Select > Invert to select the foreground image.

Click Edit > Copy to copy the select image to clipboard.

Close the original file.

Click File > New to create a new image

Expend the Advanced Options in the Create a New Image dialog.
Select Transparency in the Fill with option, and click OK.

Click Edit > Paste to paste the copied image as the foreground.

Run the Android Application again, the background have been changed to transparency now.

Exercise: Add a icon on Dialog

Extends from the previous exercise, Exercise: Menu and Dialog. A icon will be added on the About me Dialog, as shown:


Save the icon, , in the folder res/drawable.

Add one line in the openOptionsDialog() class:


private void openOptionsDialog()
{
new AlertDialog.Builder(this)
.setTitle(R.string.app_about)
.setIcon(R.drawable.android)
.setMessage(R.string.app_about_message)
.setPositiveButton(R.string.str_ok,
new DialogInterface.OnClickListener()
{
public void onClick(DialogInterface dialoginterface, int i)
{
}
})
.show();
}


Next: Simple steps to change the drawable icon with Transparency background using GIMP

Exercise: Menu and Dialog

In this article, option menu and dialog will be added to Android Application.

Create a new Android Application with the following setting:
Project name: AndroidMenu
Application name: Android Menu
Package name: com.example.androidMenu
Create Activity: AndroidMenuActivity
Min SDK Version: 2


Use the technique described in the article, Tips and Tricks in using Eclipse: Override a method from a base class, to insert methods onCreateOptionsMenu and onOptionsItemSelected.

Right click on the Source Code Editor and invoke Source > Override/Implement Methods.

Find and select onCreateOptionsMenu and onOptionsItemSelected, select the insertion position, and click OK.

The selected methods will be inserted with dummy code, the need files, android.view.Menu and android.view.MenuItem, will be imported also.

We have to add string constane in the string.xml file.
Modify R.string in res>values>string.xml, add the items:
<string name="app_about">About Me</string>
<string name="str_exit">Exit</string>
<string name="app_about_message">Android Menu</string>
<string name="str_ok">OK</string>
<string name="app_exit">Exit</string>
<string name="app_exit_message">Exit?</string>
<string name="str_no">No</string>

Modify onCreateOptionsMenu(Menu menu), onOptionsItemSelected(MenuItem item) and implement openOptionsDialog() and exitOptionsDialog().


@Override
public boolean onCreateOptionsMenu(Menu menu) {
// TODO Auto-generated method stub
menu.add(0, 0, 0, R.string.app_about);
menu.add(0, 1, 1, R.string.str_exit);
return super.onCreateOptionsMenu(menu);
}


@Override
public boolean onOptionsItemSelected(MenuItem item) {
// TODO Auto-generated method stub
super.onOptionsItemSelected(item);

switch(item.getItemId())
{
case 0:
openOptionsDialog();
break;
case 1:
exitOptionsDialog();
break;
}
return true;
}


private void openOptionsDialog()
{
new AlertDialog.Builder(this)
.setTitle(R.string.app_about)
.setMessage(R.string.app_about_message)
.setPositiveButton(R.string.str_ok,
new DialogInterface.OnClickListener()
{
public void onClick(DialogInterface dialoginterface, int i)
{
}
})
.show();
}


private void exitOptionsDialog()
{
new AlertDialog.Builder(this)
.setTitle(R.string.app_exit)
.setMessage(R.string.app_exit_message)
.setNegativeButton(R.string.str_no,
new DialogInterface.OnClickListener()
{
public void onClick(DialogInterface dialoginterface, int i)
{}
})
.setPositiveButton(R.string.str_ok,
new DialogInterface.OnClickListener()
{
public void onClick(DialogInterface dialoginterface, int i)
{
 finish();
}
})
.show();
}


In order to use AlertDialog, DialogInterface, two more classes have to be imported:

import android.app.AlertDialog;
import android.content.DialogInterface;


Run the application, click the MENU button, two Menu Option, About Me and Exit, will be displayed.
Click About Me will show the About Me dialog
Click Exit will show a Exit dialog asking to confirm exit.

autoLink and layout change

In this exercise, autoLink Attribute of TextView will be used.

autoLink controls whether links such as urls and email addresses are automatically found and converted to clickable links. The default value is "none", disabling this feature.

It must be one or more (separated by '|') of the following constant values: none, web, email, phone, map and all.

Also, in this exercise, TWO layout will be used on ONE activity, the application can switch between them using setContentView() at runtime.

Create a new Android Application fill in the project details with the following values:
  • Project name: HelloAndroid_III
  • Application name: Hello, Android III
  • Package name: com.example.helloandroid3
  • Create Activity: HelloAndroid
  • Min SDK Version: 2
Modify main.xml and create a main2.xml.

main.xml

<?xml version="1.0" encoding="utf-8"?>
<LinearLayout xmlns:android="http://schemas.android.com/apk/res/android"
   android:orientation="vertical"
   android:layout_width="fill_parent"
   android:layout_height="fill_parent"
   >
<TextView
  android:layout_width="fill_parent"
  android:layout_height="wrap_content"
  android:text="Who are you?"
  />
<EditText
android:id = "@+id/whoareyou"
  android:layout_width="fill_parent"
  android:layout_height="wrap_content"
  />

<TextView
  android:layout_width="fill_parent"
  android:layout_height="wrap_content"
  android:text="Phone number is?"
  />
<EditText
android:id = "@+id/phonenumberIs"
  android:layout_width="fill_parent"
  android:layout_height="wrap_content"
  />

<TextView
  android:layout_width="fill_parent"
  android:layout_height="wrap_content"
  android:text="email is?"
  />
<EditText
android:id = "@+id/emailIs"
  android:layout_width="fill_parent"
  android:layout_height="wrap_content"
  />

<TextView
  android:layout_width="fill_parent"
  android:layout_height="wrap_content"
  android:text="web Site is?"
  />
<EditText
android:id = "@+id/websiteIs"
  android:layout_width="fill_parent"
  android:layout_height="wrap_content"
  />

<TextView
  android:layout_width="fill_parent"
  android:layout_height="wrap_content"
  android:text="address is?"
  />
<EditText
android:id = "@+id/addressIs"
  android:layout_width="fill_parent"
  android:layout_height="wrap_content"
  />

<LinearLayout
   android:orientation="horizontal"
   android:layout_width="fill_parent"
   android:layout_height="wrap_content"
   android:gravity="right|bottom"
  >
<Button
android:id = "@+id/ok"
      android:layout_width="wrap_content"
      android:layout_height="wrap_content"
      android:text="OK" />
<Button
android:id = "@+id/cancel_1"
      android:layout_width="wrap_content"
      android:layout_height="wrap_content"
      android:text="Cancel" />
</LinearLayout>
</LinearLayout>


main2.xml


<?xml version="1.0" encoding="utf-8"?>
<LinearLayout xmlns:android="http://schemas.android.com/apk/res/android"
   android:orientation="vertical"
   android:layout_width="fill_parent"
   android:layout_height="fill_parent"
   >
<TextView
   android:id = "@+id/name"
   android:layout_width="fill_parent"
   android:layout_height="wrap_content"
   />
<TextView
   android:id = "@+id/phonenumber"
   android:layout_width="fill_parent"
   android:layout_height="wrap_content"
   android:autoLink="phone"
   />
<TextView
   android:id = "@+id/email"
   android:layout_width="fill_parent"
   android:layout_height="wrap_content"
   android:autoLink="email"
   />
<TextView
   android:id = "@+id/website"
   android:layout_width="fill_parent"
   android:layout_height="wrap_content"
   android:autoLink="web"
   />
<TextView
   android:id = "@+id/address"
   android:layout_width="fill_parent"
   android:layout_height="wrap_content"
   android:autoLink="map"
   />
<LinearLayout
   android:orientation="horizontal"
   android:layout_width="fill_parent"
   android:layout_height="wrap_content"
   android:gravity="right|bottom"
  >
    <Button
       android:id = "@+id/back"
       android:layout_width="wrap_content"
       android:layout_height="wrap_content"
       android:text="Back" />
    <Button
        android:id = "@+id/cancel_2"
       android:layout_width="wrap_content"
       android:layout_height="wrap_content"
       android:text="Cancel" />
</LinearLayout>
</LinearLayout>

Note the attribute android:autoLink ahve been added on TextView.

And modify HelloAndroid.java

package com.example.helloandroid3;

import android.app.Activity;
import android.os.Bundle;
import android.widget.Button;
import android.widget.TextView;
import android.widget.EditText;
import android.view.View;

public class HelloAndroid extends Activity {
 
   private
       Button okButton;
       Button cancel1Button;
       EditText textName;
       EditText textPhonenumberIs;
       EditText textEmailIs;
       EditText textWebsiteIs;
       EditText textAddressIs;
     
       Button backButton;
       Button cancel2Button;
       TextView nameField;
       TextView phonenumberField;
       TextView emailField;
       TextView websiteField;
       TextView addressField;
 
   /** Called when the activity is first created. */
   @Override
   public void onCreate(Bundle savedInstanceState) {
       super.onCreate(savedInstanceState);
     
       startLayout1();
   }
 
   private Button.OnClickListener okOnClickListener =
       new Button.OnClickListener(){
       @Override
       public void onClick(View v) {
           textName = (EditText) findViewById(R.id.whoareyou);
           CharSequence textName_value = textName.getText();
         
           textPhonenumberIs =
                 (EditText) findViewById(R.id.phonenumberIs);
           CharSequence textPhonenumberIs_value =
                 textPhonenumberIs.getText();
         
           textEmailIs = (EditText) findViewById(R.id.emailIs);
           CharSequence textEmailIs_value = textEmailIs.getText();
         
           textWebsiteIs = (EditText) findViewById(R.id.websiteIs);
           CharSequence textWebsiteIs_value = textWebsiteIs.getText();
         
           textAddressIs = (EditText) findViewById(R.id.addressIs);
           CharSequence textAddressIs_value = textAddressIs.getText();
         
           startLayout2();

           nameField = (TextView) findViewById(R.id.name);
           nameField.setText("Hello "+textName_value);
         
           phonenumberField = (TextView) findViewById(R.id.phonenumber);
           phonenumberField.setText("Phone Number: "
                           +textPhonenumberIs_value);
         
           emailField = (TextView) findViewById(R.id.email);
           emailField.setText("Email: "+textEmailIs_value);
         
           websiteField = (TextView) findViewById(R.id.website);
           websiteField.setText("Website: "+textWebsiteIs_value);
         
           addressField = (TextView) findViewById(R.id.address);
           addressField.setText("Address: "+textAddressIs_value);
         
       }
   };
 
   private Button.OnClickListener backOnClickListener =
                                new Button.OnClickListener(){
       @Override
       public void onClick(View v) {
           startLayout1();
       }
   };
 
   private Button.OnClickListener cancelOnClickListener =
                                  new Button.OnClickListener(){
         @Override
         public void onClick(View v) {
          finish();
         }
   };
 
   private void startLayout1(){
       setContentView(R.layout.main);
       okButton = (Button) findViewById(R.id.ok);
       okButton.setOnClickListener(okOnClickListener);
       cancel1Button = (Button) findViewById(R.id.cancel_1);
       cancel1Button.setOnClickListener(cancelOnClickListener);
   };

   private void startLayout2(){
       setContentView(R.layout.main2);
       backButton = (Button) findViewById(R.id.back);
       backButton.setOnClickListener(backOnClickListener);
       cancel2Button = (Button) findViewById(R.id.cancel_2);
       cancel2Button.setOnClickListener(cancelOnClickListener);  
   };
}


In order to use the autoLink of map function, you have to use a Android Virtual Device (AVD) with target of Google APIs - 1.5. To create a new AVG, refer to the previous article, How to create Android Virtual Device (AVD) in Eclipse.

Run the Android Application and enter the information, then click OK.


The Activity will switch to another layout, if the data entered are match with the expected format, it will be changed to hyper-link. You can click it to involve another default application to handle it.


Phone Number:


Email is not yet supported!


Address: (It's the address of Google headquarter)

Popular Posts