Pages

Monday, July 23, 2012

How to check SDCard free space in ANDROID?

This is a simple example that shows how many bytes are free in your SDCard.
Inorder to run this example, you have to create an SDCard and start the emulator with the SDCard.
Now create a fresh project and name it “FreeSpaceActivity.java” and copy the following code to it.

1
2
3
4
5
6
7
8
9
10
11
12
13
14
15
16
17
18
19
20
21
22
23
24
25
26
package pack.coderzheaven.check_space;
 
import android.app.Activity;
import android.graphics.Color;
import android.os.Bundle;
import android.os.Environment;
import android.os.StatFs;
import android.widget.TextView;
 
public class FreeSpaceActivity extends Activity {
    @Override
    public void onCreate(Bundle savedInstanceState) {
        super.onCreate(savedInstanceState);
        setContentView(R.layout.main);
 
        StatFs stat_fs = new StatFs(Environment.getExternalStorageDirectory().getPath());
        double avail_sd_space = (double)stat_fs.getAvailableBlocks() *(double)stat_fs.getBlockSize();
        double GB_Available = (avail_sd_space / 1073741824);
        System.out.println("Available GB : " + GB_Available);
 
        TextView tv = (TextView)findViewById(R.id.tv);
        tv.setText("Your SD Card is " + GB_Available + " bytes free." );
        tv.setTextColor(Color.GREEN);
        tv.setTextSize(20);
    }
}
The main.xml file
?
1
2
3
4
5
6
7
8
9
10
11
12
13
<?xml version="1.0" encoding="utf-8"?>
<LinearLayout xmlns:android="http://schemas.android.com/apk/res/android"
    android:orientation="vertical"
    android:layout_width="fill_parent"
    android:layout_height="fill_parent"
    >
<TextView
    android:layout_width="fill_parent"
    android:layout_height="wrap_content"
    android:text=""
    android:id="@+id/tv"
    />
</LinearLayout>
AndroidManifest file
?
1
2
3
4
5
6
7
8
9
10
11
12
13
14
15
<?xml version="1.0" encoding="utf-8"?>
<manifest xmlns:android="http://schemas.android.com/apk/res/android"
      package="pack.coderzheaven.check_space"
      android:versionCode="1"
      android:versionName="1.0">
    <application android:icon="@drawable/icon" android:label="@string/app_name">
        <activity android:name=".FreeSpaceActivity"
                  android:label="@string/app_name">
            <intent-filter>
                <action android:name="android.intent.action.MAIN" />
                <category android:name="android.intent.category.LAUNCHER" />
            </intent-filter>
        </activity>
    </application>
</manifest>
Please leave your comments if the post was useful.
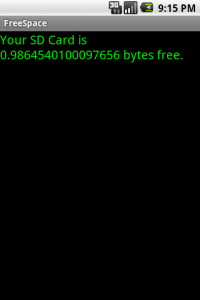
Free space in SD Card

TextSwitching animation in ANDROID or Using TextSwitcher Control in ANDROID

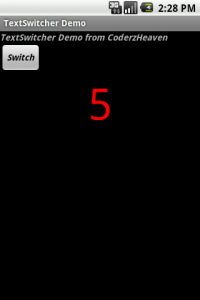
Today I will show you how to do a simple and beautiful text animation while switching the text in a textView in android
The advantage is that you don’t need a seperate xml file for animation in this program, all is done inside the java code.
This is the main java file.
?
1
2
3
4
5
6
7
8
9
10
11
12
13
14
15
16
17
18
19
20
21
22
23
24
25
26
27
28
29
30
31
32
33
34
35
36
37
38
39
40
41
42
43
44
45
46
47
48
49
50
51
52
53
54
55
56
57
58
package pack.coderzheaven;
 
import android.app.Activity;
import android.graphics.Color;
import android.os.Bundle;
import android.view.Gravity;
import android.view.View;
import android.view.animation.Animation;
import android.view.animation.AnimationUtils;
import android.widget.Button;
import android.widget.TextSwitcher;
import android.widget.TextView;
import android.widget.ViewSwitcher;
 
public class TextSwitcherDemo extends Activity implements ViewSwitcher.ViewFactory,
        View.OnClickListener {
 
    private TextSwitcher mSwitcher;
 
    private int mCounter = 0;
 
    @Override
    protected void onCreate(Bundle savedInstanceState) {
        super.onCreate(savedInstanceState);
 
        setContentView(R.layout.main);
 
        mSwitcher = (TextSwitcher) findViewById(R.id.switcher);
        mSwitcher.setFactory(this);
 
        Animation in = AnimationUtils.loadAnimation(this,  android.R.anim.fade_in);
        Animation out = AnimationUtils.loadAnimation(this, android.R.anim.fade_out);
        mSwitcher.setInAnimation(in);
        mSwitcher.setOutAnimation(out);
 
        Button nextButton = (Button) findViewById(R.id.next);
        nextButton.setOnClickListener(this);
 
        updateCounter();
    }
 
    public void onClick(View v) {
        mCounter++;
        updateCounter();
    }
 
    private void updateCounter() {
        mSwitcher.setText(String.valueOf(mCounter));
    }
 
    public View makeView() {
        TextView t = new TextView(this);
        t.setGravity(Gravity.CENTER | Gravity.CENTER_HORIZONTAL);
        t.setTextSize(70);
        t.setTextColor(Color.RED);
        return t;
    }
}
Here we use a widget called TextSwitcher in android.
Now the main.xml file.


1
2
3
4
5
6
7
8
9
10
11
12
13
14
15
16
17
18
19
20
21
22
<?xml version="1.0" encoding="utf-8"?>
<LinearLayout xmlns:android="http://schemas.android.com/apk/res/android"
    android:layout_width="fill_parent"
    android:layout_height="fill_parent"
    android:orientation="vertical">
 
    <TextView android:id="@+id/tv"
        android:layout_width="wrap_content"
        android:layout_height="wrap_content"
        android:text="@string/hello"
        android:textStyle="bold|italic"/>
 
    <Button android:id="@+id/next"
        android:layout_width="wrap_content"
        android:layout_height="wrap_content"
        android:text="Switch"
        android:textStyle="bold|italic" />
 
    <TextSwitcher android:id="@+id/switcher"
        android:layout_width="fill_parent"
        android:layout_height="wrap_content" />
</LinearLayout>
Strings.xml
?
1
2
3
4
5
<?xml version="1.0" encoding="utf-8"?>
<resources>
    <string name="hello">TextSwitcher Demo from CoderzHeaven</string>
    <string name="app_name">TextSwitcher Demo</string>
</resources>
AndroidManifest.xml file contents.
?
1
2
3
4
5
6
7
8
9
10
11
12
13
14
15
<?xml version="1.0" encoding="utf-8"?>
<manifest xmlns:android="http://schemas.android.com/apk/res/android"
      package="pack.coderzheaven"
      android:versionCode="1"
      android:versionName="1.0">
    <application android:icon="@drawable/icon" android:label="@string/app_name">
        <activity android:name=".TextSwitcherDemo"
                  android:label="@string/app_name">
            <intent-filter>
                <action android:name="android.intent.action.MAIN" />
                <category android:name="android.intent.category.LAUNCHER" />
            </intent-filter>
        </activity>
    </application>
</manifest>
TextSwitcher
TextSwitcher

How to listen to the softkeyboard done button in android?

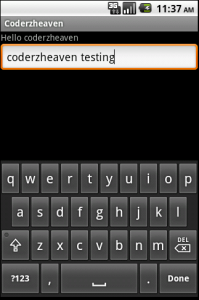
Instead of using a button on the view we can use the softkeyboard done button to trigger an action. The action can include calling another activity or retrieving the data from the EditText etc.
The main.xml contains an Edittext
1
2
3
4
5
6
7
8
9
10
11
12
13
14
15
16
17
18
19
<?xml version="1.0" <span class="IL_AD" id="IL_AD2">encoding</span>="utf-8"?>
<LinearLayout xmlns:android="http://<span class="IL_AD" id="IL_AD5">schemas</span>.android.com/apk/res/android"
    android:orientation="vertical"
    android:layout_width="fill_parent"
    android:layout_height="fill_parent"
    >
    <TextView
        android:layout_width="fill_parent"
        android:layout_height="wrap_content"
        android:text="@string/hello"
        />
    <EditText android:layout_width="match_parent"
        android:singleLine="true"
        android:inputType="textNoSuggestions"
        android:layout_height="wrap_content"
        android:id="@+id/editText1">
            <requestFocus></requestFocus>
        </EditText>
</LinearLayout>
For listening to the keyboard event we need onKeyListener
?
1
2
3
4
5
6
7
8
9
10
11
12
13
14
15
16
17
18
19
20
21
22
23
24
25
26
27
28
29
30
31
32
33
<span class="IL_AD" id="IL_AD8">import</span> android.app.Activity;
import android.content.Context;
import android.os.Bundle;
import android.view.KeyEvent;
import android.view.View;
import android.view.inputmethod.InputMethodManager;
import android.widget.EditText;
import android.widget.Toast;
 
public class TesstActivity extends Activity {
    /** Called when the activity is first created. */
    @Override
    public void onCreate(Bundle savedInstanceState) {
        super.onCreate(savedInstanceState);
        setContentView(R.layout.main);
 
        EditText text = (EditText) findViewById(R.id.editText1);
        text.setOnKeyListener(onSoftKeyboardDonePress);
 
    }
 
    private View.OnKeyListener onSoftKeyboardDonePress=new View.OnKeyListener()
    {
        public boolean onKey(View v, int keyCode, KeyEvent event)
        {
            if (event.getKeyCode() == KeyEvent.KEYCODE_ENTER)
            {
                Toast.makeText(TesstActivity.this, "checking event", Toast.LENGTH_LONG).show();
            }
            return false;
        }
    };
}

How to Open camera in ANDROID?

In today’s tutorial I will show you how to use camera in ANDROID in your program.
In this tutorial we will be having a button which will open the camera and after taking the photo it will show it in an imageView.
Note: This program will work only in the real device not in the emulator. So make sure to test it in the device itself. Also make sure to add the permission while using camera as shown below in your AndroidManifest file.
1
<uses-feature android:name="android.hardware.camera"></uses-feature>
Here is the main java file code
?
1
2
3
4
5
6
7
8
9
10
11
12
13
14
15
16
17
18
19
20
21
22
23
24
25
26
27
28
29
30
31
32
33
34
35
36
37
package com.coderzheaven;
 
<span class="IL_AD" id="IL_AD8">import</span> android.app.Activity;
import android.content.Intent;
import android.graphics.Bitmap;
import android.os.Bundle;
import android.view.View;
import android.view.View.OnClickListener;
import android.widget.Button;
import android.widget.ImageView;
 
public class OpenCameraDemo extends Activity {
 
    private static final int CAMERA_PIC_REQUEST = 2500;
 
    @Override
    public void onCreate(Bundle savedInstanceState) {
        super.onCreate(savedInstanceState);
        setContentView(R.layout.main);
 
        Button b = (Button)findViewById(R.id.Button01);
        b.setOnClickListener(new OnClickListener() {
            public void onClick(View v) {
                 Intent cameraIntent = new Intent(android.<span class="IL_AD" id="IL_AD12">provider</span>.<span class="IL_AD" id="IL_AD6">MediaStore</span>.ACTION_IMAGE_CAPTURE);
                 startActivityForResult(cameraIntent, CAMERA_PIC_REQUEST);
            }
        });
    }
 
    protected void onActivityResult(int requestCode, int resultCode, Intent data) {
        if (requestCode == CAMERA_PIC_REQUEST) {
              Bitmap image = (Bitmap) data.getExtras().get("data");
              ImageView imageview = (ImageView) findViewById(R.id.ImageView01);
              imageview.setImageBitmap(image);
        }
    }
}
Now the main.xml file which contains the button and the imageview.
?
1
2
3
4
5
6
7
8
9
10
11
12
13
14
15
16
17
18
19
20
21
22
23
<?xml version="1.0" encoding="utf-8"?>
<LinearLayout xmlns:android="http://<span class="IL_AD" id="IL_AD5">schemas</span>.android.com/apk/res/android"
    android:<span class="IL_AD" id="IL_AD9">orientation</span>="<span class="IL_AD" id="IL_AD11">vertical</span>"
    android:layout_width="fill_parent"
    android:layout_height="fill_parent"
    >
<TextView
    android:layout_width="fill_parent"
    android:layout_height="wrap_content"
    android:text="@string/hello"
    />
<ImageView
    android:id="@+id/ImageView01"
    android:layout_width="wrap_content"
    android:layout_height="wrap_content">
</ImageView>
<Button
    android:text="Open Camera"
    android:id="@+id/Button01"
    android:layout_width="wrap_content"
    android:layout_height="wrap_content">
</Button>
</LinearLayout>
The strings.xml file
1
2
3
4
5
<?xml version="1.0" encoding="utf-8"?>
<resources>
    <string name="hello">Hello World, OpenCameraDemo!</string>
    <string name="app_name">OpenCamera</string>
</resources>
And the AndroidManifest.xml file.
?
1
2
3
4
5
6
7
8
9
10
11
12
13
14
15
16
17
18
<?xml version="1.0" encoding="utf-8"?>
<manifest xmlns:android="http://schemas.android.com/apk/res/android"
      package="com.coderzheaven"
      android:versionCode="1"
      android:versionName="1.0">
 
      <uses-feature android:name="android.hardware.camera"></uses-feature>
 
    <<span class="IL_AD" id="IL_AD3">application</span> android:icon="@drawable/icon" android:label="@string/app_name">
        <activity android:name=".OpenCameraDemo"
                  android:label="@string/app_name">
            <intent-filter>
                <action android:name="android.intent.action.MAIN" />
                <category android:name="android.intent.category.LAUNCHER" />
            </intent-filter>
        </activity>
    </application>
</manifest>

A Simple FlashLight Application.

Here is a simple Application on how to use flashlight in android.
?
1
2
3
4
5
6
7
8
9
10
11
12
13
14
15
16
17
18
19
20
21
22
23
24
25
26
27
28
29
30
31
32
33
34
35
36
37
38
39
40
41
42
43
44
45
46
47
48
49
50
51
52
53
54
55
56
57
58
59
60
61
62
63
64
65
66
67
68
69
70
71
72
73
74
75
76
77
78
79
80
81
82
83
84
85
package com.coderzheaven.pack;
 
import android.app.Activity;
import android.content.Context;
import android.content.pm.PackageManager;
import android.hardware.Camera;
import android.hardware.Camera.Parameters;
import android.os.Bundle;
import android.util.Log;
import android.view.View;
import android.view.View.OnClickListener;
import android.widget.Button;
import android.widget.Toast;
 
public class FlashLightActivity extends Activity {
 
    //flag to detect flash is on or off
    private boolean isLighOn = false;
 
    private Camera camera;
 
    private Button button;
 
    @Override
    protected void onStop() {
        super.onStop();
 
        if (camera != null) {
            camera.release();
        }
    }
 
    @Override
    public void onCreate(Bundle savedInstanceState) {
        super.onCreate(savedInstanceState);
        setContentView(R.layout.main);
 
        button = (Button) findViewById(R.id.buttonFlashlight);
 
        Context context = this;
        PackageManager pm = context.getPackageManager();
 
        // if device support camera?
        if (!pm.hasSystemFeature(PackageManager.FEATURE_CAMERA)) {
            Log.e("err", "Device has no camera!");
            return;
        }
        try{
            camera = Camera.open();
            final Parameters p = camera.getParameters();
     
            button.setOnClickListener(new OnClickListener() {
     
                @Override
                public void onClick(View arg0) {
     
                    if (isLighOn) {
     
                        Log.i("info", "torch is turn off!");
     
                        p.setFlashMode(Parameters.FLASH_MODE_OFF);
                        camera.setParameters(p);
                        camera.stopPreview();
                        isLighOn = false;
     
                    } else {
     
                        Log.i("info", "torch is turn on!");
     
                        p.setFlashMode(Parameters.FLASH_MODE_TORCH);
     
                        camera.setParameters(p);
                        camera.startPreview();
                        isLighOn = true;
     
                    }
     
                }
            });
        }catch(Exception e){
            Toast.makeText(this, "Your device doesnot have FlashLight capability", Toast.LENGTH_LONG).show();
        }
 
    }
}
Now the layout file main.xml.

1
2
3
4
5
6
7
8
9
10
11
12
13
14
15
<?xml version="1.0" encoding="utf-8"?>
<RelativeLayout xmlns:android="http://schemas.android.com/apk/res/android"
    android:id="@+id/relativeLayout1"
    android:layout_width="fill_parent"
    android:layout_height="fill_parent" >
 
    <Button
        android:id="@+id/buttonFlashlight"
        android:layout_width="wrap_content"
        android:layout_height="wrap_content"
        android:layout_centerVertical="true"
        android:layout_centerHorizontal="true"
        android:text="Torch" />
 
</RelativeLayout>
AndroiManifest.xml file contents.
Make sure to add the permissions.
?
1
2
3
4
5
6
7
8
9
10
11
12
13
14
15
16
17
18
19
20
21
22
23
24
25
26
27
<?xml version="1.0" encoding="utf-8"?>
<manifest xmlns:android="http://schemas.android.com/apk/res/android"
    package="com.coderzheaven.pack"
    android:versionCode="1"
    android:versionName="1.0" >
 
    <uses-sdk android:minSdkVersion="5" />
 
    <uses-permission android:name="android.permission.CAMERA" />
    <uses-feature android:name="android.hardware.camera" />
 
    <application
        android:debuggable="true"
        android:icon="@drawable/ic_launcher"
        android:label="@string/app_name" >
        <activity
            android:label="@string/app_name"
            android:name=".FlashLightActivity" >
            <intent-filter >
                <action android:name="android.intent.action.MAIN" />
 
                <category android:name="android.intent.category.LAUNCHER" />
            </intent-filter>
        </activity>
    </application>
 
</manifest>

Popular Posts