Pages

Showing posts with label Ubuntu. Show all posts

Monday, June 6, 2011

Cannot complete the install because one or more required items could not be found

I tried to install Android SDK and Eclipse Galileo on a fresh ubuntu 9.10 and found the error while installing ADT Plugin for Eclipse:

Cannot complete the install because one or more required items could not be found.
Software being installed: Android Development Tools 0.9.4.v200910220141-17704 (com.android.ide.eclipse.adt.feature.group 0.9.4.v200910220141-17704)
Missing requirement: Android Development Tools 0.9.4.v200910220141-17704 (com.android.ide.eclipse.adt.feature.group 0.9.4.v200910220141-17704) requires 'org.eclipse.wst.xml.core 0.0.0' but it could not be found


It's because there are some components missed in the setup, and the Galileo update site is not in the list of Available Software Sites.

To solve the problem:
Add "http://download.eclipse.org/releases/galileo" in the Available Software Sites.

Install Android SDK release 3 on Eclipse 3.5 Galileo, in Ubuntu 9.10

Both Adroid SDK and ubuntu have new release recently. There is a little bit variation in installation from the old version, so I re-write the installation procedure here. In this article, Eclipse 3.5 Galileo with Android SDK release 3 (for Android 2) will be installed on a fresh new ubuntu 9.10.

Environment:
OS: Linux ubuntu 9.10 for desktop or laptop (http://www.ubuntu.com/)
Eclipse: Eclipse 3.5 Galileo (bundled with ubuntu 9.10)
Android SDK: Android SDK release 3 (http://developer.android.com/)

Install Java:

Start a Terminal and type the command:
$ sudo apt-get install sun-java6-jdk


For Ubuntu 10.04 LTS, refer the article "How to install sun-java6-jdk on Ubuntu 10.04 LTS?" - Android Er@2010-05-04 -


Download Android SDK:

Download Android SDk release 3 from http://developer.android.com/sdk/index.html, extract to any folder you want. In my case, it is $home/android-sdk-linux/

Install Eclipse:

In ubuntu 9.10, Eclipse 3.5.1 is bundled currently. To install Eclipse on ubuntu, it can be downloaded from http://www.eclipse.org/, installe using Ubuntu Software Center (Application->Ubuntu Software Center in ubuntu menu bar), or installed using Synaptic Package Manager (System->Administration->Synaptic Package Manager in ubuntu menu bar). I tried install using the download version and Ubuntu Software Center, both cannot be installed without error, so Synaptic Package Manager is suggested to install Eclipse.
Involve Synaptic Package Manager from System->Administration of Ubuntu top menu.


Type Eclipse in te Quick search box, select eclipse in the list and mark for installation.


Additional required changes are listed, click Mark to accept.


Click Apply to start installation


Installing the ADT Plugin

Start Eclipse, Click Help->Install New Software... from the top menu.

Click Available Software Sites to check if http://download.eclipse.org/releases/galileo is available. If not, add it.

Add a new site https://dl-ssl.google.com/android/eclipse/


Select https://dl-ssl.google.com/android/eclipse/, and wait a moment. The available will be listed. click to select it and click Next.


Click Next again


Accept the terms and click Finish.


Wait, you will be asked for security warning, click OK.


Wait installation to finish, and accept re-start after finished.

Setup Android SDT inside Eclipse:

Click Window->Preference in Eclipse top menu.

Select Android on the left, and browse to your Android SDK folder, it's $home/android-sdk-linux/ in my setup.


Install Package:

Click Window->Android SDK and AVD Manager

Click Available Package from the left, expend and select your expected packages, and click Install Selected.


Accept All, and Install Accepted.


Restart Again.

Create AVD:
Refer to the article http://z4android.blogspot.com/2011/06/create-android-virtual-device-avd-in.html

Now, the installation is finished.

Friday, May 20, 2011

Copying Files to a Disk Image

Once you have created the disk image, you can copy files to it prior to loading it in the emulator. To copy files, you can mount the image as a loop device and then copy the files to it, or you can use a utility such as mtools to copy the files directly to the image. The mtools package is available for Linux, Mac, and Windows.

Here, I will mount and copy files to emulator SD Card as a loop device.

In Unix-like operating systems, a loop device, vnd (vnode disk), or lofi (loopback file interface) is a pseudo-device that makes a file accessible as a block device.

Create a directory, named SD in my home.

Type the command in Terminal:
$sudo mount -o loop /home/eric/.android/avd/my_avd_GoogleAPIs_1.5.avd/sdcard.img /home/eric/sd

Where /home/eric/sd is the directory mounted to be accessed.
/home/eric/.android/avd/my_avd_GoogleAPIs_1.5.avd/sdcard.img is the SDCard image created for Android Emulator.

Now, you can create directory, copy files to the emulator's SDCard by SD.

$cd sd
$sudo mkdir pictures
$cd pictures
$sudo cp /home/eric/SDCard_16M.png .
$...

To know more details of the command mount, type
$man mount

Configure Eclipse to work with local cvs server

In previous article, Setup cvs server on Ubuntu, I described how to setup cvs server. In this article, I will describe how to setup Eclipse to work with the local cvs server.

OS: Ubuntu 9.04
Eclipse version: 3.5 Galileo, with CVS installed.

Firstly, open your project and switch to CVS Perspective
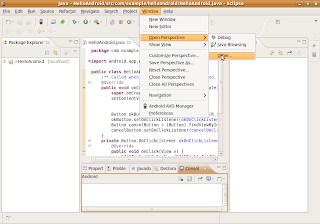
Click the Eclipse Menu Bar Window > Open Perspective > Other...

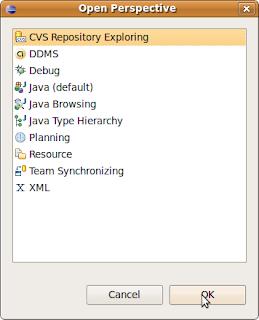
Select CVS Perspective Expoloring


Right click on the empty are of CVS Perspective wiindow,
select New Perspective Location

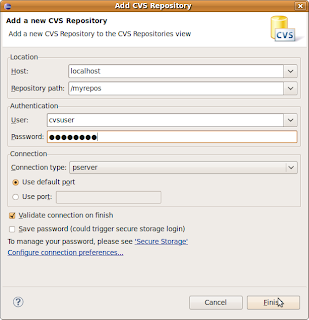
Enter the setting:
Host: localhost
Repository path: /myrepos
User: cvsuser
Password: ********
Connection Type: pserver
Use the default port


Click Finish


Switch back to java Perspective

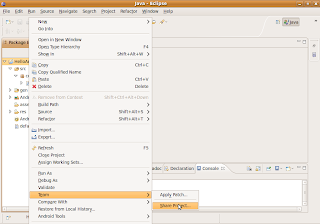
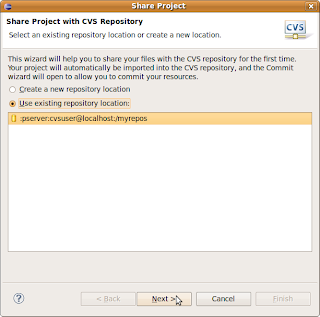
Right click project, select Team > Share Project...


Use existing repository location:
:pserver:cvsuser@local:/myrepos
and click Next


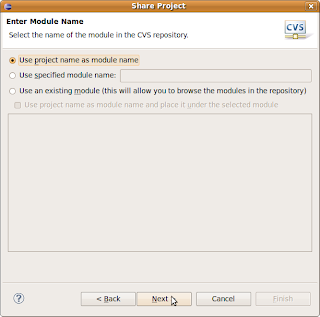
Accept the default setting, click Next


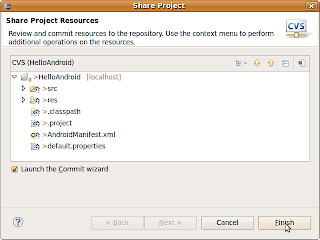
And click Finish


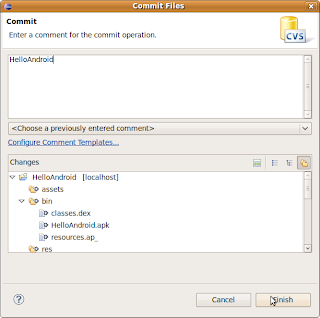
Enter your comment and click Finish


Now, your Eclipse project is linked with your local CVS sserver.

Setup cvs server on Ubuntu

In this article, I describe steps to setup cvs server on Ubuntu.

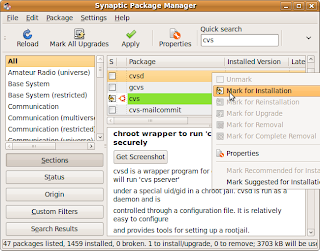
Install cvs and cvsd, start Synaptic Package Manager from ubuntu menu bar
System > Administration > Synaptic Package Manager

typ cvs in Quick Search box, select cvs and cvsd, click Apply.


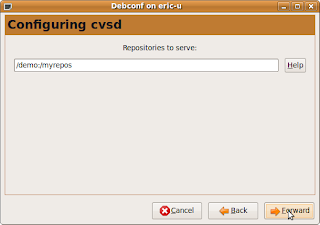
When installing cvsd, you will be asked to enter Repositories to serve, the default setting is /demo:/myrepos, just accept it and click Forward.


After changes applied, you can close Synaptic Package Manager.

Next, open a Terminal.

Type the command to create /myrepos
#cd /var/lib/cvsd
#sudo mkdir myrepos

Initial /myrepos
#sudo cvs -d /var/lib/cvsd/myrepos init

Modify the file /var/lib/cvsd/myrepos/CVSROOT/config
(May be you have to change the permission to writable)

#sudo gedit /var/lib/cvsd/myrepos/CVSROOT/config
Add the line into it:

SystemAuth=no
PamAuth=no
LockDir=/tmp/myrepos

Save and Exit editor

Create LockDir
#sudo mkdir /var/lib/cvsd/tmp/myrepos

Add a user, named cvsuser
#sudo cvsd-passwd /var/lib/cvsd/myrepos cvsuser
You will be ask to input password.

Modify /etc/cvsd/cvsd.conf
#sudo gedit /etc/cvsd/cvsd.conf

Scroll to end of the file, find the text

Listen * 2401
Repos /demo
Repos /myrepos


change to

Listen 127.0.0.1 2401
Repos /demo
Repos /myrepos


where 127.0.0.1 is my local static IP, 2401 is the default port used by cvs.

and then, set the right.
#sudo chown cvsd:cvsd /var/lib/cvsd -R

Restart cvsd
#sudo /etc/init.d/cvsd restart

You can check the cvsd status using the command,
#sudo /etc/init.d/cvsd status

Make sure it's running.


Now your cvs server is up and running, in the comming article, I will describe how to configure Eclipse to work with this local cvs server.

Popular Posts