Pages

Friday, May 6, 2011

Android Layout Tutorial

there are different types of layouts:

  • FrameLayout: All controls (children) are placed in the upper left corner.
  • LinearLayout: All children are positioned in vertical/horizontal order.
  • RelativeLayout: The positions of the children are specified in relation to the other children.
  • TableLayout: The child elements are placed with a grid.
  • AbsoluteLayout: The child elements are positioned based on absolute coordinates (in pixel).

we will see each layout in details ........

Hello, World

Now we want to create our first application, which is (as always) a Hello World application. First of all, start Eclipse. Then select "File/New/Project". In the "New Project" dialog, select "Android/Android Project" and click "Next".
New_Project_empty.jpg
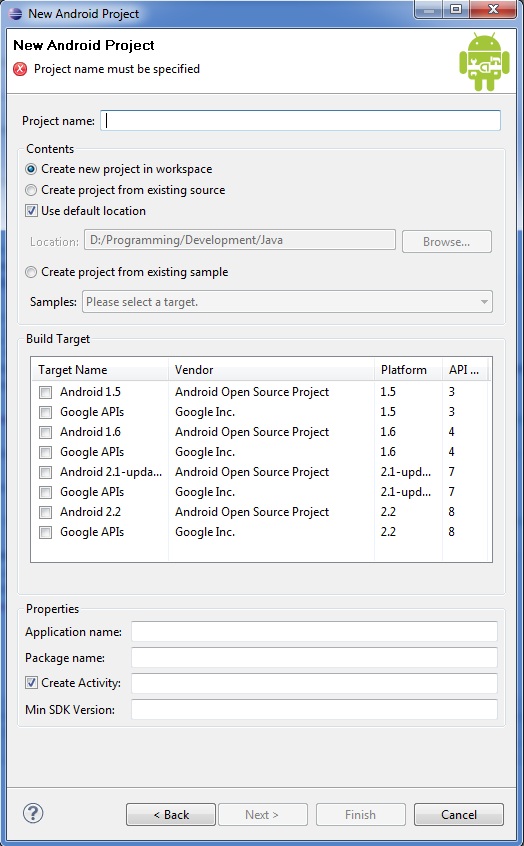
Here you can set up the project. First of all, we need to give the project a name, so type "Hello World" in the name box. Next you have to select the Android version you want to use. Here we choose version 2.2. As we see in the last column, we need the API Version 8 for this Android version, so we type an "8" in the Min SDK Version box. Also, the project requires an application name. (Notice that this name is also used in code, so the name should have no whitespaces). Usually, you use the project name and delete all whitespaces (e.g., "helloworld" for this project). Next, you have to define the package of the project. We will use "com.test.helloworld" here (a package can group multiple classes; for more information, see here). At least, you need a name for the activity (one App might have multiple Activities; they are like a single part/screen of the app). In this example, we simply use "HelloWorldApp".
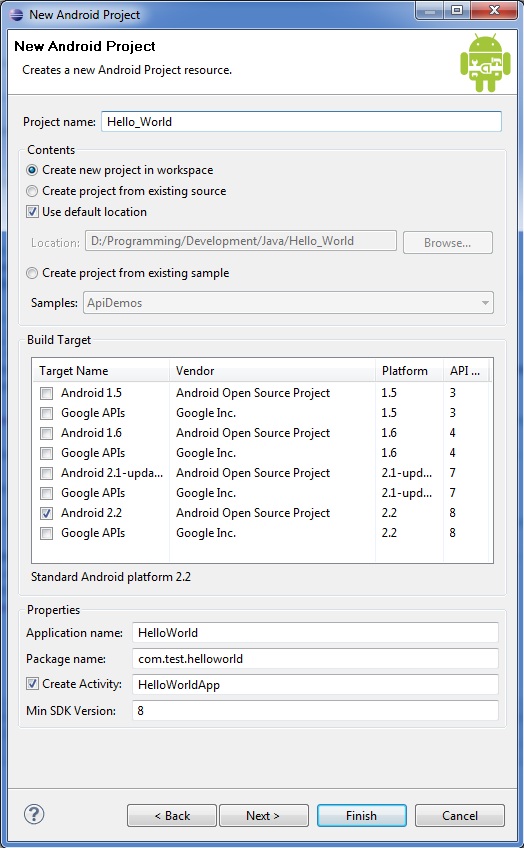
New_Project.jpg
Before we can finally start our first project, we need to create a configuration. This configuration specifies under which circumstances the app will be started. E.g., you can control the network speed the emulator/app can use. Also, you can choose different emulators to test the app with different versions of Android or in different screen sizes. To create the configuration, go to "Run/Run Configurations". Now click the "Android Application" tab at the side and then the New button above the tabs. Call the new configuration "HelloWorldConfig" and select our project over the Browse button. Now move on to the target tab. Here you can select the network speed and which emulator will be used.
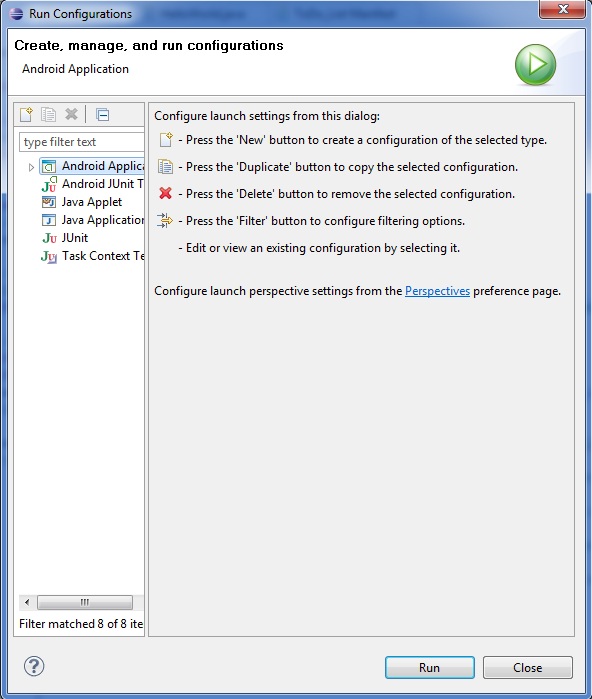
Run_Config_Screen.jpg
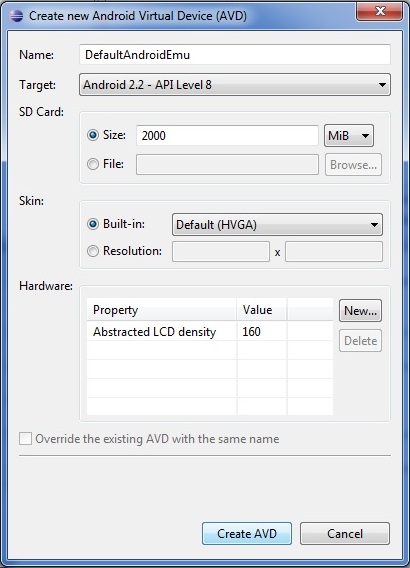
Since we haven't created an emulator till now, we need to do that first. Click the automatic control to enable the buttons at the side and then click on the manager-button. Here, click the new button to the right to create a new emulator. In the following screen, you can enter a name for the emulator (I have used "DefaultAndroidEmulator") and specify the details (like Android version, SD card size, and much more). You can control every little detail of the emulator over the hardware section.
Create_Emulator_.jpg
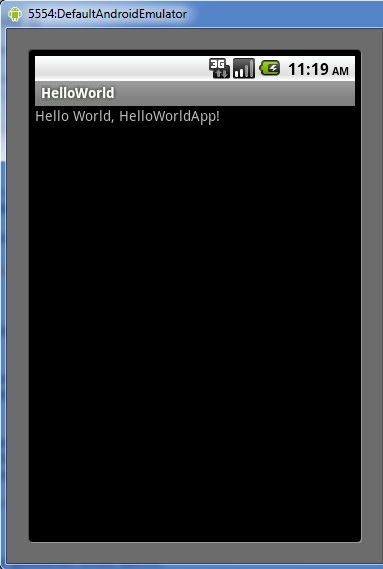
Once you are done with that, click "Create AVD" and close the manager window. Now we have successfully created the run configurations. Click "Apply" and close the configurations. At least run your first Android project.
Notice: It may take the emulator some time to get started, so be patient! Also, I have cropped the image so that you can't see the keyboard or the D-pad.
Congratulations! You just created your first App!
First_App_.jpg

Coding is Fun

After we have set up everything, it's (finally) time to actually getting started with the code, because we all know: Coding is fun!
But before we can actually jump into the Java code, we need to understand the structure of an Android Application. Go to your Package Explorer and enlarge the "Hello World" project. You will see five folders and two files. Let's get started with the one of these two files, the AndroidManifest file. This file contains all the information about your project, like the icon, the name of the author. To open it, make a right click on it and choose "Open With/Android Manifest Editor". In the upcoming tab, you can specify the package name and the version of your project. At the bottom, you will find additional tabs. I think most of the settings you will find are pretty much self-explanatory. Note the @ in front of some attributes. This shows that the following string is a reference to a resource. You can find the resources in the "res" folder of your project. If you enlarge it, you will notice that it has some subfolders. To be specific, the res folder can have seven types of subfolders: values, drawable, layout, animations, xml, styles, and raw.
Let's focus on the values folder first. Here you can store all kinds of simple resources (like strings, colors, numbers, dimensions, arrays, etc.). By default, you will find the strings.xml file in there. When you open it (with right click, "Open with/Android Layout Editor"), you will see that it contains two values. The first is the message you see when you run your project, and the second is the name of your app. You can add new values if you want to use them later on in code (or in the Manifest or Layout files). You can also create specific resources using quantifiers. If you add a - to the folder's name, you can add a quantifier to the name. E.g., you can rename the values folder to values-en which means that the content of the folder is only used by Android phones with English language activated. If you do not add a quantifier, the resources are default. The default resources are used if no specific resources for the current system are found. If the project is started, all resources will be compiled as efficiently as possible and added to the package. Also, a reference will be created (called R) which allows you to access the resources in code. Since this is only a tutorial, I will not focus on all the types of resources here. You can find more information on resources and quantifiers here.
At last, it is time to start coding! Go to the "src" folder. In the folder, you will find the package folder, open the HelloWorld.java file. You will see the default code for an Android Activity:
Collapse
package com.test.helloworld; //the package we are working in

//some android packages we need to import
import android.app.Activity;
import android.os.Bundle;

//our activity class (extendes the default activity class)
public class HelloWorldApp extends Activity {
    /** Called when the activity is first created. */
    @Override
    //the function called when activity is created
    public void onCreate(Bundle savedInstanceState) {
        //call the create fct. Of the base class
        super.onCreate(savedInstanceState);
        //load the layout specified in the layout.xml
        setContentView(R.layout.main);
    }
}
As you can see, we create a new activity by extending the default Android activity class. Then we override the default onCreate function, which is called when the project is created. In there, we load our own layout from the resources and also call the onCreate function of the base class. Now let's take a closer look at the layout file. You find it in the layout folder under resources. When you open it, it should look like this:
Collapse
<linearlayout android:layout_height="fill_parent" 
    android:layout_width="fill_parent" android:orientation="vertical" 
    xmlns:android="http://schemas.android.com/apk/res/android" />
      <textview android:layout_height="wrap_content" 
        android:layout_width="fill_parent" android:text="@string/hello" />
</linearlayout />
You see the root node is called LinearLayout. As you you might already have figured out, there are different types of layouts:
  • FrameLayout: All controls (children) are placed in the upper left corner.
  • LinearLayout: All children are positioned in vertical/horizontal order.
  • RelativeLayout: The positions of the children are specified in relation to the other children.
  • TableLayout: The child elements are placed with a grid.
  • AbsoluteLayout: The child elements are positioned based on absolute coordinates (in pixel).
Once you have chosen a layout type, you can add child elements. In the code given, there is already a TextView, which is used to display text on the screen. The current content is a reference to a resource defined in the values.xml file. As you will see, it uses the whole width of the screen, but is only as long as it needs to, to display the content. We might start with some small changes. Let's change the text color of the TextView to green:
Collapse
<textview android:layout_height="wrap_content" 
    android:layout_width="fill_parent" android:text="@string/hello" 
    android:textcolor="#FF00FF00" />
Now, launch the project and see the changes. Next, let's add a new control called EditText:
Collapse
<linearlayout android:layout_height="fill_parent" 
     android:layout_width="fill_parent" android:orientation="vertical" 
     xmlns:android="http://schemas.android.com/apk/res/android" />
        <edittext android:layout_height="wrap_content" 
             android:layout_width="fill_parent" android:textcolor="#FF0000FF"
             android:id="@+id/et_Text" />
<textview android:layout_height="wrap_content" android:layout_width="fill_parent"
    android:textcolor="#FF00FF00" android:id="@+id/lv_View" />
</linearlayout />
When we want to access the controls in code, they need to have an ID. Next we create some code for the controls. Go to the helloworld.java file.
Collapse
@Override
public void onCreate(Bundle savedInstanceState) {
    super.onCreate(savedInstanceState);
    //loading the layout over the resource reference
    setContentView(R.layout.main);
        
    //get the two controls we created earlier, also with the resource reference and the id
    final TextView tv_View = (TextView)findViewById(R.id.tv_View);
    final EditText et_Text = (EditText)findViewById(R.id.et_Text);
        
    //add new KeyListener Callback (to record key input)
    et_Text.setOnKeyListener(new OnKeyListener()
    {
        //function to invoke when a key is pressed
        public boolean onKey(View v, int keyCode, KeyEvent event)
        {
            //check if there is 
            if (event.getAction() == KeyEvent.ACTION_DOWN)
            {
                //check if the right key was pressed
                if (keyCode == KeyEvent.KEYCODE_DPAD_CENTER)
                {
                                    //add the text to the textview
                    tv_View.setText(tv_View.getText() + ", " + 
                                     et_Text.getText());
                                    //and clear the EditText control
                    et_Text.setText("");
                    return true;
                }
            }
            return false;
        }
    });
}
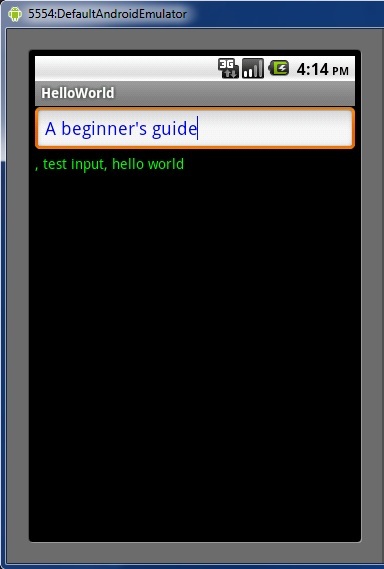
We will analyze the code line by line. First of all, as before, we load the layout. Then we create a TextView and a EditText variable and load our interface objects in them (that's what we need the ID for). Finally, we add a new OnKeyListener to the EditText control. In this OnKeyListener, we create the method onKey, which is called when a key is pressed, when the control is active. In the method, we perform two checks: the first to be sure that a key is pressed down (and not released), and the second to specify the key (in this case, the center key of the D-pad). If both checks are passed, we add the text of the EditText control to the TextView, and finally the text of the EditText control is deleted. Run and test the application. Great, you created your first real Android app.
Final_App_.jpg

basic to know about android

1.1. Android Operation System

Android is an operating system based on Linux with a Java programming interface. It provides tools, e.g. a compiler, debugger and a device emulator as well as its own Java Virtual machine (Dalvik Virtual Machine - DVM). Android is created by the Open Handset Alliance which is lead by Google.
Android uses a special virtual machine, e.g. the Dalvik Virtual Machine. Dalvik uses special bytecode. Therefore you cannot run standard Java bytecode on Android. Android provides a tool "dx" which allows to convert Java Class files into "dex" (Dalvik Executable) files. Android applications are packed into an .apk (Android Package) file by the program "aapt" (Android Asset Packaging Tool) To simplify development Google provides the Android Development Tools (ADT) for Eclipse . The ADT performs automatically the conversion from class to dex files and creates the apk during deployment.
Android supports 2-D and 3-D graphics using the OpenGL libraries and supports data storage in a SQLite database.
Every Android applications runs in its own process and under its own userid which is generated automatically by the Android system during deployment. Therefore the application is isolated from other running applications and a misbehaving application cannot easily harm other Android applications.

1.2. Important Android components

An Android application consists out of the following parts:
  • Activity - Represents the presentation layer of an Android application, e.g. a screen which the user sees. An Android application can have several activities and it can be switched between them during runtime of the application.
  • Views - The User interface of an Activities is build with widgets classes which inherent from "android.view.View". The layout of the views is managed by "android.view.ViewGroups".
  • Services - perform background tasks without providing an UI. They can notify the user via the notification framework in Android.
  • Content Provider - provides data to applications, via a content provider your application can share data with other applications. Android contains a SQLite DB which can serve as data provider
  • Intents are asynchronous messages which allow the application to request functionality from other services or activities. An application can call directly a service or activity (explicit intent) or asked the Android system for registered services and applications for an intent (implicit intents). For example the application could ask via an intent for a contact application. Application register themself to an intent via an IntentFilter. Intents are a powerful concept as they allow to create loosely coupled applications.
  • Broadcast Receiver - receives system messages and implicit intents, can be used to react to changed conditions in the system. An application can register as a broadcast receiver for certain events and can be started if such an event occurs.
Other Android parts are Android widgets or Live Folders and Live Wallpapers . Live Folders display any source of data on the homescreen without launching the corresponding application.

1.3. Security and permissions

Android defines certain permissions for certain tasks. For example if the application want to access the Internet it must define in its configuration file that it would like to use the related permission. During the installation of an Android application the user get a screen in which he needs to confirm the required permissions of the application.

1.4. AndroidManifest.xml

An Android application is described the file "AndroidManifest.xml". This files must declare all activities, services, broadcast receivers and content provider of the application. It must also contain the required permissions for the application. For example if the application requires network access it must be specified here. "AndroidManifest.xml" can be thought as the deployment descriptor for an Android application.

<?xml version="1.0" encoding="utf-8"?>
<manifest xmlns:android="http://schemas.android.com/apk/res/android"
      package="de.vogella.android.temperature"
      android:versionCode="1"
      android:versionName="1.0">
    <application android:icon="@drawable/icon" android:label="@string/app_name">
        <activity android:name=".Convert"
                  android:label="@string/app_name">
            <intent-filter>
                <action android:name="android.intent.action.MAIN" />
                <category android:name="android.intent.category.LAUNCHER" />
            </intent-filter>
        </activity>

    </application>
    <uses-sdk android:minSdkVersion="9" />

</manifest> 
   
The "package" attribute defines the base package for the following Java elements. It also must be unique as the Android Marketplace only allow application for a specfic package once. Therfore I good habit is to use your reverse domain name as a package to avoid collisions with other developers.
"android:versionName" and "android:versionCode" specify the version of your application. "versionName" is what the user sees and can be any string. "versionCode" must be an integer and the Android Market uses this to determine if you provided a newer version to trigger the update on devices which have your application installed. You typically start with "1" and increase this value by one if you roll-out a new version of your application.
"activity" defines an activity in this example pointing to the class "de.vogella.android.temperature.Convert". For this class an intent filter is registered which defines that this activity is started ion the application starts (action android:name="android.intent.action.MAIN"). The category definition (category android:name="android.intent.category.LAUNCHER" ) defimes that this application is added to the application directory on the Android device. The @ values refer to resource files which contain the actual values. This makes it easy to provide different resources, e.g. strings, colors, icons, for different devices and makes it easy to translate applications.
The "uses-sdk" part of the "AndroidManifest.xml" defines the minimal SDK version your application is valid for. This will prevent your application being installed on devices with older SDK versions.

1.5. R.java, Resources and Assets

The directory "gen" in an Android project contains generated values. "R.java" is a generated class which contains references to resources of the "res" folder in the project. These resources are maintained in the "res" directory and can be values, menus, layouts, icons or pictures or animations. For example a resource can be an image or an XML files which defines strings.
If you create a new resources, the corresponding reference is automatically created in "R.java". The references are static int values, the Android system provides methods to access the corresponding resource. For example to access a String with the reference id "R.string.yourString" use the method getString(R.string.yourString)); Please do not try to modify "R.java" manually.
While the directory"res" contains structured values which are known to the Android platform the directory "assets" can be used to store any kind of data. In Java you can access this data via the AssetsManager and the method getAssets().

1.6. Activities and Layouts

The user interface for Activities is defined via layouts. Layouts are at runtime instances of "android.view.ViewGroups". The layout defines the UI elements, their properties and their arragement. UI elements are based on the class "android.view.View". ViewGroup is a subclass of View A and a layout can contain UI components (Views) or other layouts (ViewGroups). You should not nestle ViewGroups to deeply as his impact performance.
A layout can be defined via Java code or via XML. You typically uses Java code to generate the layout if you don't know the content before, for example if your layout depends on content which you read from the internet.
XML based layouts are defined via a resource file in the folder "/res/layout". This file specifies the view groups, views, their relationship and their attributes for a specific layout. If a UI element needs to be accessed via Java code you have to give the UI element an unique id via the "android:id" attribute. To assign a new id to an UI element use "@+id/yourvalue". By conversion this will create and assign a new id "yourvalue" to the corresponding UI element. In your Java code you can later access these UI elements via the method findViewById(R.id.yourvalue).
Defining layouts via XML is usually the preferred way as this separates the programming logic from the layout definition and allow to define easily different layout resources from different devices. You can also mix both approaches.

1.7. Activities and Lifecyle

The operating system controls the life cycle of your application. At any time the Android system may stop or destroy your application, e.g. because of an incoming call. The Android system defines a life cycle for an activities via pre-defined methods. The most important methods are:
  • onSaveInstanceState() - called if the activity is stopped. Used to save data so that the activity can restore its states if re-started
  • onPause() - always called if the Activity ends, can be used to release ressource or save data
  • onResume() - called if the Activity is re-started, can be used to initiaze fields

1.8. Context

The class android.content.Context provides the connections to the Android system. It is the interface to global information about the application environment. Contexts also provides the method getSystemService which allows to receive a manager object for the different hardware parts. As Activities and Services extend the class "Context" you can directly access the context via "this"

19 Ways to Make "Free" Mobile Application Pricing Profitable

19 Ways to Make "Free" Mobile Application Pricing Profitable

In terms of app pricing, one of the first questions to ask yourself is: are you going to charge users or give the app away for “free”? But can you give away your app and still make money? Here are 19 ways you can try.

When developing a new mobile application, you need to decide how you’re going to price it. This question is best answered early, while the application is still being designed. Wait too long and your choices regarding application monetization become limited.
In terms of app pricing, one of the first questions to ask yourself is: are you going to charge users or give the app away for “free”? Yes, you heard us right. Free. At least, free for the user to install. There are a number of ways you can give away an application and still make money. Don’t believe us? Here’s how: you don’t charge the consumer directly. Instead, you rely on other types of revenue. Get creative.
Let’s take a look at some of the ways “free” apps can fit into the mobile marketplace. Not all the methods discussed below are feasible on every mobile platform. In fact, many are not feasible on most platforms. However, Android is an open platform. If you don’t like how things are being distributed, develop a new way. (Take that, iPhone* developers! *Disclaimer #1: we also develop iPhone apps, so really, we're mocking ourselves).
#1: A free app can derive revenue from advertisers or brand sponsors
If you can find a way to cleverly integrate ad services (e.g. Google AdSense) or specific advertisers’ content in your application, you can give the app away for free and rely on ad revenue generated by users. You can also develop applications that are extensions of a single brand and in this case the brand company sponsors the application for users (this app is brought to you by….). Regardless, when working with advertising, it’s important to understand that you have two separate types of customers who want different (often opposing) things: the end user and the advertiser.
#2: A free app might drive users to spend money elsewhere
Here, the developer acts as a middleman or referrer. Users can install a free “shell” application, but they spend money to purchase things (widgets, thingies, thneeds, credits, tokens) within the app. An example of this sort of application would be a free auction, music or e-book client. The app collects revenue either through referral fees or the resulting transaction fees and sales (depending on if the developer owns the service or is referring users to it).
#3: A free app for a paid back-end service
Here, you might develop free clients on a number of different platforms, but charge the user for only membership to the underlying service. Here, the application is only useful when tied to the backend service available to members only. Geocaching.com’s geocaching application is a good example of this type of model (requires a geocaching.com account to work properly). You might also see this method used with online banking or stock brokerage apps or mobile news clients for premium newspaper content.
Note that the underlying service might have nothing to do with the application—for example, a phone carrier might give away certain apps that use streaming data so they can collect the resulting data charges (like a TV video streaming app or enterprise email app that is free, but requires a data plan).
#4: A free app for a trial period
Give users a chance to evaluate your application before paying for premium features. For example, a free client with a limited feature set, such as only the first few levels of a game or only work for 10 launches.
#5: A free app as a value-added service to connect with your existing customers
A retail store chain might offer a free app allowing users to search its inventory and find the nearest store location. No money is made directly by the app, but the app drives more customers to the store, hopefully resulting in increased sales.
#5: A free app as a BETA program to gather user feedback
App not ready for prime time? Consider a free version to get your app out there. This allows you to collect free feedback and user statistics as well as get the buzz out about your app. Use this time to iron out any issues without upsetting paid users who won’t tolerate bugs or rough features. Users of free apps (especially those clearly marked as BETAs) are much more forgiving and willing to help out.
#6: A free app for unsupported user segments and markets
Got an application that is already successful in another market or handset, but not quite ready for this new one? Give the existing paid application away for free while you gear up for the new market or handset. For example, offer the English language version of an application for free on non-English markets while working on those target locales. Or, release an app for a similar but not fully tested handset for free until it’s been verified (rather like a BETA).
#7: A free app for a limited time to build a user base
Users are a valuable commodity, especially for a new application. When building your brand, you could provide a free version of your application to hook users and lure them in. Build brand loyalty early on, then switch to a paid strategy later.
#8: A free app for a “lite” version of the app
Give users who don’t want to pay for all the shiny features another option: a stripped down version of the app. Perhaps you provide the app for free when the user limits their usage or bandwidth. Keep the juicy, tempting premium features for paid customers only. Users who want unlimited access or the full feature set must pay for it (the Flickr premium membership model).
#9: A free app with paid extras
All core features provided for free, but fun extras come at a cost. Facebook’s paid extras (like birthday presents) are an example of this. You might also have a free chat program, but charge for skins and icons to customize it (the MSN Instant Messenger emoticon fees).
#10: A free app made available for the greater good, to support non-profit service or government agency
An application might be provided for free for the greater good. This type of app might facilitate using a public service or prevent bad things from happening (emergency preparedness apps, free virus protection for the masses). This type of app makes no money directly, but is funded by the supporters of the non-profit or government agency. Costs are covered by grants, donations, etc.
#11: A free app as a vehicle to reach your customers or constituents, where profit is not the end goal, action is
Sometimes money isn’t what you value, but the ability to reach your customers or constituents. Think how political campaigns and causes have leveraged SMS in the past few elections to mobilize people. Why not write an app for that? :P
#12: A free app with the ability to take donations
Rely on loyal users to help keep your application afloat with donations.
Now let’s look at some of the “free” app strategies we see on the horizon (they are certainly feasible on the Android platform).
#13: A free app for users who contribute something of value (time, work, contacts, tweets, referrals)
An application provided for free to users who perform some kind of service, such as referring all their friends and giving away their names and email addresses (something of value to marketers), or tweeting about the app (word of mouth promotion), or doing some work like that of reCAPTCHA services (using CAPTCHA to digitize books). An example of this is Amazon’s Mechanical Turk service.
#14: A free app as a giveaway with the purchase of something else
An application bundled with something of more significant value. For example, a device pre-loaded with apps (free to purchasers of that device, where they would be paid for otherwise). You might also foster cross-brand alliances by promoting one app from another (a loyal user in one of your apps might receive a free version of another of your apps).
#15: A free app as a gift or goody
An app might be paid for by a third party as a gift membership or subscription. It might be a giveaway, like the Starbucks iTunes music cards (free music a business subsidizes for their customers).
#16: A free app as a market disrupter
An app might be given away for free to eat into the competition’s market share or break up a monopoly within a category. However, it’s important to note that pricing an app incorrectly hurts all developers (we’ve talked about this in previous posts).
#17: An app might be paid for using a different “currency” – such as a loyalty program or point system
An app might paid for using a different kind of currency, such as points from a hotel, airline or credit card loyalty program.
#18: An app could have a creative pricing scheme with free and paid users mixed together (early bird discounts, full price, and last minute pricing
App markets are getting more and more sophisticated. Developers can build new app markets or sell applications from their own websites, etc. This means that the sky’s the limit when it comes to payment models. There’s no reason why you couldn’t develop an application with a daily fee, where the first 1000 users get it for free, and the rest pay on a sliding scale. Early adopters on a given day pay less, but perhaps latecomers get some other incentive-a coupon for a free day later on in the week. You can get as creative as you need with your pricing.
You could also reward loyal users by making paid subscriptions cheaper (approaching free) the more a user plays (and therefore, the more money you’ve made from them). Veteran users are your best customers: they live and breathe within your app and they tell all their friends about it.
#19: A free app might have paid support
An app might be free, but if it users require configuration expertise or help, they might have to pay to get technical support. (Much like the Microsoft, Apple, and Dell Support programs).
Free application strategies are not suitable for all applications. However, in many cases, they can work very well. To determine if the free application route is the right one for your app and business, make sure your pricing strategy jives with your business plan, target market, and application cost analysis. These strategies work for more than just apps, too. You can apply these ideas to third party libraries, content and media, etc.
Got an idea for a different way to make "free" apps work for profit? Post a comment!


Common: Android Virtual Device Configurations

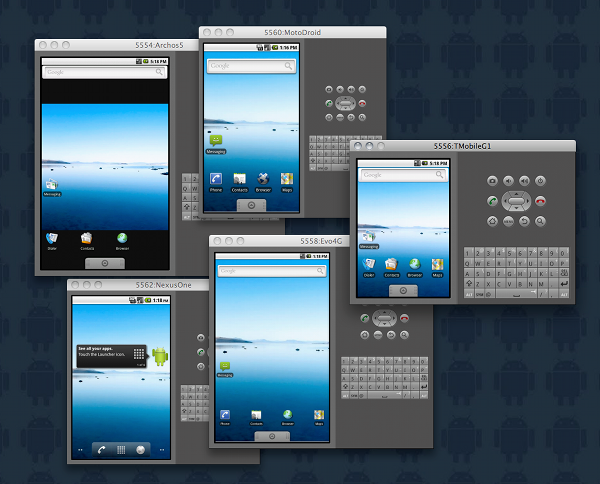
Android developers must target a variety of different Android devices in order to reach the greatest number of users. By properly configuring the Android Emulator to mimic the behavior of different devices, developers can save valuable time and money on testing and identify incompatibilities. In this tutorial, you will learn how to create Android Virtual Device (AVD) configurations for a variety of popular Android devices on the market today. Specifically, you will create AVD configurations for the:
  • HTC Evo 4G
  • Google/HTC Nexus One
  • Motorola Droid
  • T-Mobile/HTC G1
  • Archos 5 Internet Tablet

Final Result Preview

Android Virtual Device Configurations

Assumptions

The authors are assuming the reader has some basic knowledge of Android and have all of the tools installed and working—specifically Eclipse, the Android SDK and the Android ADT plug-in for Eclipse. You will need to use the Android SDK and AVD Manager available within the Eclipse IDE for this tutorial.
Note: If you do not use the Eclipse IDE for Android development, you can still follow this tutorial and create the appropriate AVD configurations using the android.bat (or the android command on Mac & Linux) command–line tool provided in the /tools directory of the Android SDK installation. However, the steps will be different, as you are working on the command-line instead of through the Android SDK and AVD Manager. For more information about the android command-line tool and how to use it to create and manage AVDs, see the Android SDK documentation.

Step 1: Getting Comfortable with the Android SDK and AVD Manager

The Android SDK and AVD Manager is integrated into the Eclipse IDE when you install the Android Development Tools (ADT) plug-in. The Android SDK and AVD Manager is used to keep track of the different Android SDK targets installed on your development machine, as well as to manage the Android Virtual Devices (AVDs) used by the Android Emulator to mimic the behavior of real Android devices.
An Android Emulator must have an AVD configuration in order to function. An AVD represents a unique, persistent system image. Any Settings changed and applications installed while using the AVD within the Emulator will be stored within the system image.
An AVD configuration also describes how the emulator should emulate a real device, including:
  • What version of the Android platform to emulate (API Level) (Note: The target platform is subject to change if, and when, devices receive over-the-air updates)
  • Screen size, density, and resolution
  • SD Card size and contents
  • Hardware details (Camera? Keyboard? Trackball? D-Pad?)
A complete list of hardware emulation options, including settings and their default values, is available in the Android SDK documentation.
You can launch the Android SDK and AVD Manager from the Eclipse toolbar by pressing the button with the green Android icon with the arrow () or by choosing Window->Android SDK and AVD Manager.

Step 2: Creating an AVD to Emulate the HTC Evo 4G

One of the newest Android devices on the market, the HTC Evo 4G is a powerful new phone with a nice big screen, a powerful processor, and a great camera.
The important specs of this device from an Emulator perspective are:
  • Target platform: Currently Android 2.1
  • Screen info: Large screen, high density
  • Lack of keyboard and DPad
  • Lack of trackball
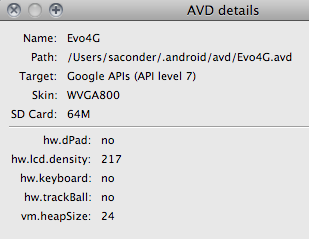
Therefore, let’s create an AVD configuration called Evo4G:
  1. Within Eclipse, launch the Android SDK and AVD Manager
  2. Select “Virtual Devices” from the left-hand options
  3. Click the “New” button to create a new AVD configuration
  4. Name the AVD: “Evo4G”
  5. Select the Target: “Google APIs API Level 7”
  6. Input the SD Card Size: “8GB”
  7. Input the Skin Details: “800×480”
  8. Edit the Hardware Property for Abstracted LCD Density: “217”
  9. Add another Hardware Property for DPad Support: “No”
  10. Add another Hardware Property for Keyboard Support: “No”
  11. Add another Hardware Property for Track-ball Support: “No”
  12. Save the AVD
You have now created an AVD that can be used by the Android Emulator to closely resemble and behave like the HTC Evo 4G. If you launch an Android application in emulator while this AVD, you can see that the screen closely resembles the experience one would have on the actual device. If you own one of these devices, you may immediately notice that the screen doesn’t look the same (software-wise). The emulator does not provide third-party add-ons, such as the HTC Sense UI.

Step 3: Creating an AVD to Emulate the Google Nexus One

Google’s Nexus One is a powerful phone with the latest Android release. Being a device originally sold directly by Google, this phone seems to get updates the soonest. It also has a nice screen and is quite fast, especially with Android 2.2.
The important specs of this device from an Emulator perspective are:
  • Target platform: Currently Android 2.2
  • Screen info: Medium sized, high density
  • No keyboard or DPad
  • Has track-ball
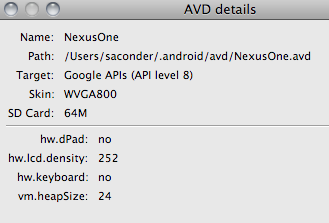
Therefore, let’s create an AVD configuration called NexusOne:
  1. Within Eclipse, launch the Android SDK and AVD Manager
  2. Select “Virtual Devices” from the left-hand options
  3. Click the “New” button to create a new AVD configuration
  4. Name the AVD: “NexusOne”
  5. Select the Target: “Google APIs API Level 8”
  6. Input the SD Card Size: “4GB”
  7. Input the Skin Details: “WVGA800” (800×480)
  8. Add a Hardware Property for Abstracted LCD Density: “252”
  9. Add another Hardware Property for DPad Support: “No”
  10. Save the AVD
Virtual Device Configuration
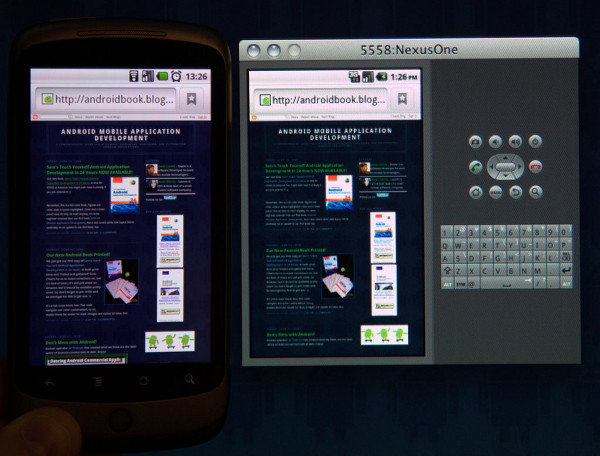
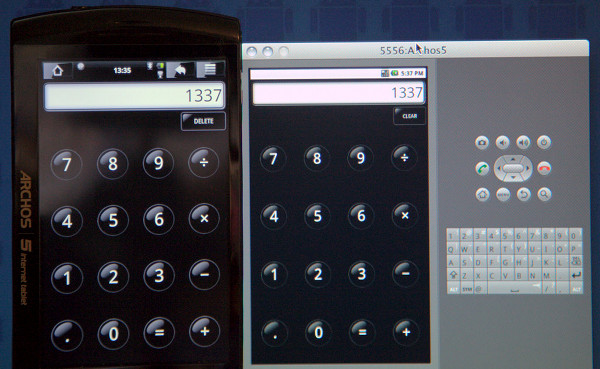
You have now created an AVD that can be used by the Android Emulator to closely resemble and behave like the Google Nexus One. If you launch an Android application in emulator while this AVD, you can see that the screen closely resembles the experience one would have on the actual device. Here we see a photo that shows the Android Emulator using the NexusOne AVD on the right and an actual Nexus One on the left.
Android Virtual Device

Step 4: Creating an AVD to Emulate the Motorola Droid

The Motorola Droid is one of the most prevalent Android phones available in the United States today. It’s also different from many of the other newer Android handsets in that it has a hardware keyboard.
The important specs of this device from an Emulator perspective are:
  • Target platform: Currently Android 2.1.
  • Screen info
  • Lack of trackball support
  • Has keyboard and DPAD
Therefore, let’s create an AVD configuration called MotoDroid:
  1. Within Eclipse, launch the Android SDK and AVD Manager
  2. Select “Virtual Devices” from the left-hand options
  3. Click the “New” button to create a new AVD configuration
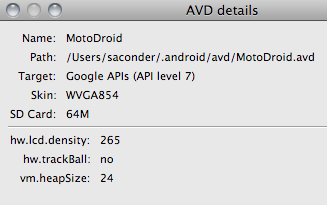
  4. Name the AVD: “MotoDroid”
  5. Select the Target: “Google APIs API Level 7”
  6. Input the SD Card Size: “16GB”
  7. Input the Skin Details: “WVGA854”
  8. Edit the Hardware Property for Abstracted LCD Density: “265”
  9. Add another Hardware Property for Track-ball Support: “No”
  10. Save the AVD
Android Virtual Device
You have now created an AVD that can be used by the Android Emulator to closely resemble and behave like the Motorola Droid. If you launch an Android application in emulator while this AVD, you can see that the screen closely resembles the experience one would have on the actual device.

Step 5: Creating an AVD to Emulate the T-Mobile G1

The T-Mobile G1 was the first publicly available Android handset. Although many users have upgraded to the newer Android devices, many G1s are still around. In fact, as of this writing, a good
50% of activated devices are still running Android 1.5 and Android 1.6—a good indication that G1s and other early Android handsets are still being used.
The important specs of this device from an Emulator perspective are:
  • Target platform: Google add-ons with Android 1.6
  • Screen info: medium density and small
  • Has keyboard and Track-ball, but no DPad
Therefore, let’s create an AVD configuration called TMobileG1:
  1. Within Eclipse, launch the Android SDK and AVD Manager
  2. Select “Virtual Devices” from the left-hand options
  3. Click the “New” button to create a new AVD configuration
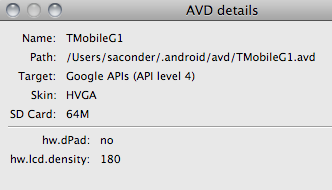
  4. Name the AVD: “TMobileG1”
  5. Select the Target: “Google APIs API Level 5”
  6. Input the SD Card Size: “2GB”
  7. Input the Skin Details: “HVGA” (480×320)
  8. Edit the Hardware Property for Abstracted LCD Density: “180”
  9. Add a Hardware Property for DPad Support: “No”
  10. Save the AVD
Android Virtual Device
You have now created an AVD that can be used by the Android Emulator to closely resemble and behave like the T-Mobile G1. If you launch an Android application in emulator while this AVD, you can see that the screen closely resembles the experience one would have on the actual device.

Step 6: Creating an AVD to Emulate the Archos 5 Internet Tablet

Finally, let’s look at an Android device that isn’t a phone. One good option is the Archos 5 Internet Table. Developing for other types of Android devices has its own set of challenges. Without the Google Add-ons, you can’t rely on any particular apps being present. For instance, the Google Maps app won’t be available. The device may still have a Maps app, but you won’t necessarily know how it will behave. Testing without these apps present, as you can do with the emulator, is highly recommended so you know if the application is making assumptions that it shouldn’t.
The important specs of this device from an Emulator perspective are:
  • Target platform: Android 1.6, but no Google Add-ons
  • Screen info: High Density and Large
  • No keyboard
  • No Google APIs
  • No Camera
Therefore, let’s create an AVD configuration called Archos5:
  1. Within Eclipse, launch the Android SDK and AVD Manager
  2. Select “Virtual Devices” from the left-hand options
  3. Click the “New” button to create a new AVD configuration
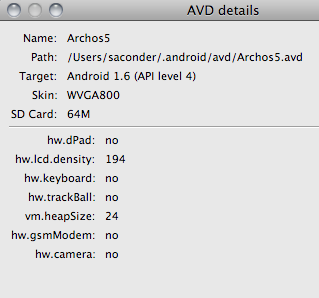
  4. Name the AVD: “Archos5”
  5. Select the Target: “Android 1.6 API Level 5”
  6. Input the SD Card Size: “2GB”
  7. Input the Skin Details: “WVGA800”
  8. Edit the Hardware Property for Abstracted LCD Density: “194”
  9. Add a Hardware Property for DPad Support: “No”
  10. Add another Hardware Property for Track-ball Support: “No”
  11. Add another Hardware Property for Keyboard Support: “No”
  12. Add another Hardware Property for Camera Support: “No”
  13. Add another Hardware Property for GSM modem Support: “No”
  14. Save the AVD
Android Virtual Device
You have now created an AVD that can be used by the Android Emulator to closely resemble and behave like the Archos 5 Internet Tablet. If you launch an Android application in emulator while this AVD, you can see that the screen closely resembles the experience one would have on the actual device. This next photo shows the Android Emulator using the Archos5 AVD on the right and an actual Archos 5 Internet Tablet on the left.
Android Virtual Device

Step 7: Using a Specific AVD with the Android Emulator

In order to use the AVDs you have created, you need to launch the Android Emulator, assigning it the appropriate AVD. The easiest way to do this from within Eclipse is to choose an Android project and update its Debug or Run Configuration to Target either Manual mode or a specific AVD by name. When you run or debug the application, the appropriate AVD will be loaded (if you chose one) or you will be prompted to manually choose an appropriate AVD from the Android Device Chooser, as shown below.
Android Virtual Device
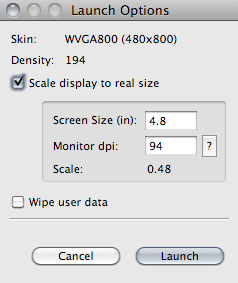
If you want to be able to control the on-screen size of the emulator, you’ll need to use the “Start…” button from the Device Chooser or from the Android SDK and AVD Manager. You’ll see the following dialog:
Android Virtual Device
Be sure to choose the correct numbers for your desktop display and the device screen size. On my 24” monitor that has a display resolution of 1920×1200, the dpi is 94. You’ll need to calculate this for your own monitor or laptop screen.

Step 8: Being Practical

Although you can now emulate a device in a far more realistic way, there are certain disadvantages to doing this. First, you’re still only just emulating, as we discussed. Second, and more importantly, some of these settings make using the emulator much more difficult. For instance, if you choose to turn off the keyboard, the emulator will honor that and you’ll be forced to use the on-screen keyboard within Android. Also, if you turn off GSM hardware, you will have no way of making a data connection as the Wi-Fi option does not work, either.
Finally, the SD card size directly takes up that much space on your computer. Make sure you use an SD card size that’s large enough for testing your application, but there is no real compelling need to emulate the SD card size exactly. The SD cards are user-replaceable, too, so you can’t guarantee that a user still has the original card in place. So, you have to decide which emulation is most important for you. In addition, the full emulation may be most useful when used with automated testing tools instead of by humans.

Conclusion

In this tutorial, you learned how to create Android Virtual Devices (AVDs) to emulate many popular Android devices, including: the HTC Evo 4G, the Google Nexus One, the Motorola Droid, the T-Mobile G1 and the Archos 5 Internet Tablet.
The Android Emulator is the developer’s most important tool for developing and publishing Android applications but it’s effective if it’s actually emulating the appropriate target devices. That’s where crafting detailed AVD configurations for target handsets becomes essential. Still, it’s important to remember that the Emulator is just pretending—not actually running the hardware and software abilities and constraints unique to that device. To ensure that your application works as expected on a given device, you should always test it on the actual hardware whenever possible. The same AVD can be used to test multiple applications, or multiple AVDs could be created to test different device configurations for a single application.
If you have any questions about this tutorial, feel free to contact us. For more information about Android Virtual Devices (AVDs), check out the Dev Guide documentation at the Android Developer website.
We hope you enjoyed this tutorial and look forward to your feedback!

Tip: Installed Application Not Installed Error

Have you ever loaded up an application, ready to debug, but then seen a message along the lines of, "Application Not Installed" display? This usually has an accompanying LogCat error:

ActivityManager: java.lang.SecurityException: Permission Denial: starting Intent

The cause and solution are very simple:

    This error is most likely caused by a duplicate Activity class entry in the manifest file.

 <activity 
   android:name=".MainActivity" 
   android:label="@string/app_name"> 
   <intent-filter> 
     <action 
       android:name="android.intent.action.MAIN" /> 
     <category 
       android:name="android.intent.category.LAUNCHER" /> 
   </intent-filter> 
 </activity> 
 <!-- lots of stuff --> 
 <activity 
   android:name="MainActivity"></activity> 

The solution should be clear by now:

    Remove the duplicate tag from the AndroidManifest.xml file
    Build the application again
    Reload the application

This is quite the opposite of forgetting to add an Activity class to the manifest file. And, yet, it leads to a failure just the same. Proper maintenance of the manifest file is important. It's not a file to mess around with.

Happy Android Coding!

Tip:speedup your android emulator lanch

The latest version of the Android emulator comes with a feature called "snapshots." It needs to be enabled as a feature of each AVD. Luckily, this version also includes the ability to edit existing AVDs.

First, enable the feature:

Enabling Snapshots

Second, when launching the AVD, choose to load from the snapshot and save the snapshot. When a snapshot isn't found, the AVD boots up from scratch. As we all know, this takes quite a long time even on very fast machines.

Enable Snapshot options

Now, when you exit, the system will store off a snapshot of the state of the AVD. This takes a little while, depending on how much RAM is assigned to the AVD. After saving the state once, the AVD will now launch very quickly - usually in just a couple of seconds.

However, the exit is no longer super speedy and often triggers "Not Responding" type messages. If you always want to return to exactly where you left off, this is how it will work. Overall, the behavior is much faster. However, if you want it to come up clean each time, just make sure the first time you boot it's clean, then exit to save the snapshot. Now, when you launch the AVD, only check load from snapshot, but make sure save to snapshot is unchecked.

Don't save over old snapshot

Now, the system will just load the AVD from the one snapshot you created and not save the state each time you exit. This means super speedy launches into a cleanly booted emulator as well as super speedy exits since the snapshot doesn't have to be saved each time.

You'll start to feel like you don't need to keep the emulators running all the time. You also won't necessarily go looking for a phone each time just to save the emulator boot-up time. (You'll still go after the phone or tablet when debugging for performance or with code bases that are otherwise slow on the emulator or other such reasons.)

How much difference does it actually make? Here are some test results running on a 6 core 3 GHz desktop with 8GB of RAM and a relatively speedy SSD:

  • Cold launch of Android 3.0 emulator to a usable state: 4 minutes 35 seconds
  • Snapshop launch of same Android 3.0 AVD: 8 seconds

That cuts the emulator launch time by 97%. Put another way, the cold launch takes 34 times longer. Taking these steps is well worth the minimal additional effort.

Creating A New Android Project

The Android Development Tools plugins kindly provides a Wizard for setting up new Projects which will allow us to create new Eclipse projects relatively quickly for either new or existing code.

Select File > New > Project

  1. Select Android > Android Project, and press Next
  2. Select the contents for the project:
  • Select Create new project in workspace to start a project for new code. Enter the project name, the base package name, the name of a single Activity class to create as a stub .java file, and a name to use for your application.
  • Select Create project from existing source to start a project from existing code. Use this option if you want to build and run any of the sample applications included with the SDK. The sample applications are located in the samples/ directory in the SDK. Browse to the directory containing the existing source code and click OK. If the directory contains a valid Android manifest file, the ADT plugin fills in the package, activity, and application names for you.

Press Finish.

Once completed the ADT plugin will go ahead and create the following files and folders as appropriate for the type of project selected:

  • src/ A folder that includes your stub .java Activity file.
  • res/ A folder for your resources.
  • AndroidManifest.xml The manifest for your project.

Creating A Launch Configuration For Eclipse

In order to be able to run and debug your own Eclipse applications you must first create a launch configuration. Simply, a launch config is used to specify which project to launch, which activity to start and the specific emulation options to use.

To create a launch configuration for the application, please see the following steps:
1. Select Run > Open Run Dialog… or Run > Open Debug Dialog… as appropriate.
2. In the project type list on the left, right-click Android Application and select New.
3. Enter a name for your configuration.
4. On the Android tab, browse for the project and Activity to start.
5. On the Emulator tab, set the desired screen and network properties, as well as any other emulator startup options.
6. You can set additional options on the Common tab as desired.
7. Press Apply to save the launch configuration, or press Run or Debug (as appropriate).

Running and Debugging an Eclipse Application

Once both steps 1 and 2 have been completed and your project and launch configs are up and running you will now be able to run or debug your application.

From the Eclipse main menu, select Run > Run or Run > Debug as appropriate. This command will run or debug the most recently selected application.

To set or change the active launch configuration, use the Run configuration manager, which you can access through Run > Open Run Dialog… or Run > Open Debug Dialog….

Running or debugging the application will trigger the following actions:

  • Starts the emulator, if it is not already running.
  • Compile the project, if there have been changes since the last build, and installs the application on the emulator.
  • Run starts the application.
  • Debug starts the application in “Wait for debugger” mode, then opens the Debug perspective and attaches the Eclipse Java debugger to the application.

Developing Android Applications with Other IDEs and Tools

Although it is recommended you use Eclipse with the Android plugin to develop your applications, the SDK also provides tools which will enable you to develop with other IDE’s including intelliJ (alternatively you could just use Eclipse without the plugin).

Creating an Android Project

Bundled with the Android SDK is a program called activityCreatory. activityCreator will generate a number of ‘stub’ files for your chosen project alongside a build file. This can be used to either create an Android project for new code or from existing code.

For Linux and Mac users the Android SDK provides a Python script called activityCreator.py, with Windows users receiving a btach script called activityCreator.bat. The program is used in the same way regardless of operating system.

In order to run activityCreator and create an Android project, follow these steps:

  1. In the command line, change to the tools/ directory of the SDK and create a new directory for your project files. If you are creating a project from existing code, change to the root folder of your application instead.
  2. Run activityCreator. In the command, you must specify a fully-qualified class name as an argument. If you are creating a project for new code, the class represents the name of a stub class that the script will create. If you are creating a project from existing code, you must specify the name of one Activity class in the package. Command options for the script include:

–out which sets the output directory. By default, the output directory is the current directory. If you created a new directory for your project files, use this option to point to it.

–ide intellij, which generates IntelliJ IDEA project files in the newly created project
Here’s an example:

/android_linux_sdk/tools$ ./activityCreator.py –out myproject your.package.name.ActivityName
package: your.package.name
out_dir: myproject
activity_name: ActivityName
~/android_linux_sdk/tools$

The activityCreator script generates the following files and directories (but will not overwrite existing ones):

  • AndroidManifest.xml The application manifest file, synced to the specified Activity class for the project.
  • build.xml An Ant file that you can use to build/package the application.
  • src/your/package/name/ActivityName.java The Activity class you specified on input.
  • your_activity.iml, your_activity.ipr, your_activity.iws [only with the -ide intelliJ flag] intelliJ project files.
  • res/ A directory to hold resources.
  • src/ The source directory.
  • bin/ The output directory for the build script.

Once complete you will now be able to move your folder wherever you choose for development but you’ll need to bear in mind then you will need to use the adb program in the tools folder in order to send the files to the emulator.

How-To Build An Android Application

Here’s how to use the Ant build.xml file generated by activityCreator to build your application.

  1. If you don’t have it, you can obtain Ant from the Apache Ant home page. Install it and make sure it is on your executable path.
  2. Before calling Ant, you need to declare the JAVA_HOME environment variable to specify the path to where the JDK is installed.Note: When installing JDK on Windows, the default is to install in the “Program Files” directory. This location will cause ant to fail, because of the space. To fix the problem, you can specify the JAVA_HOME variable like this: set JAVA_HOME=c:\Prora~1\Java\. The easiest solution, however, is to install JDK in a non-space directory, for example: c:\java\jdk1.6.0_02.
  3. If you have not done so already, follow the instructions for Creating a New Project above to set up the project.
  4. You can now run the Ant build file by simply typing ant in the same folder as the build.xml file for your project. Each time you change a source file or resource, you should run ant again and it will package up the latest version of the application for you to deploy.

How-To Run An Android Application

In order to run a compiled application you will first need to upload the .apk file to the /data/app/ directory in the emulator using the adb tool:

  1. Start the emulator (run $SDK_HOME/tools/emulator from the command line)
  2. On the emulator, navigate to the home screen (it is best not to have that application running when you reinstall it on the emulator; press the Home key to navigate away from that application).
  3. Run adb install myproject/bin/.apk to upload the executable. So, for example, to install the Lunar Lander sample, navigate in the command line to $SDK_ROOT/sample/LunarLander and type ../../tools/adb install bin/LunarLander.apk
  4. In the emulator, open the list of available applications, and scroll down to select and start your application.

Please Note: When installing an activity for the first time you may need to restart the emulator engine in order for the activity to show up in the application launcher or before any other application can call. This is usually down to the fact that the package manager normally only examines manifests completely on emulator start-up.

How-To Attach a Debugger to Your Application

The following section details how to display debug information directly onto the screen (for example CPU usage). It also shows you how to hook up your IDE to debug running applications on the emulator.

The Eclipse plugin automatically attaches a debugger but you can configure other IDE’s to wait on a debugging port by doing the following:

Start the Dalvik Debug Monitor Server (DDMS) tool , which acts as a port forwarding service between your IDE and the emulator.

  1. Set optional debugging configurations on your emulator, such as blocking application startup for an activity until a debugger is attached. Note that many of these debugging options can be used without DDMS, such as displaying CPU usage or screen refresh rate on the emulator.
  2. Configure your IDE to attach to port 8700 for debugging. We’ve included information higher up on how to set up Eclipse to debug your project.

How-To Configure Your IDE To Attach To The Debugging Port

DDMS will automatically assign a specific debugging port for every virtual machine that it detects on the emulator. You must either attach your IDE to that port, or use a default port 8700 to connect to whatever application is currently selected on the list of discovered virtual machines.

Ideally your IDE will attach to the application running on the emulator, showing its threads and allowing you to suspend them, inspect them, or set breakpoints. If you choose to “Wait for debugger” in the Development settings panel, this will cause the application to run when Eclipse connects therefore you will need to set any breakpoints you want before connecting. If you change the application being debugged or the “Wait for debugger” then the system will kill the selected currently running application.

This can be handy if your application is in a bad state, you can simply go to the settings and toggle the checkbox to kill it.

Debugging Android

Google Android has a fairly extensive set of tools to help you debug your programs:

  • DDMS – A graphical program that supports port forwarding (so you can set up breakpoints in your code in your IDE), screen captures on the emulator, thread and stack information, and many other features. You can also run logcat to retrieve your Log messages. See the linked topic for more information.
  • logcat – Dumps a log of system messages. The messages include a stack trace when the emulator throws an error, as well as Log messages. To run logcat, see the linked topic. …
    I/MemoryDealer( 763): MemoryDealer (this=0×54bda0): Creating 2621440 bytes heap at 0×438db000
    I/Logger( 1858): getView() requesting item number 0
    I/Logger( 1858): getView() requesting item number 1
    I/Logger( 1858): getView() requesting item number 2
    D/ActivityManager( 763): Stopping: HistoryRecord{409dbb20 com.google.android.home.AllApps}
  • Android Log- A logging class to print out messages to a log file on the emulator. You can read messages in real time if you run logcat on DDMS (covered next). Add a few logging method calls to your code.
  • To use the Log class, you just call Log.v() (verbose), Log.d() (debug), Log.i() (information), Log.w() (warning) or Log.e (error) depending on the importance you wish to assign the log message.
    Log.i(“MyActivity”, “MyClass.getView() — Requesting item number ” + position) You can use logcat to read these messages

  • Traceview – Android can save a log of method calls and times to a logging file that you can view in a graphical reader called Traceview. See the linked topic for more information.
  • Eclipse plugin – The Eclipse Android plugin incorporates a number of these tools (ADB, DDMS, logcat output, and other functionality). See the linked topic for more information.
  • Debug and Test Device Settings – Android exposes several settings that expose useful information such as CPU usage and frame rate.

Debug and Test Settings on the Device

Android enables you to set a number of options that will make it far easier to test and debug your applications.

To get to the development settings page on the emulator simply go to Dev Tools > Development Settings. This will in turn open up the development settings page with the following options (among others):

  • Debug app Selects the application that will be debugged. You do not need to set this to attach a debugger, but setting this value has two effects:

It will prevent Android from throwing an error if you pause on a breakpoint for a long time while debugging.

It will enable you to select the Wait for Debugger option to pause application startup until your debugger attaches (described next).

  • Wait for debugger Blocks the selected application from loading until a debugger attaches. This way you can set a breakpoint in onCreate(), which is important to debug the startup process of an Activity. When you change this option, any currently running instances of the selected application will be killed. In order to check this box, you must have selected a debug application as described in the previous option. You can do the same thing by adding waitForDebugger() to your code.
  • Immediately destroy activities Tells the system to destroy an activity as soon as it is stopped (as if Android had to reclaim memory). This is very useful for testing the onFreeze(Bundle) / onCreate(android.os.Bundle) code path, which would otherwise be difficult to force. Choosing this option will probably reveal a number of problems in your application due to not saving state.
  • Show screen updates Flashes a momentary pink rectangle on any screen sections that are being redrawn. This is very useful for discovering unnecessary screen drawing.
  • Show CPU usage Displays CPU meters at the top of the screen, showing how much the CPU is being used. The top red bar shows overall CPU usage, and the green bar underneath it shows the CPU time spent in compositing the screen. Note: You cannot turn this feature off once it is on, without restarting the emulator.
  • Show screen FPS Displays the current frame rate. Mostly useful for games to see the overall frame rate they are achieving. Note: You cannot turn this feature off once it is on without restarting the emulator.
  • Show background Displays a background pattern when no activity screens are visible. This typically does not happen, but can happen during debugging.

Android SDK Installation Guide

Here’s a quick start installation guide to get you up and running with the Google Android Software Development Kit (SDK). This guide will describe how to install the Android SDK and set up your chosen development environments. If you’ haven’t already done so you can download the Android SDK from the link below, then we can get started.

First you’ll need to download the Android SDK source files:
( http://code.google.com/android/download.html )

System Requirements

In order to first use the Android SDK code and tools for development you will of course need a suitable environment develop from.

Currently the following operating systems are supported:

  • Windows XP or Vista
  • Mac OS X 10.4.8 or later (x86 only)
  • Linux (tested on Linux Ubuntu Dapper Drake)

You will also need to install a suitable development environment such as:

Installing The Android SDK

First you will need to download the Android SDK pack .zip archive, once downloaded find a suitable installation location on your machine and extract the zipped files.

Please note: This installation location will be referred to as $SDK_ROOT from now on through this tutorial

Alternatively you can add /tools to your root path which will prevent the need to specify the full path to the tools directory along with enabling you to run Android Debug Bridge (adb) along with other command line tools.

To add /tools:

Linux

  1. Edit the ~/.bash_profile or ~/.bashrc files looking for a line that sets the PATH variable.
  2. Add the full path location to your $SDK_ROOT/tools location for the PATH variable.
  3. If no PATH line exists you can add the line by typing the following:
  4. export PATH=${PATH}:

Mac OS X

  1. In the home directory locate the .bash_profile and locating the PATH variable add the location to your $SDK_ROOT/tools folder.

Windows XP / Vista

  1. Right click on the My Computer icon and select the properties tab.
  2. Select the Advanced tab and click the Environment Variables button.
  3. In the new dialog box dowble-click on Path (located under System Variables) and type in the full path location to the tools directory.

The Android SDK also requires a suitable development environment to work in, here’s the installation guides for each of the supported environments.

Android Eclipse Plugin (ADT)

If you choose to use the Eclipse IDE as your Android development environment you will have the opportunity to install and run a plug-in called Android Development Tools. ADT comes with a variety of powerful tools and extensions that will make creating, running and debugging your Android applications much easier and faster.

In order to download and install ADT you will first need to configure an Eclipse remote update, this can achieved via the following steps:

  1. Start Eclipse, then select Help > Software Updates > Find and Install….
  2. In the dialog that appears, select Search for new features to install and press Next.
  3. Press New Remote Site.
  4. In the resulting dialog box, enter a name for the remote site (e.g. Android Plugin) and enter this as its URL: https://dl-ssl.google.com/android/eclipse/.
  5. Press OK.
  6. You should now see the new site added to the search list (and checked).
  7. Press Finish.
  8. In the subsequent Search Results dialog box, select the checkbox for Android Plugin > Eclipse Integration > Android Development Tools and press Next.
  9. Read the license agreement and then select Accept terms of the license agreement, if appropriate.
  10. Press Next.
  11. Press Finish.
  12. The ADT plugin is not signed; you can accept the installation anyway by pressing Install All.
  13. Restart Eclipse.
  14. After restart, update your Eclipse preferences to point to the SDK root directory ($SDK_ROOT):
    Select Window > Preferences… to open the Preferences panel. (Mac OS X: Eclipse > Preferences)
    Select Android from the left panel.
    For the SDK Location in the main panel, press Browse... and find the SDK root directory.
  15. Press Apply, then OK

Updating the ADT Plugin

To update the ADT plugin to the latest version, follow these steps:

  1. Select Help > Software Updates > Find and Install….
  2. Select Search for updates of the currently installed features and press Finish.
  3. If any update for ADT is available, select and install.

Alternatively:

  1. Select Help > Software Updates > Manage Configuration.
  2. Navigate down the tree and select Android Development Tools
  3. Select Scan for Updates under Available Tasks.

Popular Posts