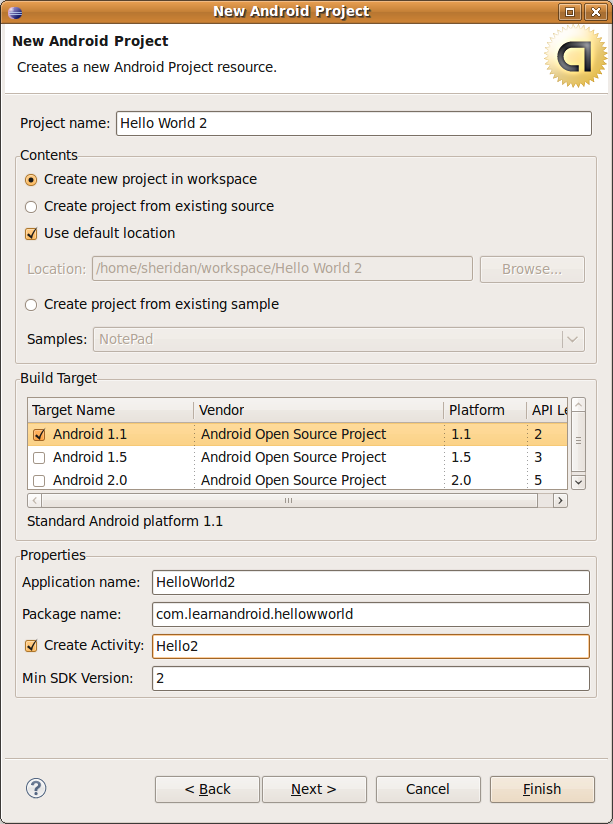
This is part 2 of a multipart series that looks at some basic Android I/O using some simple Hello World programs. If you haven’t already read it you should probably start with Part 1. For this part we are going to create a new project with these settings.
 The default Hello2.java will look very similar to the default Hello.java from Part 1.
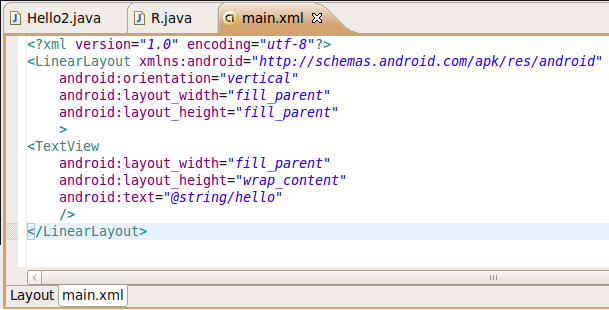
This time, however, we are going to find out more about the line setContentView(R.layout.main); In the first example we used setContentView to render our TextView to the screen. By default, however, Android is designed to use XML files to setup your UI. In addition to the src folder, which holds the source code intended to be edited by the developer, there is a gen folder and a res folder. The gen folder holds automatically generated code. If you open this folder and expand the namespace you should see R.java. We’ll come back to R.java in a moment. Before we open that file, lets also expand the contents of the res folder. The res folder holds resources for your android app. By default you should see three folders in here, drawable (which holds an android icon), layout (which contains main.xml), and values (which contains strings.xml). If you open main.xml and click on the main.xml tab you should see the XML that provides your activity its layout.
 We aren’t going to go into too much detail in this post on the UI XML. I will highlight, however, that the main node is LinearLayout which is a Layout Container that simply lines its children up in order one after another. android:orientation indicates whether they are lined up vertically or horizontally. The one child node we have in LinearLayout in a TextView. This is the same control we used in Part 1, but instead of instantiating it in our code we are using the UI XML to tell Android to provide us with one. The other thing I want you to notice is the line android:text=”@string/hello”. This is going to set the value of our TextView. If you go back to the res folder, open values, open strings.xml and click on the strings.xml tab you can see exactly what value we are putting into our TextView. In strings.xml there is a line
<string name=”hello”>Hello World, Hello2!</string>
so android:text=”@string/hello” will get this value and place it in the TextView that is displayed to the user. Let’s go ahead and change the value to our simple “Hello World” now.
<string name=”hello”>Hello World</string>
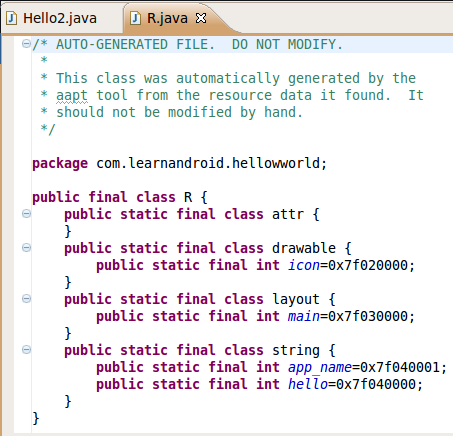
Go ahead and save your change and close both strings.xml and main.xml. At this point you are probably wondering how Android gets the information from the XML files and uses them in your program. Go back to the gen folder and open R.java and we’ll see the answer.
 When R.Java is generated it creates a class for each resource type (drawable, layout, and string) and variables in each class providing access to your resources. so R.layout.main actually maps to your main.xml file via this R Class and the layout inner class. If you don’t exactly understand what is going on here don’t worry. Just remember that R will let you access items in your res folder so the line.
setContentView(R.layout.main);
tells android to use the layout in your main.xml file in res/layout. Since we edited the value in string.xml we should be able to run this program and see our “Hello World” displayed. Before we move on to part three, let’s modify this program a little bit to show how to access a View element (such as our TextView) in our code.
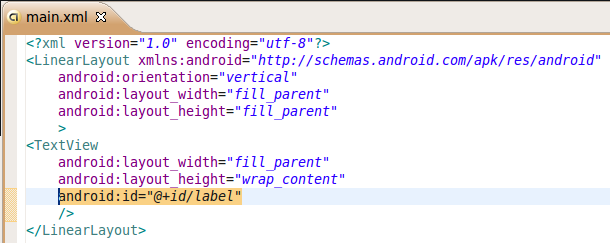
In order to make our TextView accessible in our code we’re going to start by opening main.xml in /res/layout and editing it like so:

We’ve removed the line
android:text=”@string/hello”
and replaced it with the line
android:id=”@+id/label”
The @+id tells Android that we are giving the TextView an ID inside of our Application Namespace. This will allow us to access it in our code. Let’s open up Hello2.java in our src folder.
We’ve added two lines of code. The first:
uses the findViewById method to get the View, which we cast to a TextView. Notice how our automatically generated R class automatically provides us with the id we defined in main.xml. The next line:
Simply sets the text to Hello World. If you run this application now you should see (once again) Hello World on your screen. That wraps up part 2. Make sure to check out Part 3 of the series where we explore two kinds of pop-up messages available in Android.
 The default Hello2.java will look very similar to the default Hello.java from Part 1.
package com.learnandroid.hellowworld;

import android.app.Activity;
import android.os.Bundle;

public class Hello2 extends Activity {
    /** Called when the activity is first created. */
    @Override
    public void onCreate(Bundle savedInstanceState) {
        super.onCreate(savedInstanceState);
        setContentView(R.layout.main);
    }
}
 We aren’t going to go into too much detail in this post on the UI XML. I will highlight, however, that the main node is LinearLayout which is a Layout Container that simply lines its children up in order one after another. android:orientation indicates whether they are lined up vertically or horizontally. The one child node we have in LinearLayout in a TextView. This is the same control we used in Part 1, but instead of instantiating it in our code we are using the UI XML to tell Android to provide us with one. The other thing I want you to notice is the line android:text=”@string/hello”. This is going to set the value of our TextView. If you go back to the res folder, open values, open strings.xml and click on the strings.xml tab you can see exactly what value we are putting into our TextView. In strings.xml there is a line
<string name=”hello”>Hello World, Hello2!</string>
so android:text=”@string/hello” will get this value and place it in the TextView that is displayed to the user. Let’s go ahead and change the value to our simple “Hello World” now.
<string name=”hello”>Hello World</string>
Go ahead and save your change and close both strings.xml and main.xml. At this point you are probably wondering how Android gets the information from the XML files and uses them in your program. Go back to the gen folder and open R.java and we’ll see the answer.
 When R.Java is generated it creates a class for each resource type (drawable, layout, and string) and variables in each class providing access to your resources. so R.layout.main actually maps to your main.xml file via this R Class and the layout inner class. If you don’t exactly understand what is going on here don’t worry. Just remember that R will let you access items in your res folder so the line.
setContentView(R.layout.main);
tells android to use the layout in your main.xml file in res/layout. Since we edited the value in string.xml we should be able to run this program and see our “Hello World” displayed. Before we move on to part three, let’s modify this program a little bit to show how to access a View element (such as our TextView) in our code.
In order to make our TextView accessible in our code we’re going to start by opening main.xml in /res/layout and editing it like so:

We’ve removed the line
android:text=”@string/hello”
and replaced it with the line
android:id=”@+id/label”
The @+id tells Android that we are giving the TextView an ID inside of our Application Namespace. This will allow us to access it in our code. Let’s open up Hello2.java in our src folder.
package com.learnandroid.hellowworld;

import android.app.Activity;
import android.os.Bundle;
import android.widget.TextView;

public class Hello2 extends Activity {
    /** Called when the activity is first created. */
    @Override
    public void onCreate(Bundle savedInstanceState) {
        super.onCreate(savedInstanceState);
        setContentView(R.layout.main);
        TextView label = (TextView) findViewById(R.id.label);
        label.setText("Hello World");

    }
}
TextView label = (TextView) findViewById(R.id.label);
label.setText("Hello World");


No comments:
Post a Comment