In the previous article, you saw the various basic views such as the TextView, EditText, Button, and how you can use them in your Android applications. In this article, we shall continue our exploration of another three categories of views - Picker views, List views, and Display views. The views discussed include:
Add a new file to the res/layout folder and name it as datetimepicker.xml and populate it with the following element:
Add a new class to the src/net.learn2develop.AndroidViews folder and name it as DateTimePickerExample.java. Populate it as follows:
Modify the AndroidManifest.xml file to register the new activity:
Modify the ViewsActivity.java file to start the DateTimePickerExample activity:
Press
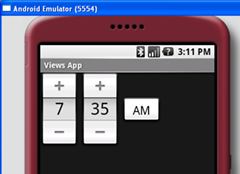
Figure 1: The TimePicker view in action
The above program displays the TimePickerDialog when the activity is created. When the time is set, the selected time is displayed using the Toast class. Figure 2 shows the TimePickerDialog in action.
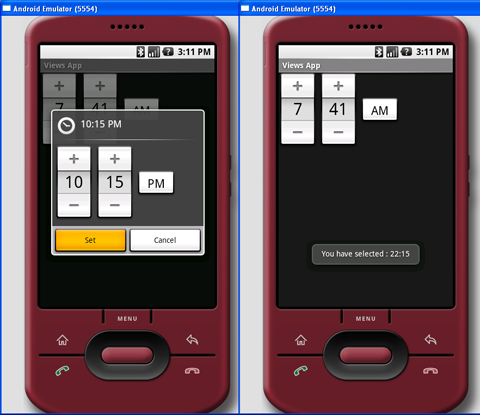
Figure 2: The TimePickerDialog in action
Remove the following statement added in the previous section:
Press F11 to debug the application on the Android emulator. Figure 3 shows the DatePicker view in action. Besides touching the “+” and “-“ buttons, you can also use the numeric keypad on the device to change the month, day, and year.
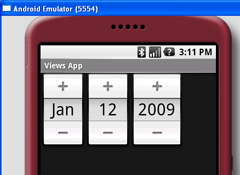
Figure 3: The DatePicker view in action
The above program displays the DatePickerDialog when the activity is created. When the date is set, the set date is displayed using the Toast class. Figure 4 shows the DatePickerDialog in action.
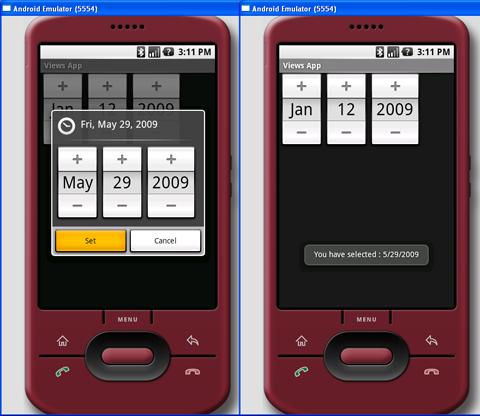
Figure 4: The DatePickerDialog in action
Add a new class to the src/net.learn2develop.AndroidViews folder and name it as ListViewExample.java. Populate it as follows:
Notice that the ListViewExample class extends the ListActivity class.
Modify the AndroidManifest.xml file to register the new activity:
Modify the ViewsActivity.java file as follows to start the ListViewExample activity:
Press
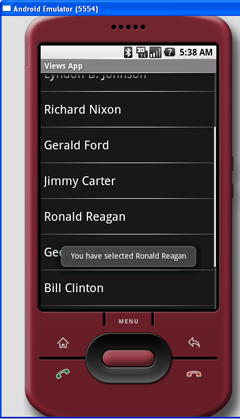
Figure 5: The ListView view in action
Add a new file to the res/layout folder and name it as spinner.xml and populate it with the following element:
Add a new class to the src/net.learn2develop.AndroidViews folder and name it as SpinnerExample.java. Populate it as follows:
The above program creates an ArrayAdapter object and associates it with the Spinner view. When an item in the Spinner view is selected, you will use the Toast class to display the item selected.
Modify the AndroidManifest.xml file to register the new activity:
Modify the ViewsActivity.java file to start the SpinnerExample activity:
Press
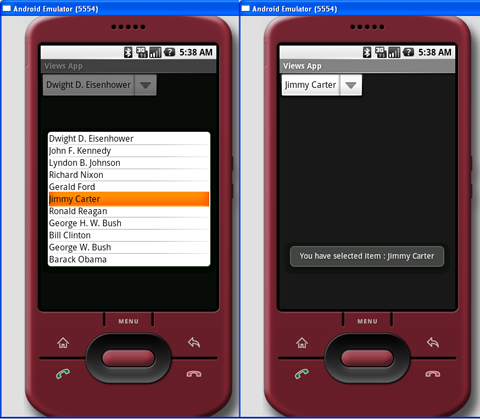
Figure 6: The Spinner view in actionInstead of displaying the items in the ArrayAdapter as a simple list, you can also display them using radio buttons. To do so, modify the second parameter in the constructor of the ArrayAdapter class:
Figure 7 shows the new appearance of the Spinner view.
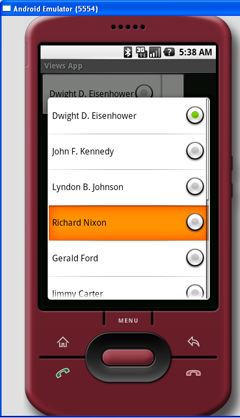
Figure 7: The Spinner view

Figure 8: The Gallery view used in the Android MarketTo see how the Gallery view works, add a new file to the res/layout folder and name it as displayview.xml and populate it with the following elements:
Add a new file to the res/values folder and name it as attrs.xml. Populate it with the following:
The Gallery1 style is used to apply to images displayed in the Gallery view so that the each image has a border around it (see Figure 9).
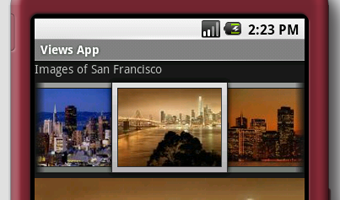
Figure 9: Gallery view, with borders on imagesAdd a few images to the res/drawable folder (see Figure 10).
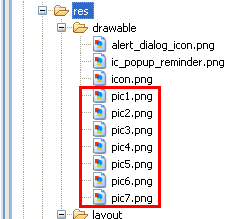
Figure 10: Adding imagesAdd a new class to the src/net.learn2develop.AndroidViews folder and name it as DisplayViewsExample.java. Populate it as follows:
You create the ImageAdapter class (which extends the BaseAdapter class) so that it can bind to the Gallery view with a series of ImageView views. The ImageView view is used to display images.
When an image in the Gallery view is selected (or clicked), the position of the image selected is displayed.
Modify the AndroidManifest.xml file to register the new activity:
Modify the ViewsActivity.java file as follows to start the DisplayViewsExample activity:
Press
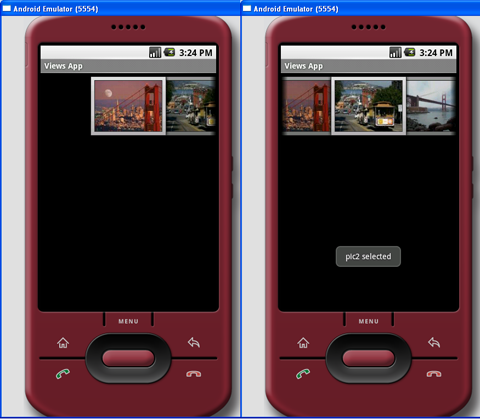
Figure 11: The Gallery view in actionIf you want to display the selected image in an ImageView view, modify the onItemClick() method so that the selected image is shown in the ImageView (image1) view:
When an image is selected, it will now be displayed in the ImageView view below (see Figure 12).
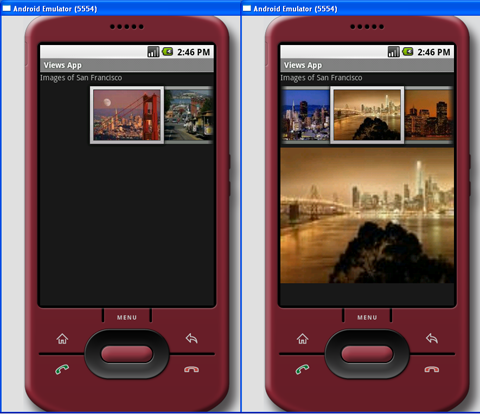
Figure 12: Selected image displayed in ImageView view
Modify the displayview.xml file as follows by adding the ImageSwitcher element:
Modify the DisplayViewsExample.java file as shown below:
Observe that the DisplayViewsExample class now implements the ViewFactory class. The ViewFactory class creates the views in a ViewSwitcher view. When your class implements the ViewFactory class, you need to override the makeView() method, which creates a new View to be added in a ViewSwitcher.
Press F11 in Eclipse and observe the ImageSwitcher in action as shown in Figure 13.

Figure 13: The ImageSwitcher in action
Modify the displayview.xml file as follows:
In the DisplayViewsExample.java file, code the following:
Observe that the code is very similar to the Gallery view example - you create the ImageAdapter class (which extends the BaseAdapter class) so that it can bind to the GridView view with a series of ImageView views. The ImageView view is used to display images. When an image is selected, the position of the image is displayed using the Toast class.
Press
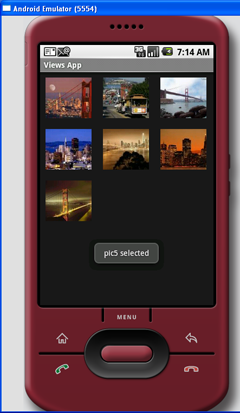
Figure 14: The Gridview in action
- TimePicker view
- DatePicker view
- ListView view
- Spinner view
- Gallery view
- ImageView
- ImageSwitcher view
- GridView view
Picker Views
Selecting date and time is one of the very common tasks you need to perform in a mobile application. Android supports this functionality through the TimePicker and DatePicker views.TimePicker View
The TimePicker view allows users to select a time of the day, in either 24 hour mode or AM/PM mode.Add a new file to the res/layout folder and name it as datetimepicker.xml and populate it with the following element:
<?xml version="1.0" encoding="utf-8"?>
<LinearLayout xmlns:android="http://schemas.android.com/apk/res/android"
    android:orientation="vertical"
    android:layout_width="fill_parent"
    android:layout_height="fill_parent"
    >

    <TimePicker
        android:layout_width="wrap_content"
        android:layout_height="wrap_content" />

</LinearLayout>
package net.learn2develop.AndroidViews;

import android.app.Activity;
import android.os.Bundle;

public class DateTimePickerExample extends Activity
{
    @Override
    protected void onCreate(Bundle savedInstanceState)
    {
        super.onCreate(savedInstanceState);
        setContentView(R.layout.datetimepicker);
    }
}
<?xml version="1.0" encoding="utf-8"?>
<manifest xmlns:android="http://schemas.android.com/apk/res/android"
      package="net.learn2develop.AndroidViews"
      android:versionCode="1"
      android:versionName="1.0.0">
    <application android:icon="@drawable/icon" android:label="@string/app_name">

        <activity android:name=".ViewsActivity"
                  android:label="@string/app_name">
            <intent-filter>
                <action android:name="android.intent.action.MAIN" />
                <category android:name="android.intent.category.LAUNCHER" />
            </intent-filter>
        </activity>

        <activity android:name=".DateTimePickerExample"
                  android:label="@string/app_name" />

    </application>
</manifest>
package net.learn2develop.AndroidViews;

import android.app.Activity;
import android.content.Intent;
import android.os.Bundle;

public class ViewsActivity extends Activity
{
    /** Called when the activity is first created. */
    @Override
    public void onCreate(Bundle savedInstanceState)
    {
        super.onCreate(savedInstanceState);
        setContentView(R.layout.main);

        startActivity(new Intent(this, DateTimePickerExample.class));

    }
}
F11 to debug the application on the Android emulator. Figure 1 shows the TimePicker view in action. You can use the numeric keypad on the device to change the hour and minute and click on the AM button to toggle between AM and PM.Figure 1: The TimePicker view in action
Displaying the TimePicker View in a Dialog Window
You can also display the TimePicker view in a dialog. Modify the DateTimePickerExample.java file as shown below:package net.learn2develop.AndroidViews; import android.app.Activity; import android.app.Dialog; import android.app.TimePickerDialog; import android.os.Bundle; import android.widget.TimePicker; import android.widget.Toast; public class DateTimePickerExample extends Activity { int hour, minute; static final int TIME_DIALOG_ID = 0; @Override protected void onCreate(Bundle savedInstanceState) { super.onCreate(savedInstanceState); setContentView(R.layout.datetimepicker); showDialog(TIME_DIALOG_ID); } @Override protected Dialog onCreateDialog(int id) { switch (id) { case TIME_DIALOG_ID: return new TimePickerDialog( this, mTimeSetListener, hour, minute, false); } return null; } private TimePickerDialog.OnTimeSetListener mTimeSetListener = new TimePickerDialog.OnTimeSetListener() { public void onTimeSet(TimePicker view, int hourOfDay, int minuteOfHour) { hour = hourOfDay; minute = minuteOfHour; Toast.makeText(getBaseContext(), "You have selected : " + hour + ":" + minute, Toast.LENGTH_SHORT).show(); } }; }
Figure 2: The TimePickerDialog in action
DatePicker View
Like the TimePicker view, the DatePicker view allows users to select a date. Modify the datetimepicker.xml file as follows:<?xml version="1.0" encoding="utf-8"?> <LinearLayout xmlns:android="http://schemas.android.com/apk/res/android" android:orientation="vertical" android:layout_width="fill_parent" android:layout_height="fill_parent" > <DatePicker android:layout_width="wrap_content" android:layout_height="wrap_content" /> </LinearLayout>
@Override
    protected void onCreate(Bundle savedInstanceState)
    {
         super.onCreate(savedInstanceState);
         setContentView(R.layout.datetimepicker);
         //---remove this line---
         //showDialog(TIME_DIALOG_ID);
}Figure 3: The DatePicker view in action
Displaying the DatePicker View in a Dialog Window
You can also display the DatePicker view in a dialog. Modify the DateTimePickerExample.java file as shown below:package net.learn2develop.AndroidViews; import android.app.Activity; import android.app.DatePickerDialog; import android.app.Dialog; import android.app.TimePickerDialog; import android.os.Bundle; import android.widget.DatePicker; import android.widget.TimePicker; import android.widget.Toast; public class DateTimePickerExample extends Activity { int hour, minute; int Year, month, day; static final int TIME_DIALOG_ID = 0; static final int DATE_DIALOG_ID = 1; @Override protected void onCreate(Bundle savedInstanceState) { super.onCreate(savedInstanceState); setContentView(R.layout.datetimepicker); showDialog(DATE_DIALOG_ID); } @Override protected Dialog onCreateDialog(int id) { switch (id) { case TIME_DIALOG_ID: return new TimePickerDialog( this, mTimeSetListener, hour, minute, false); case DATE_DIALOG_ID: return new DatePickerDialog( this, mDateSetListener, Year, month, day); } return null; } private TimePickerDialog.OnTimeSetListener mTimeSetListener = new TimePickerDialog.OnTimeSetListener() { //... }; private DatePickerDialog.OnDateSetListener mDateSetListener = new DatePickerDialog.OnDateSetListener() { public void onDateSet(DatePicker view, int year, int monthOfYear, int dayOfMonth) { Year = year; month = monthOfYear; day = dayOfMonth; Toast.makeText(getBaseContext(), "You have selected : " + (month + 1) + "/" + day + "/" + Year, Toast.LENGTH_SHORT).show(); } }; }
Figure 4: The DatePickerDialog in action
List Views
The ListView and Spinner views are useful for displaying long lists of items.ListView View
The ListView view displays a list of items in a vertically scrolling list. To see how the ListView view works, add a new file to the res/layout folder and name it as listview.xml and populate it with the following element:<?xml version="1.0" encoding="utf-8"?> <LinearLayout xmlns:android="http://schemas.android.com/apk/res/android" android:orientation="vertical" android:layout_width="fill_parent" android:layout_height="fill_parent" > <ListView android:id="@+id/android:list" android:layout_width="fill_parent" android:layout_height="fill_parent" /> </LinearLayout>
package net.learn2develop.AndroidViews;

import android.os.Bundle;
import android.view.View;
import android.widget.ArrayAdapter;
import android.widget.ListView;
import android.widget.Toast;
import android.app.ListActivity;

public class ListViewExample extends ListActivity
{
    String[] presidents = {
            "Dwight D. Eisenhower",
            "John F. Kennedy",
            "Lyndon B. Johnson",
            "Richard Nixon",
            "Gerald Ford",
            "Jimmy Carter",
            "Ronald Reagan",
            "George H. W. Bush",
            "Bill Clinton",
            "George W. Bush",
            "Barack Obama"
    };

    @Override
    public void onCreate(Bundle savedInstanceState)
    {
        super.onCreate(savedInstanceState);
        setContentView(R.layout.listview);

        setListAdapter(new ArrayAdapter<String>(this,
            android.R.layout.simple_list_item_1, presidents));
    }

    public void onListItemClick(
    ListView parent, View v,
    int position, long id)
    {
        Toast.makeText(this,
            "You have selected " + presidents[position],
            Toast.LENGTH_SHORT).show();
    }
}
Modify the AndroidManifest.xml file to register the new activity:
<?xml version="1.0" encoding="utf-8"?>
<manifest xmlns:android="http://schemas.android.com/apk/res/android"
      package="net.learn2develop.AndroidViews"
      android:versionCode="1"
      android:versionName="1.0.0">
    <application android:icon="@drawable/icon" android:label="@string/app_name">

        <activity android:name=".ViewsActivity"
                  android:label="@string/app_name">
            <intent-filter>
                <action android:name="android.intent.action.MAIN" />
                <category android:name="android.intent.category.LAUNCHER" />
            </intent-filter>
        </activity>

        <activity android:name=".ListViewExample"
                  android:label="@string/app_name" />

    </application>
</manifest>
package net.learn2develop.AndroidViews;

import android.app.Activity;
import android.content.Intent;
import android.os.Bundle;

public class ViewsActivity extends Activity
{
    /** Called when the activity is first created. */
    @Override
    public void onCreate(Bundle savedInstanceState) {
        super.onCreate(savedInstanceState);
        setContentView(R.layout.main);

        startActivity(new Intent( this, ListViewExample.class));

    }
}
F11 to debug the application on the Android emulator. Figure 5 shows the ListView view in action. When an item is selected, a message will be displayed.Figure 5: The ListView view in action
Spinner View
The Spinner view displays an item at a time from a list and lets the users choose among them.Add a new file to the res/layout folder and name it as spinner.xml and populate it with the following element:
<?xml version="1.0" encoding="utf-8"?>
<LinearLayout xmlns:android="http://schemas.android.com/apk/res/android"
    android:orientation="vertical"
    android:layout_width="fill_parent"
    android:layout_height="fill_parent"
    >
    <Spinner
        android:id="@+id/spinner1"
        android:layout_width="wrap_content"
        android:layout_height="wrap_content"
        android:drawSelectorOnTop="true" />

</LinearLayout>
package net.learn2develop.AndroidViews;

import android.app.Activity;
import android.os.Bundle;
import android.view.View;
import android.widget.AdapterView;
import android.widget.ArrayAdapter;
import android.widget.Spinner;
import android.widget.Toast;
import android.widget.AdapterView.OnItemSelectedListener;

public class SpinnerExample extends Activity
{
    String[] presidents = {
            "Dwight D. Eisenhower",
            "John F. Kennedy",
            "Lyndon B. Johnson",
            "Richard Nixon",
            "Gerald Ford",
            "Jimmy Carter",
            "Ronald Reagan",
            "George H. W. Bush",
            "Bill Clinton",
            "George W. Bush",
            "Barack Obama"
    };

    Spinner s1;

    @Override
    public void onCreate(Bundle savedInstanceState)
    {
        super.onCreate(savedInstanceState);
        setContentView(R.layout.spinner);

        s1 = (Spinner) findViewById(R.id.spinner1);

        ArrayAdapter<String> adapter = new ArrayAdapter<String>(this,
            android.R.layout.simple_spinner_item, presidents);

        s1.setAdapter(adapter);
        s1.setOnItemSelectedListener(new OnItemSelectedListener()
        {
            public void onItemSelected(AdapterView<?> arg0,
            View arg1, int arg2, long arg3)
            {
                int index = s1.getSelectedItemPosition();
                Toast.makeText(getBaseContext(),
                    "You have selected item : " + presidents[index],
                    Toast.LENGTH_SHORT).show();
            }

            public void onNothingSelected(AdapterView<?> arg0) {}
        });
    }
}
Modify the AndroidManifest.xml file to register the new activity:
<?xml version="1.0" encoding="utf-8"?>
<manifest xmlns:android="http://schemas.android.com/apk/res/android"
      package="net.learn2develop.AndroidViews"
      android:versionCode="1"
      android:versionName="1.0.0">
    <application android:icon="@drawable/icon" android:label="@string/app_name">
        <activity android:name=".ViewsActivity"
                  android:label="@string/app_name">
            <intent-filter>
                <action android:name="android.intent.action.MAIN" />
                <category android:name="android.intent.category.LAUNCHER" />
            </intent-filter>
        </activity>

        <activity android:name=".SpinnerExample"
                  android:label="@string/app_name" />

    </application>
</manifest>
package net.learn2develop.AndroidViews;

import android.app.Activity;
import android.content.Intent;
import android.os.Bundle;

public class ViewsActivity extends Activity
{
    /** Called when the activity is first created. */
    @Override
    public void onCreate(Bundle savedInstanceState) {
        super.onCreate(savedInstanceState);

        startActivity(new Intent(this, SpinnerExample.class));

    }
}
F11 to debug the application on the Android emulator. Figure 6 shows the Spinner view in action. Figure 6: The Spinner view in action
ArrayAdapter<String> adapter  = new ArrayAdapter<String>(
            this,
            android.R.layout.simple_spinner_dropdown_item,
            presidents);
Figure 7: The Spinner view
Display Views
So far all the views you have seen are used to display text information. For displaying images, you can use the ImageView, Gallery and ImageSwitcher views.Gallery and ImageView Views
The Gallery is a view that shows items (such as images) in a center-locked, horizontal scrolling list. Figure 8 shows the Gallery view used in the Android Market.Figure 8: The Gallery view used in the Android Market
<?xml version="1.0" encoding="utf-8"?>
<LinearLayout xmlns:android="http://schemas.android.com/apk/res/android"
    android:orientation="vertical"
    android:layout_width="fill_parent"
    android:layout_height="fill_parent"
    >

    <TextView
        android:layout_width="fill_parent"
        android:layout_height="wrap_content"
        android:text="Images of San Francisco" />

    <Gallery
        android:id="@+id/gallery1"
        android:layout_width="fill_parent"
        android:layout_height="wrap_content" />
    <ImageView
        android:id="@+id/image1"
        android:layout_width="320px"
        android:layout_height="250px"
        android:scaleType="fitXY" />

</LinearLayout>
<?xml version="1.0" encoding="utf-8"?>
<resources>
    <declare-styleable name="Gallery1">
        <attr name="android:galleryItemBackground" />
    </declare-styleable>
</resources>
Figure 9: Gallery view, with borders on images
Figure 10: Adding images
package net.learn2develop.AndroidViews;

import android.app.Activity;
import android.content.Context;
import android.content.res.TypedArray;
import android.os.Bundle;
import android.view.View;
import android.view.ViewGroup;
import android.widget.AdapterView;
import android.widget.BaseAdapter;
import android.widget.Gallery;
import android.widget.ImageView;
import android.widget.Toast;
import android.widget.AdapterView.OnItemClickListener;

public class DisplayViewsExample extends Activity
{
    //---the images to display---
    Integer[] imageIDs = {
            R.drawable.pic1,
            R.drawable.pic2,
            R.drawable.pic3,
            R.drawable.pic4,
            R.drawable.pic5,
            R.drawable.pic6,
            R.drawable.pic7
    };

    @Override
    public void onCreate(Bundle savedInstanceState)
    {
        super.onCreate(savedInstanceState);
        setContentView(R.layout.displayview);

        Gallery gallery = (Gallery) findViewById(R.id.gallery1);

        gallery.setAdapter(new ImageAdapter(this));
        gallery.setOnItemClickListener(new OnItemClickListener()
        {
            public void onItemClick(AdapterView parent,
            View v, int position, long id)
            {
                Toast.makeText(getBaseContext(),
                        "pic" + (position + 1) + " selected",
                        Toast.LENGTH_SHORT).show();
            }
        });
    }

    public class ImageAdapter extends BaseAdapter
    {
        private Context context;
        private int itemBackground;

        public ImageAdapter(Context c)
        {
            context = c;
            //---setting the style---
            TypedArray a = obtainStyledAttributes(R.styleable.Gallery1);
            itemBackground = a.getResourceId(
                R.styleable.Gallery1_android_galleryItemBackground, 0);
            a.recycle();
        }

        //---returns the number of images---
        public int getCount() {
            return imageIDs.length;
        }

        //---returns the ID of an item---
        public Object getItem(int position) {
            return position;
        }

        public long getItemId(int position) {
            return position;
        }

        //---returns an ImageView view---
        public View getView(int position, View convertView, ViewGroup parent) {
            ImageView imageView = new ImageView(context);
            imageView.setImageResource(imageIDs[position]);
            imageView.setScaleType(ImageView.ScaleType.FIT_XY);
            imageView.setLayoutParams(new Gallery.LayoutParams(150, 120));
            imageView.setBackgroundResource(itemBackground);
            return imageView;
        }
    }
}
When an image in the Gallery view is selected (or clicked), the position of the image selected is displayed.
Modify the AndroidManifest.xml file to register the new activity:
<?xml version="1.0" encoding="utf-8"?>
<manifest xmlns:android="http://schemas.android.com/apk/res/android"
      package="net.learn2develop.AndroidViews"
      android:versionCode="1"
      android:versionName="1.0.0">
    <application android:icon="@drawable/icon" android:label="@string/app_name">
        <activity android:name=".ViewsActivity"
                  android:label="@string/app_name">
            <intent-filter>
                <action android:name="android.intent.action.MAIN" />
                <category android:name="android.intent.category.LAUNCHER" />
            </intent-filter>
        </activity>

        <activity android:name=".DisplayViewsExample"
                  android:label="@string/app_name" />

    </application>
</manifest>
public class ViewsActivity extends Activity
{
    /** Called when the activity is first created. */
    @Override
    public void onCreate(Bundle savedInstanceState) {
        super.onCreate(savedInstanceState);
        setContentView(R.layout.main);

        startActivity(new Intent(this, DisplayViewsExample.class));

    }
}
F11 to debug the application on the Android emulator. Figure 11 shows the Gallery view in action. You can scroll through the list of thumbnail images by swiping it. When an image is selected, the name of the image selected will be displayed by the Toast class.Figure 11: The Gallery view in action
public void onItemClick(AdapterView parent,
            View v, int position, long id)
            {
                //---display the images selected---
                ImageView imageView = (ImageView) findViewById(R.id.image1);
                imageView.setImageResource(imageIDs[position]);
            }
Figure 12: Selected image displayed in ImageView view
ImageSwitcher View
You saw in the previous section on how to use the Gallery view together with an ImageView view to display a series of thumbnail images so that when one is selected, the selected image is displayed in the ImageView view. Because this is such a common UI task, Android provides the ImageSwitcher view, which is functionally similar to what you have achieved in the previous section.Modify the displayview.xml file as follows by adding the ImageSwitcher element:
<?xml version="1.0" encoding="utf-8"?>
<RelativeLayout xmlns:android="http://schemas.android.com/apk/res/android"
    android:orientation="vertical"
    android:layout_width="fill_parent"
    android:layout_height="fill_parent"
    android:background="#ff000000"
    >

    <ImageSwitcher
        android:id="@+id/switcher1"
        android:layout_width="fill_parent"
        android:layout_height="fill_parent"
        android:layout_alignParentLeft="true"
        android:layout_alignParentRight="true"
        android:layout_alignParentBottom="true"
        />
    <Gallery
        android:id="@+id/gallery1"
        android:layout_width="fill_parent"
        android:layout_height="wrap_content"
        />

</RelativeLayout>
package net.learn2develop.AndroidViews;

import android.app.Activity;
import android.content.Context;
import android.content.res.TypedArray;
import android.os.Bundle;
import android.view.View;
import android.view.ViewGroup;
import android.view.animation.AnimationUtils;
import android.widget.AdapterView;
import android.widget.BaseAdapter;
import android.widget.Gallery;
import android.widget.Gallery.LayoutParams;
import android.widget.ViewSwitcher.ViewFactory;
import android.widget.ImageSwitcher;
import android.widget.ImageView;
import android.widget.AdapterView.OnItemClickListener;

public class DisplayViewsExample extends Activity
implements ViewFactory
{
    //---the images to display---
    Integer[] imageIDs = {
            R.drawable.pic1,
            R.drawable.pic2,
            R.drawable.pic3,
            R.drawable.pic4,
            R.drawable.pic5,
            R.drawable.pic6,
            R.drawable.pic7
    };

    private ImageSwitcher imageSwitcher;

    @Override
    public void onCreate(Bundle savedInstanceState)
    {
        super.onCreate(savedInstanceState);
        setContentView(R.layout.displayview);

        imageSwitcher = (ImageSwitcher) findViewById(R.id.switcher1);
        imageSwitcher.setFactory(this);
        imageSwitcher.setInAnimation(AnimationUtils.loadAnimation(this,
                android.R.anim.fade_in));
        imageSwitcher.setOutAnimation(AnimationUtils.loadAnimation(this,
                android.R.anim.fade_out));

        Gallery gallery = (Gallery) findViewById(R.id.gallery1);
        gallery.setAdapter(new ImageAdapter(this));
        gallery.setOnItemClickListener(new OnItemClickListener()
        {
            public void onItemClick(AdapterView parent,
            View v, int position, long id)
            {
             imageSwitcher.setImageResource(imageIDs[position]);
            }
        });
    }

    public View makeView()
    {
        ImageView imageView = new ImageView(this);
        imageView.setBackgroundColor(0xFF000000);
        imageView.setScaleType(ImageView.ScaleType.FIT_CENTER);
        imageView.setLayoutParams(new
                ImageSwitcher.LayoutParams(
                        LayoutParams.FILL_PARENT,
                        LayoutParams.FILL_PARENT));
        return imageView;
    }

    public class ImageAdapter extends BaseAdapter
    {
        private Context context;
        private int itemBackground;

        public ImageAdapter(Context c)
        {
            context = c;

            //---setting the style---
            TypedArray a = obtainStyledAttributes(R.styleable.Gallery1);
            itemBackground = a.getResourceId(
                    R.styleable.Gallery1_android_galleryItemBackground, 0);
            a.recycle();
        }

        //---returns the number of images---
        public int getCount()
        {
            return imageIDs.length;
        }

        //---returns the ID of an item---
        public Object getItem(int position)
        {
            return position;
        }

        public long getItemId(int position)
        {
            return position;
        }

        //---returns an ImageView view---
        public View getView(int position, View convertView, ViewGroup parent)
        {
            ImageView imageView = new ImageView(context);
            imageView.setImageResource(imageIDs[position]);
            imageView.setScaleType(ImageView.ScaleType.FIT_XY);
            imageView.setLayoutParams(new Gallery.LayoutParams(150, 120));
            imageView.setBackgroundResource(itemBackground);
            return imageView;
        }
   }
    }
Press F11 in Eclipse and observe the ImageSwitcher in action as shown in Figure 13.
Figure 13: The ImageSwitcher in action
GridView View
The GridView view shows items in two-dimensional scrolling grid. You can use the GridView view together with ImageView views to display a series of images.Modify the displayview.xml file as follows:
<?xml version="1.0" encoding="utf-8"?>
<GridView xmlns:android="http://schemas.android.com/apk/res/android"
    android:id="@+id/gridview"
    android:layout_width="fill_parent"
    android:layout_height="fill_parent"
    android:numColumns="auto_fit"
    android:verticalSpacing="10dp"
    android:horizontalSpacing="10dp"
    android:columnWidth="90dp"
    android:stretchMode="columnWidth"
    android:gravity="center"
/>
package net.learn2develop.AndroidViews;

import android.app.Activity;
import android.content.Context;
import android.os.Bundle;
import android.view.View;
import android.view.ViewGroup;
import android.widget.AdapterView;
import android.widget.BaseAdapter;
import android.widget.GridView;
import android.widget.ImageView;
import android.widget.Toast;
import android.widget.AdapterView.OnItemClickListener;

public class DisplayViewsExample extends Activity
{
    //---the images to display---
    Integer[] imageIDs = {
            R.drawable.pic1,
            R.drawable.pic2,
            R.drawable.pic3,
            R.drawable.pic4,
            R.drawable.pic5,
            R.drawable.pic6,
            R.drawable.pic7
    };

    @Override
    public void onCreate(Bundle savedInstanceState)
    {
        super.onCreate(savedInstanceState);
        setContentView(R.layout.displayview);

        GridView gridView = (GridView) findViewById(R.id.gridview);
        gridView.setAdapter(new ImageAdapter(this));

        gridView.setOnItemClickListener(new OnItemClickListener()
        {
            public void onItemClick(AdapterView parent,
            View v, int position, long id)
            {
                Toast.makeText(getBaseContext(),
                        "pic" + (position + 1) + " selected",
                        Toast.LENGTH_SHORT).show();
            }
        });
    }

    public class ImageAdapter extends BaseAdapter
    {
        private Context context;

        public ImageAdapter(Context c)
        {
            context = c;
        }

        //---returns the number of images---
        public int getCount() {
            return imageIDs.length;
        }

        //---returns the ID of an item---
        public Object getItem(int position) {
            return position;
        }

        public long getItemId(int position) {
            return position;
        }

        //---returns an ImageView view---
        public View getView(int position, View convertView, ViewGroup parent)
        {
            ImageView imageView;
            if (convertView == null) {
                imageView = new ImageView(context);
                imageView.setLayoutParams(new GridView.LayoutParams(85, 85));
                imageView.setScaleType(ImageView.ScaleType.CENTER_CROP);
                imageView.setPadding(5, 5, 5, 5);
            } else {
                imageView = (ImageView) convertView;
            }
            imageView.setImageResource(imageIDs[position]);
            return imageView;
        }
    }
}
Press
F11 to debug the application. Figure 14 shows the GridView view in action.Figure 14: The Gridview in action


No comments:
Post a Comment