Pages

Thursday, June 2, 2011

Displaying the List of video files Stored in SD card and playing the video

The folowing example used to list all the video files stored in SDcard and you can
play the video by selecting the file from list.

AndroidManifest.xml
--------------------
<?xml version="1.0" encoding="utf-8"?>
< manifest xmlns:android="http://schemas.android.com/apk/res/android"
      package="sample.video" android:versionCode="1" android:versionName="1.0.0">
      < uses-permission android:name="android.permission.MOUNT_UNMOUNT_FILESYSTEMS" />
      < application android:icon="@drawable/icon" android:label="@string/app_name">
            < activity android:name=".VideoActivity" android:label="@string/app_name">
                  < intent-filter>
                        < action android:name="android.intent.action.MAIN" />
                        < category android:name="android.intent.category.LAUNCHER"/>
                  < /intent-filter>
            </activity>
            < activity android:name=".ViewVideo">
                  < intent-filter>
                        < action android:name="android.intent.action.VIEW" />
                        < category android:name="android.intent.category.DEFAULT" />
                  </intent-filter>
            </activity>
      </application>
</manifest>


main.xml
--------
<?xml version="1.0" encoding="utf-8"?>
< LinearLayout xmlns:android="http://schemas.android.com/apk/res/android"
      android:orientation="vertical" android:layout_width="fill_parent"
      android:layout_height="fill_parent">
      < ListView
            android:id="@+id/PhoneVideoList"
            android:layout_width="fill_parent"
            android:layout_height="fill_parent"/>
</LinearLayout>

VideoActivity.java
-------------------
package sample.video;

import android.app.Activity;
import android.content.Context;
import android.content.Intent;
import android.database.Cursor;
import android.os.Bundle;
import android.provider.MediaStore;
import android.view.View;
import android.view.ViewGroup;
import android.widget.AdapterView;
import android.widget.BaseAdapter;
import android.widget.ListView;
import android.widget.TextView;
import android.widget.AdapterView.OnItemClickListener;

public class VideoActivity extends Activity {
      private Cursor videocursor;
      private int video_column_index;
      ListView videolist;
      int count;

      /** Called when the activity is first created. */
      @Override
      public void onCreate(Bundle savedInstanceState) {
            super.onCreate(savedInstanceState);
            setContentView(R.layout.main);
            init_phone_video_grid();
      }

      private void init_phone_video_grid() {
            System.gc();
            String[] proj = { MediaStore.Video.Media._ID,
MediaStore.Video.Media.DATA,
MediaStore.Video.Media.DISPLAY_NAME,
MediaStore.Video.Media.SIZE };
            videocursor = managedQuery(MediaStore.Video.Media.EXTERNAL_CONTENT_URI,
proj, null, null, null);
            count = videocursor.getCount();
            videolist = (ListView) findViewById(R.id.PhoneVideoList);
            videolist.setAdapter(new VideoAdapter(getApplicationContext()));
            videolist.setOnItemClickListener(videogridlistener);
      }

      private OnItemClickListener videogridlistener = new OnItemClickListener() {
            public void onItemClick(AdapterView parent, View v, int position,
long id) {
                  System.gc();
                  video_column_index = videocursor
.getColumnIndexOrThrow(MediaStore.Video.Media.DATA);
                  videocursor.moveToPosition(position);
                  String filename = videocursor.getString(video_column_index);
                  Intent intent = new Intent(VideoActivity.this, ViewVideo.class);
                  intent.putExtra("videofilename", filename);
                  startActivity(intent);
            }
      };

      public class VideoAdapter extends BaseAdapter {
            private Context vContext;

            public VideoAdapter(Context c) {
                  vContext = c;
            }

            public int getCount() {
                  return count;
            }

            public Object getItem(int position) {
                  return position;
            }

            public long getItemId(int position) {
                  return position;
            }

            public View getView(int position, View convertView, ViewGroup parent) {
                  System.gc();
                  TextView tv = new TextView(vContext.getApplicationContext());
                  String id = null;
                  if (convertView == null) {
                        video_column_index = videocursor
.getColumnIndexOrThrow(MediaStore.Video.Media.DISPLAY_NAME);
                        videocursor.moveToPosition(position);
                        id = videocursor.getString(video_column_index);
                        video_column_index = videocursor
.getColumnIndexOrThrow(MediaStore.Video.Media.SIZE);
                        videocursor.moveToPosition(position);
                        id += " Size(KB):" + videocursor.getString(video_column_index);
                        tv.setText(id);
                  } else
                        tv = (TextView) convertView;
                  return tv;
            }
      }
}


ViewVideo.java
---------------
package sample.video;

import android.app.Activity;
import android.content.Intent;
import android.os.Bundle;
import android.widget.MediaController;
import android.widget.VideoView;

public class ViewVideo extends Activity {
      private String filename;
      @Override
      public void onCreate(Bundle savedInstanceState) {
            super.onCreate(savedInstanceState);
            System.gc();
            Intent i = getIntent();
            Bundle extras = i.getExtras();
            filename = extras.getString("videofilename");
            VideoView vv = new VideoView(getApplicationContext());
            setContentView(vv);
            vv.setVideoPath(filename);
            vv.setMediaController(new MediaController(this));
            vv.requestFocus();
            vv.start();
      }
}
Displaying the List of music files Stored in SD card and playing music in the background

The foolowing example used to list all the music files stored in SDcard and you can play the music
in the backgroung by selecting the file from list.

main.xml
--------
<?xml version="1.0" encoding="utf-8"?>
< LinearLayout xmlns:android="http://schemas.android.com/apk/res/android"
      android:orientation="vertical" android:layout_width="fill_parent"
      android:layout_height="fill_parent">
      < ListView
            android:id="@+id/PhoneMusicList"
            android:layout_width="fill_parent"
            android:layout_height="fill_parent"/>
</LinearLayout>

MusicActivity.java
-------------------
package sample.music;

import android.app.Activity;
import android.content.Context;
import android.database.Cursor;
import android.media.MediaPlayer;
import android.os.Bundle;
import android.provider.MediaStore;
import android.view.View;
import android.view.ViewGroup;
import android.widget.AdapterView;
import android.widget.BaseAdapter;
import android.widget.ListView;
import android.widget.TextView;
import android.widget.AdapterView.OnItemClickListener;

public class MusicActivity extends Activity {
      ListView musiclist;
      Cursor musiccursor;
      int music_column_index;
      int count;
      MediaPlayer mMediaPlayer;

      /** Called when the activity is first created. */
      @Override
      public void onCreate(Bundle savedInstanceState) {
            super.onCreate(savedInstanceState);
            setContentView(R.layout.main);
            init_phone_music_grid();
      }

      private void init_phone_music_grid() {
            System.gc();
            String[] proj = { MediaStore.Audio.Media._ID,
MediaStore.Audio.Media.DATA,
MediaStore.Audio.Media.DISPLAY_NAME,
MediaStore.Video.Media.SIZE };
            musiccursor = managedQuery(MediaStore.Audio.Media.EXTERNAL_CONTENT_URI,
proj, null, null, null);
            count = musiccursor.getCount();
            musiclist = (ListView) findViewById(R.id.PhoneMusicList);
            musiclist.setAdapter(new MusicAdapter(getApplicationContext()));

            musiclist.setOnItemClickListener(musicgridlistener);
            mMediaPlayer = new MediaPlayer();
      }

      private OnItemClickListener musicgridlistener = new OnItemClickListener() {
            public void onItemClick(AdapterView parent, View v, int position,
long id) {
                  System.gc();
                  music_column_index = musiccursor
.getColumnIndexOrThrow(MediaStore.Audio.Media.DATA);
                  musiccursor.moveToPosition(position);
                  String filename = musiccursor.getString(music_column_index);

                  try {
                        if (mMediaPlayer.isPlaying()) {
                              mMediaPlayer.reset();
                        }
                        mMediaPlayer.setDataSource(filename);
                        mMediaPlayer.prepare();
                        mMediaPlayer.start();
                  } catch (Exception e) {

                  }
            }
      };

      public class MusicAdapter extends BaseAdapter {
            private Context mContext;

            public MusicAdapter(Context c) {
                  mContext = c;
            }

            public int getCount() {
                  return count;
            }

            public Object getItem(int position) {
                  return position;
            }

            public long getItemId(int position) {
                  return position;
            }

            public View getView(int position, View convertView, ViewGroup parent) {
                  System.gc();
                  TextView tv = new TextView(mContext.getApplicationContext());
                  String id = null;
                  if (convertView == null) {
                        music_column_index = musiccursor
.getColumnIndexOrThrow(MediaStore.Audio.Media.DISPLAY_NAME);
                        musiccursor.moveToPosition(position);
                        id = musiccursor.getString(music_column_index);
                        music_column_index = musiccursor
.getColumnIndexOrThrow(MediaStore.Audio.Media.SIZE);
                        musiccursor.moveToPosition(position);
                        id += " Size(KB):" + musiccursor.getString(music_column_index);
                        tv.setText(id);
                  } else
                        tv = (TextView) convertView;
                  return tv;
            }
      }
}

How to Display Thumbnails of Images Stored in the SD Card

Using the following example we can display the thumbnails of images stored in the sd card. Here im displaying the thumbnails in the Grid view.
You should to add the folowing permission in the manifest xml file.
< uses-permission android:name="android.permission.MOUNT_UNMOUNT_FILESYSTEMS"/>
Sd card should be available with the emulator or real device.

ImageThumbnailsActivity is the main Activity.

AndroidManifest.xml
--------------------
<?xml version="1.0" encoding="utf-8"?>
< manifest xmlns:android="http://schemas.android.com/apk/res/android"
      package="image.Thumbnails" android:versionCode="1" android:versionName="1.0.0">
      < uses-permission android:name="android.permission.MOUNT_UNMOUNT_FILESYSTEMS" />
      < application android:icon="@drawable/icon" android:label="@string/app_name">
            < activity android:name=".ImageThumbnailsActivity"
                  android:label="@string/app_name">
                  < intent-filter>
                        < action android:name="android.intent.action.MAIN" />
                        < category android:name="android.intent.category.LAUNCHER"/>
                  </intent-filter>
            </activity>
            < activity android:name=".ViewImage">
                  < intent-filter>
                        < action android:name="android.intent.action.VIEW" />
                        < category android:name="android.intent.category.DEFAULT" />
                  </intent-filter>
            </activity>
      </application>
</manifest>

package image.Thumbnails;

import android.app.Activity;
import android.content.Context;
import android.content.Intent;
import android.database.Cursor;
import android.net.Uri;
import android.os.Bundle;
import android.provider.MediaStore;
import android.view.View;
import android.view.ViewGroup;
import android.widget.AdapterView;
import android.widget.BaseAdapter;
import android.widget.GridView;
import android.widget.ImageView;
import android.widget.AdapterView.OnItemClickListener;

public class ImageThumbnailsActivity extends Activity {
      /** Called when the activity is first created. */
      private Cursor imagecursor, actualimagecursor;
      private int image_column_index, actual_image_column_index;
      GridView imagegrid;
      private int count;
      @Override
      public void onCreate(Bundle savedInstanceState) {
            super.onCreate(savedInstanceState);
            setContentView(R.layout.main);
            init_phone_image_grid();
      }
      private void init_phone_image_grid() {
            String[] img = { MediaStore.Images.Thumbnails._ID };
            imagecursor = managedQuery(
MediaStore.Images.Thumbnails.EXTERNAL_CONTENT_URI, img, null,
null, MediaStore.Images.Thumbnails.IMAGE_ID + "");
            image_column_index = imagecursor
.getColumnIndexOrThrow(MediaStore.Images.Thumbnails._ID);
            count = imagecursor.getCount();
            imagegrid = (GridView) findViewById(R.id.PhoneImageGrid);
            imagegrid.setAdapter(new ImageAdapter(getApplicationContext()));
            imagegrid.setOnItemClickListener(new OnItemClickListener() {
                  public void onItemClick(AdapterView parent, View v,
int position, long id) {
                        System.gc();
                        String[] proj = { MediaStore.Images.Media.DATA };
                        actualimagecursor = managedQuery(
MediaStore.Images.Media.EXTERNAL_CONTENT_URI, proj,
null, null, null);
                        actual_image_column_index = actualimagecursor
.getColumnIndexOrThrow(MediaStore.Images.Media.DATA);
                        actualimagecursor.moveToPosition(position);
                        String i = actualimagecursor.getString(actual_image_column_index);
                        System.gc();
                        Intent intent = new Intent(getApplicationContext(), ViewImage.class);
                        intent.putExtra("filename", i);
                        startActivity(intent);
                  }
            });
      }


      public class ImageAdapter extends BaseAdapter {
            private             Context mContext;
            public ImageAdapter(Context c) {
                  mContext = c;
            }
            public int getCount() {
                  return count;
            }
            public Object getItem(int position) {
                  return position;
            }
            public long getItemId(int position) {
                  return position;
            }
            public View getView(int position,View convertView,ViewGroup parent) {
                  System.gc();
                  ImageView i = new ImageView(mContext.getApplicationContext());
                  if (convertView == null) {
                        imagecursor.moveToPosition(position);
                        int id = imagecursor.getInt(image_column_index);
                        i.setImageURI(Uri.withAppendedPath(
MediaStore.Images.Thumbnails.EXTERNAL_CONTENT_URI, ""
+ id));
                        i.setScaleType(ImageView.ScaleType.CENTER_CROP);
                        i.setLayoutParams(new GridView.LayoutParams(92, 92));
                  }
                  else {
                        i = (ImageView) convertView;
                  }
                  return i;
            }
      }
}

// By selecting the thumbnails user can view the actual image.
package image.Thumbnails;

import android.os.Bundle;
import android.widget.ImageView;
import android.app.Activity;
import android.content.Intent;
import android.graphics.Bitmap;
import android.graphics.BitmapFactory;

public class ViewImage extends Activity {
      private String filename;
      @Override
      public void onCreate(Bundle savedInstanceState) {
            super.onCreate(savedInstanceState);
            System.gc();
            Intent i = getIntent();
            Bundle extras = i.getExtras();
            BitmapFactory.Options bfo = new BitmapFactory.Options();
            bfo.inSampleSize = 2;
            filename = extras.getString("filename");
            ImageView iv = new ImageView(getApplicationContext());
            Bitmap bm = BitmapFactory.decodeFile(filename, bfo);
            iv.setImageBitmap(bm);
            setContentView(iv);
      }
}


//main.xml

< ?xml version="1.0" encoding="utf-8"?>
< LinearLayout xmlns:android="http://schemas.android.com/apk/res/android"
android:orientation="vertical" android:layout_width="fill_parent"
android:layout_height="fill_parent">
< GridView xmlns:android="http://schemas.android.com/apk/res/android"
android:id="@+id/PhoneImageGrid" android:layout_width="fill_parent"
android:layout_height="fill_parent" android:numColumns="auto_fit"
android:verticalSpacing="10dp" android:horizontalSpacing="10dp"
android:columnWidth="90dp" android:stretchMode="columnWidth"
android:gravity="center" />
< /LinearLayout>

How to download and display Images in android

/*
This example helps you to display the remote images in android. The progress bar will be displayed when application downloading the image. Progress bar will be stopped when the download completes and the Image will be displayed. This is also a good example for using thread in the background.. I Hope it helps..
*/

import java.io.BufferedInputStream;
import java.io.BufferedOutputStream;
import java.io.ByteArrayOutputStream;
import java.io.IOException;
import java.net.URL;

import android.app.Activity;
import android.app.Dialog;
import android.app.ProgressDialog;
import android.content.Intent;
import android.graphics.Bitmap;
import android.graphics.BitmapFactory;
import android.os.Bundle;
import android.os.Handler;
import android.os.Message;
import android.widget.ImageView;

public class ViewStorageImage extends Activity {
      private String url;
      ImageView iv;
      Thread t;
      Bitmap bm;
      ProgressDialog dialog;
       @Override
      public void onCreate(Bundle savedInstanceState) {
            super.onCreate(savedInstanceState);
            showDialog(0);
            setContentView(R.layout.storageimage);
            url = "http://.........";//enter the url here..
            iv=(ImageView)findViewById(R.id.storageactualimage);
            t=new Thread() {
                  public void run() {
                        viewImage();
                  }
            };
            t.start();
      }
      @Override
      protected Dialog onCreateDialog(int id) {
            switch (id) {
                  case 0: {
                        dialog = new ProgressDialog(this);
                        dialog.setMessage("Please wait while loading...");
                        dialog.setIndeterminate(true);
                        dialog.setCancelable(true);
                        return dialog;
                  }
            }
            return null;
      }
      private Handler handler = new Handler() {
            @Override
            public void handleMessage(Message msg) {
                  Bitmap image=(Bitmap)msg.obj;
                  ImageView iv=new ImageView(this);
                  iv.setImageBitmap(image);
                  setContentView(iv);
            }
      };
      public void viewImage() {
            try {
                  URL myURL = new URL(url);
                  final BufferedInputStream bis = new BufferedInputStream(myURL.openStream(), 1024);
                  final ByteArrayOutputStream dataStream = new ByteArrayOutputStream();
                  BufferedOutputStream out = new BufferedOutputStream(dataStream,1024);
                  copy(bis, out);
                  out.flush();
                  final byte[] data = dataStream.toByteArray();
                  BitmapFactory.Options bfo = new BitmapFactory.Options();
                  bfo.inSampleSize = 2;
                  bm = BitmapFactory.decodeByteArray(data, 0, data.length, bfo);
                  bis.close();
                  removeDialog(0);
                  Message myMessage=new Message();
                  myMessage.obj=bm;
                  handler.sendMessage(myMessage);
            }
            catch (Exception e) {
                  finish();
            }
      }
      static final int BUFF_SIZE = 1024;
      static final byte[] buffer = new byte[BUFF_SIZE];
      public static void copy(BufferedInputStream in, BufferedOutputStream out) throws IOException {
            try {
                  while (true) {
                              synchronized (buffer) {
                              int amountRead = in.read(buffer);
                              if (amountRead == -1) {
                                    break;
                              }
                              out.write(buffer, 0, amountRead);
                        }
                  }
            }
            catch(Exception e){
                  if (in != null) {
                        in.close();
                  }
                  if (out != null) {
                        out.close();
                  }
            }
            finally {
                  if (in != null) {
                        in.close();
                  }
                  if (out != null) {
                        out.close();
                  }
            }
      }
}

Allows Android applications to open network sockets: "android.permission.INTERNET"

If your Android application need to access Internet, you have to grand permission to open network sockets.

Add the code <uses-permission android:name="android.permission.INTERNET" /> in AndroidManifest.xml,

<?xml version="1.0" encoding="utf-8"?>
<manifest xmlns:android="http://schemas.android.com/apk/res/android"
      package="com.exercise.AndroidTwitterClient"
      android:versionCode="1"
      android:versionName="1.0">
    <application android:icon="@drawable/icon" android:label="@string/app_name">
        <activity android:name=".AndroidTwitterClient"
                  android:label="@string/app_name">
            <intent-filter>
                <action android:name="android.intent.action.MAIN" />
                <category android:name="android.intent.category.LAUNCHER" />
            </intent-filter>
        </activity>

    </application>
    <uses-sdk android:minSdkVersion="3" />
    <uses-permission android:name="android.permission.INTERNET" />
</manifest> 

EditText for password, inputType="textPassword"


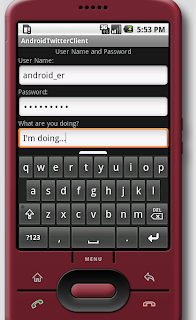
I'm going to make a exercise of Twitter Client to post update status to Twitter. In which I need a EditText, with hiden input of password.

To achieve it, EditText with android:inputType="textPassword" can be used.The input characters will be displayed as password dots instead of themselves.

Alternatively, android:password="true" can be used. But it is deprecated and not suggested.


<?xml version="1.0" encoding="utf-8"?>
<LinearLayout xmlns:android="http://schemas.android.com/apk/res/android"
    android:orientation="vertical"
    android:layout_width="fill_parent"
    android:layout_height="fill_parent"
    >
<TextView  
    android:layout_width="fill_parent" 
    android:layout_height="wrap_content" 
    android:gravity="center_horizontal"
    android:text="User Name and Password"
    />
<TextView  
    android:layout_width="fill_parent" 
    android:layout_height="wrap_content" 
    android:text="User Name:"
    />
<EditText  
    android:id="@+id/username"
    android:layout_width="fill_parent" 
    android:layout_height="wrap_content" 
    />
<TextView  
    android:layout_width="fill_parent" 
    android:layout_height="wrap_content" 
    android:text="Password:"
    />
<EditText  
    android:id="@+id/password"
    android:layout_width="fill_parent" 
    android:layout_height="wrap_content" 
    android:inputType="textPassword"
    />
<TextView  
    android:layout_width="fill_parent" 
    android:layout_height="wrap_content" 
    android:text="What are you doing?"
    />
<EditText  
    android:id="@+id/whatareyoudoing"
    android:layout_width="fill_parent" 
    android:layout_height="wrap_content" 
    />
<Button  
    android:id="@+id/mySubmit"
    android:layout_width="wrap_content" 
    android:layout_height="wrap_content" 
    android:layout_gravity="center_horizontal"
    android:text="Submit"
    />
</LinearLayout>

Simulate Animation, using Runnable Thread

After the articles, Display a drawable graph, using ImageView and AndroidRunnable, with Runnable Thread, now we can try to simulate animation using setImageResource(), inside handleMessage() which are trigged by a Runnable Thread. A circle arrow rotate in duration of 1000ms.

This exercise extends from the previous article, AndroidRunnable, with Runnable Thread.


Save the four graphics, used to form the animation of a rotating arrow, in the /res/drawable/ folder.


Add a ImageView in main.xml to display the animation.
<?xml version="1.0" encoding="utf-8"?>
<LinearLayout xmlns:android="http://schemas.android.com/apk/res/android"
   android:orientation="vertical"
   android:layout_width="fill_parent"
   android:layout_height="fill_parent"
   >
<TextView 
   android:layout_width="fill_parent"
   android:layout_height="wrap_content"
   android:text="@string/hello"
   />
<TextView 
   android:id="@+id/i"
   android:layout_width="fill_parent"
   android:layout_height="wrap_content"
   />
<ImageView
   android:id="@+id/myImageView"
   android:layout_width="fill_parent"
   android:layout_height="fill_parent"
   android:scaleType="center"
   />
</LinearLayout>


Modify update_i() to change i, and load ViewImage with arrow_01, arrow_02, arrow_03 and arrow_04 one by one.
package com.exercise.AndroidRunnable;

import android.app.Activity;
import android.os.Bundle;
import android.os.Handler;
import android.os.Message;
import android.widget.ImageView;
import android.widget.TextView;

public class AndroidRunnable extends Activity{
 
 int i = 0;
 TextView myi;
 ImageView MyImageView;
 
 Handler handler = new Handler(){

  @Override
  public void handleMessage(Message msg) {
   // TODO Auto-generated method stub
   update_i();
  }
 };
 
/** Called when the activity is first created. */
@Override
public void onCreate(Bundle savedInstanceState) {
super.onCreate(savedInstanceState);
setContentView(R.layout.main);

myi =(TextView)findViewById(R.id.i);
MyImageView = (ImageView)findViewById(R.id.myImageView);
}

@Override
 protected void onStart() {
  // TODO Auto-generated method stub
  super.onStart();
  
  Thread myThread=new Thread(new Runnable() {
   public void run() {
    while(true){
     try {
      handler.sendMessage(handler.obtainMessage());
      Thread.sleep(1000);
     }
     catch (Throwable t) {
     }
    }
   }
  });
   
  myThread.start();
 }

 private void update_i()
{
 switch(i){
 case 0:
  i++;
 MyImageView.setImageResource(R.drawable.arrow_01);
  break;
 case 1:
  i++;
 MyImageView.setImageResource(R.drawable.arrow_02);
  break;
 case 2:
  i++;
 MyImageView.setImageResource(R.drawable.arrow_03);
  break;
 case 3:
  i = 0;
 MyImageView.setImageResource(R.drawable.arrow_04);
  break;
 }
 myi.setText(String.valueOf(i));
}
}
AndroidRunnable.java can be downloaded here.

For sure, it's not a good practice to implement animation. It is used to show the implementation of Runnable Thread, and Handle.

Here is another article about Animation background, using animation-list and AnimationDrawable.

Animation background, using animation-list and AnimationDrawable

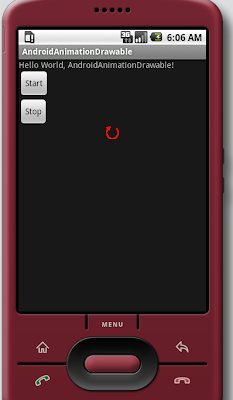
In the article Simulate Animation, using Runnable Thread, I described how to simulate animation using Runnable Thread. For sure, it's not a good practice. In this article I show how to implement animation using animation-list and AnimationDrawable.


The animation can be started and stopped by the two button, Start and Stop.

- Save the four graphics, used to form the animation of a rotating arrow, in the /res/drawable/ folder.


- Create a file named arrow_animation.xml in /res/drawable
<animation-list
  xmlns:android="http://schemas.android.com/apk/res/android"
  >
  <item android:drawable="@drawable/arrow_01" android:duration="100" />
  <item android:drawable="@drawable/arrow_02" android:duration="100" />
  <item android:drawable="@drawable/arrow_03" android:duration="100" />
  <item android:drawable="@drawable/arrow_04" android:duration="100" />
</animation-list>


- Modify main.xml to add two Button to Start and Stop animation
<?xml version="1.0" encoding="utf-8"?>
<LinearLayout xmlns:android="http://schemas.android.com/apk/res/android"
  android:orientation="vertical"
  android:layout_width="fill_parent"
  android:layout_height="fill_parent"
  >
<TextView
  android:layout_width="fill_parent"
  android:layout_height="wrap_content"
  android:text="@string/hello"
  />
<Button
     android:id="@+id/myStartButton"
     android:layout_width="wrap_content"
     android:layout_height="wrap_content"
     android:text="Start"
     />
<Button
     android:id="@+id/myStopButton"
     android:layout_width="wrap_content"
     android:layout_height="wrap_content"
     android:text="Stop"
     />
<ImageView
     android:id="@+id/myImageView"
     android:layout_width="wrap_content"
     android:layout_height="wrap_content"
     android:layout_gravity="center"
     />
</LinearLayout>


- Modify the Java code as:
package com.exercise.AndroidAnimationDrawable;

import android.app.Activity;
import android.graphics.drawable.AnimationDrawable;
import android.os.Bundle;
import android.view.View;
import android.widget.Button;
import android.widget.ImageView;

public class AndroidAnimationDrawable extends Activity {

  AnimationDrawable AniFrame;

  /** Called when the activity is first created. */
  @Override
  public void onCreate(Bundle savedInstanceState) {
      super.onCreate(savedInstanceState);
      setContentView(R.layout.main);
   
      Button MyStartButton = (Button)findViewById(R.id.myStartButton);
      MyStartButton.setOnClickListener(MyStartButtonOnClickListener);
      Button MyStopButton = (Button)findViewById(R.id.myStopButton);
      MyStopButton.setOnClickListener(MyStopButtonOnClickListener);
   
      ImageView MyImageView = (ImageView)findViewById(R.id.myImageView);
      MyImageView.setBackgroundResource(R.drawable.arrow_animation);
      AniFrame = (AnimationDrawable) MyImageView.getBackground();
  }

  Button.OnClickListener MyStartButtonOnClickListener =
      new Button.OnClickListener(){
          @Override
          public void onClick(View v) {
              // TODO Auto-generated method stub
              AniFrame.start();
          }
  };

  Button.OnClickListener MyStopButtonOnClickListener =
      new Button.OnClickListener(){
          @Override
          public void onClick(View v) {
              // TODO Auto-generated method stub
              AniFrame.stop();
          }
  };

}


----------------------------------------
In the book of Professional Android Application Development (Wrox Programmer to Programmer) by Reto Meier, it's stated that:

At the time of going to print, there is a bug in the AnimationDrawable class. Currently, AnimationDrawable resources are not properly loaded until some time after an Activity’s onCreate method has completed. Current work-arounds use timers to force a delay before loading a frame-by-frame resource.


I have the same problem; if AniFrame.start() is called inside onCreate() immediately, the animation cannot start. That's why I add the buttons to start and stop the operation.

AndroidRunnable, with Runnable Thread

It's a very simple exercise to implament a activity with a Runnable Thread.


Modify main.xml to add a TextView, as a counter used to monitor the Runnable Thread. It count-up in every 1000ms.

main.xml
<?xml version="1.0" encoding="utf-8"?>
<LinearLayout xmlns:android="http://schemas.android.com/apk/res/android"
android:orientation="vertical"
android:layout_width="fill_parent"
android:layout_height="fill_parent"
>
<TextView
android:layout_width="fill_parent"
android:layout_height="wrap_content"
android:text="@string/hello"
/>
<TextView
android:id="@+id/i"
android:layout_width="fill_parent"
android:layout_height="wrap_content"
/>
</LinearLayout>


Modify AndroidRunnable.java
package com.exercise.AndroidRunnable;

import android.app.Activity;
import android.os.Bundle;
import android.os.Handler;
import android.os.Message;
import android.widget.TextView;

public class AndroidRunnable extends Activity{
 
 int i = 0;
 TextView myi;
 
 Handler handler = new Handler(){

  @Override
  public void handleMessage(Message msg) {
   // TODO Auto-generated method stub
   update_i();
  }
 };
 
    /** Called when the activity is first created. */
    @Override
    public void onCreate(Bundle savedInstanceState) {
        super.onCreate(savedInstanceState);
        setContentView(R.layout.main);
        
        myi =(TextView)findViewById(R.id.i);
    }
    
    @Override
 protected void onStart() {
  // TODO Auto-generated method stub
  super.onStart();
  
  Thread myThread=new Thread(new Runnable() {
   public void run() {
    while(true){
     try {
      handler.sendMessage(handler.obtainMessage());
      Thread.sleep(1000);
     }
     catch (Throwable t) {
     }
    }
   }
  });
   
  myThread.start();
 }

 private void update_i()
    {
     i++;
     myi.setText(String.valueOf(i));
    }
}

AndroidRunnable.java can be downloaded here.

Note that update_i() cannot be called inside myThread directly, because only the Thread create the View can touch it. Otherwise, Exception will be generated. That's why I have to implement a Handler to call update_i() indirectly.

Display a drawable graph, using ImageView.

If you want to display some simple graphics, you can just draw it to the background of a View, or use ImageView in layout.

Download the graphic android.png and save it in the /res/drawable folder.

- To set background of a View

Add a View in main.xml, and set thr background to "@drawable/android"

<View
android:layout_width="fill_parent"

android:layout_height="fill_parent"

android:background="@drawable/android"
/>


- Using ImageView

Add a ImageView in main.xml

<ImageView
android:id="@+id/myImageView"

android:layout_width="fill_parent"

android:layout_height="fill_parent"

/>

Add the code in onCreate(), after setContentView(R.layout.main)

ImageView MyImageView = (ImageView)findViewById(R.id.myImageView); MyImageView.setImageResource(R.drawable.android);

Both have the same result.

Python scripting in Android

Android Scripting Environment (ASE) allow Python script to be run in Android.

Before you can edit and run Python program, you have to Add Interpreter of Python.

Start Android Emulator and ASE installed in the previous article, android-scripting: Android Scripting Environment.

Press MENU key, and select Add Interpreter.

Select Add Interpreter>Python 2.6.2
Wait it to be downloaded and extracted.

Press MENU key again, and select Add Script.


Select Python 2.6.2.


Type the name in the upper box; eg. HelloAndroidPython.py.
Type your Python codes in the lower box. Every Python come with the codes:

import android

droid = android.Android()

It's the android module, which is needed in every Python script that interacts with the available Android APIs.

Add the code below:

droid.makeToast("Hello Android! in Python")


Press MENU and click Save & Run.


Lets see the result:


That's my first Python script in Android:)

------------------------------------------------------------------
For more details of the Python Android API, refer to:
PythonAndroidAPI - A description of the Android API available to Python scripts.

android-scripting: Android Scripting Environment

The Android Scripting Environment (ASE) brings scripting languages to Android by allowing you to edit and execute scripts and interactive interpreters directly on the Android device.

To install and use ASE, it's no need Eclipse as in normal development. What you need is a Android Emulator, and a AVD with SD Card installed. Personally, I prefer to generate a fresh new AVD for ASE. Refer to the article Create Android Virtual Device (AVD) in command line to create a new AVD with 1000M SD Card.

After the AVD generated, you can start Android Emulator using the new AVD:

Start Terminal, switch to the tools folder of the installed Android SDK, it's ~/android-sdk-linux_x86-1.6_r1/tools in my own setup. Type the command:
$./emulator -avd my_android1.6_for_scripting

where my_android1.6_for_scripting is the name of my AVD.

Start Browser and go to android-scripting page:
http://code.google.com/p/android-scripting/
Click the Featured downloads link, ase_r13.apk.

Or go to the link directly:
http://android-scripting.googlecode.com/files/ase_r13.apk

Click on the downloaded file, and accept Install.


After a while, the ASE will be installed. It can be found in the application list.


Click to start ASE, press MENU key start the option menu, you can Add Script, Add Interpreter, start Terminal and call Help in Browser.


In Terminal, you can type any command as in desktop Linux (Shell).


To try the examples, select Add Interpreter>Lua 5.1.4


After the files downloaded and extracted, select hello.user.lua to see the result:


You may ask, why write scripts instead of real Android applications? Admittedly, Android's development environment makes life pretty easy, but you're tied to a computer to do your work. ASE lets you develop on the device itself using high-level scripting languages to try out your idea now, in the situation where you need it, quickly. Have a look at the example Lua and Python scripts to see for yourself.

Create Android Virtual Device (AVD) in command line

In the article How to create Android Virtual Device (AVD) in Eclipse and Create an SD Card to existing AVD, I described how to create AVD in Eclipse and how to add SD Card to existing AVD. In this article, I describe how to create AVD, with SD Card, in command line (Terminal of Ubuntu Linux).

Environment:
OS: Ubuntu Linux 9.04
Android SDK 1.6 r1

- Before create AVD, you have to check the available system image targets in your system.

Start Terminal, switch to the tools folder of the installed Android SDK, it's ~/android-sdk-linux_x86-1.6_r1/tools in my own setup. Type the command:
$./android list targets


- Now you can create a new AVD, eg. a new AVD base on Android 1.6 (ID = 2), with 1000M SD Card.

Type the command:
$./android create avd -n my_android1.6_for_scripting -t 2 -c 1000M

You will be asked: Do you wish to create a custom hardware profile
Press Enter to answer NO.

After a while, the new AVD will be created.

- Start Emulator with the new AVD
$./emulator -avd my_android1.6_for_scripting

Multi-Language Translate

Extends from previous exercise, AndroidTranslate, using Google Translate API in Android application. It's a multi-language translation application. There are two spinner in the application, user can select the language to be translated.


------------------------------------------
Please note:
- google-api-translate-java have to be downloaded and build path have to be set, refer the article google-api-translate-java.
- "android.permission.INTERNET" have to be set in AndroidMainfest.xml, refer to the article AndroidTranslate, using Google Translate API in Android application.
------------------------------------------

Modify main.xml to add two Spinner to select the language to be translated from and to.
<?xml version="1.0" encoding="utf-8"?>
<LinearLayout xmlns:android="http://schemas.android.com/apk/res/android"
  android:orientation="vertical"
  android:layout_width="fill_parent"
  android:layout_height="fill_parent"
  >
<TextView
  android:layout_width="fill_parent"
  android:layout_height="wrap_content"
  android:text="@string/hello"
  />
<EditText
 android:id="@+id/InputText"
  android:layout_width="fill_parent"
  android:layout_height="wrap_content"
 />
<TextView
 android:layout_width="fill_parent"
  android:layout_height="wrap_content"
  android:text="from:"
  />
<Spinner
 android:id = "@+id/spinner_InputLanguage"
 android:layout_width="fill_parent"
 android:layout_height="wrap_content"
 />
<TextView
 android:layout_width="fill_parent"
  android:layout_height="wrap_content"
  android:text="to:"
  />
<Spinner
 android:id = "@+id/spinner_OutputLanguage"
 android:layout_width="fill_parent"
 android:layout_height="wrap_content"
 />
<Button
 android:id="@+id/TranslateButton"
  android:layout_width="fill_parent"
  android:layout_height="wrap_content"
  android:text="Translate"
 />
<TextView
 android:id="@+id/OutputText"
  android:layout_width="fill_parent"
  android:layout_height="wrap_content"
  />
</LinearLayout>

main.xml can be downloaded here.

Implement a file arrayLanguage.xml in the folder /res/values/

<?xml version="1.0" encoding="utf-8"?>
<resources>
<string-array name="language">
<item>ARABIC</item>
<item>BULGARIAN</item>
<item>CATALAN</item>
<item>CHINESE</item>
<item>CHINESE_SIMPLIFIED</item>
<item>CHINESE_TRADITIONAL</item>
<item>CROATIAN</item>
<item>CZECH</item>
<item>DANISH</item>
<item>DUTCH</item>
<item>ENGLISH</item>
<item>FILIPINO</item>
<item>FINNISH</item>
<item>FRENCH</item>
<item>GERMAN</item>
<item>GREEK</item>
<item>HEBREW</item>
<item>HINDI</item>
<item>INDONESIAN</item>
<item>ITALIAN</item>
<item>JAPANESE</item>
<item>KOREAN</item>
<item>LATVIAN</item>
<item>LITHUANIAN</item>
<item>NORWEGIAN</item>
<item>POLISH</item>
<item>PORTUGESE</item>
<item>ROMANIAN</item>
<item>RUSSIAN</item>
<item>SERBIAN</item>
<item>SLOVAK</item>
<item>SLOVENIAN</item>
<item>SPANISH</item>
<item>SWEDISH</item>
<item>UKRANIAN</item>
<item>VIETNAMESE</item>
</string-array>
</resources>

arrayLanguage.xml can be downloaded here.

Modify AndroidTranslate.java
package com.exercise.AndroidTranslate;

import android.app.Activity;
import android.os.Bundle;
import android.view.View;
import android.widget.ArrayAdapter;
import android.widget.Button;
import android.widget.EditText;
import android.widget.Spinner;
import android.widget.TextView;

import com.google.api.translate.Language;
import com.google.api.translate.Translate;


public class AndroidTranslate extends Activity {
 
 EditText MyInputText;
 Button MyTranslateButton;
 TextView MyOutputText;
 Spinner spinner_InputLanguage, spinner_OutputLanguage;
 
  /** Called when the activity is first created. */
  @Override
  public void onCreate(Bundle savedInstanceState) {
      super.onCreate(savedInstanceState);
      setContentView(R.layout.main);
    
      MyInputText = (EditText)findViewById(R.id.InputText);
      MyTranslateButton = (Button)findViewById(R.id.TranslateButton);
      MyOutputText = (TextView)findViewById(R.id.OutputText);
    
      MyTranslateButton.setOnClickListener(MyTranslateButtonOnClickListener);
    
      ArrayAdapter<CharSequence> adapter
      = ArrayAdapter.createFromResource(this,
        R.array.language, android.R.layout.simple_spinner_item);
    
      spinner_InputLanguage = (Spinner) findViewById(R.id.spinner_InputLanguage);
      adapter.setDropDownViewResource(android.R.layout.simple_spinner_dropdown_item);
      spinner_InputLanguage.setAdapter(adapter);
    
      spinner_OutputLanguage = (Spinner) findViewById(R.id.spinner_OutputLanguage);
      adapter.setDropDownViewResource(android.R.layout.simple_spinner_dropdown_item);
      spinner_OutputLanguage.setAdapter(adapter);
  }

  private Button.OnClickListener MyTranslateButtonOnClickListener
    = new Button.OnClickListener(){

  @Override
  public void onClick(View v) {
   // TODO Auto-generated method stub
   String InputString;
   String OutputString = null;
   InputString = MyInputText.getText().toString();
   
   Language fromLanguage =
    Language.valueOf((String)spinner_InputLanguage
    .getItemAtPosition((int) spinner_InputLanguage
    .getSelectedItemId()));
   Language toLanguage =
    Language.valueOf((String)spinner_OutputLanguage
    .getItemAtPosition((int) spinner_OutputLanguage
    .getSelectedItemId()));
   
   try {
    Translate.setHttpReferrer("http://z4android.blogspot.com/");
    OutputString = Translate.execute(InputString,
      fromLanguage, toLanguage);
    
   } catch (Exception ex) {
    ex.printStackTrace();
    OutputString = "Error";
      }
   
   MyOutputText.setText(OutputString);
  }
  };
}

AndroidTranslate.java can be downloaded here.

In this exercise, two spinner are used to select the language to be translated from and to. A array-string are used to store the languages.

It can be retrieved using:
(String)spinner_InputLanguage.getItemAtPosition((int) spinner_InputLanguage.getSelectedItemId())
(String)spinner_OutputLanguage.getItemAtPosition((int) spinner_OutputLanguage.getSelectedItemId())

It's same as the parameters to be passed to Translate.execute(), but in String type, not the expected Language type. So we have to use the Language.valueOf() to convert it to Language type.

Popular Posts